How Falco Wholesale works
One system runs the wholesale business: buying from suppliers, stock in every warehouse, invoicing your trade customers from stock and getting paid, with the office on a computer and the warehouse on a computer or tablet.
One system runs the whole wholesale business: the office on a computer, the warehouse, sales reps and drivers on their phones, the counter till, your trade customers ordering on their own, and a public online shop.
This guide shows every job step by step: who does it, on which device, where in the software, and what you should see. The pictures are real screens from the demo business.
Who uses it, and on what
Everyone signs in at the same web address with their own email and password. The software then opens the right app for that person, on whatever device they use.
Sets the business up: staff, roles, prices, products, tills, delivery areas. Watches the dashboard: what's sold, owed and low.Reads the reports and VAT.
Invoices shops from stock, takes payments, makes credit notes, buys stock from suppliers.Takes phone orders, approves what needs a look, plans the vans, invoices, takes payments, buys stock.
Receives supplier deliveries into the right warehouse, adds and moves stock, writes off breakages, counts the shelves.
Picks each order, prints pick lists and invoices, loads the vans in the right order.
Visits shops, takes orders at their prices, asks for changes, signs up new shops, sees commission.
Checks the van, loads it, delivers each stop, takes payment, counts the cash at the end of the day.
Sells at the warehouse counter: scan, weigh, take payment, cash in and out, close the shift.
Orders at their own prices, reorders their usual, tracks deliveries, prints invoices.
Buys from the public online shop, pays on delivery, tracks the order, asks for a trade account.
Signing in
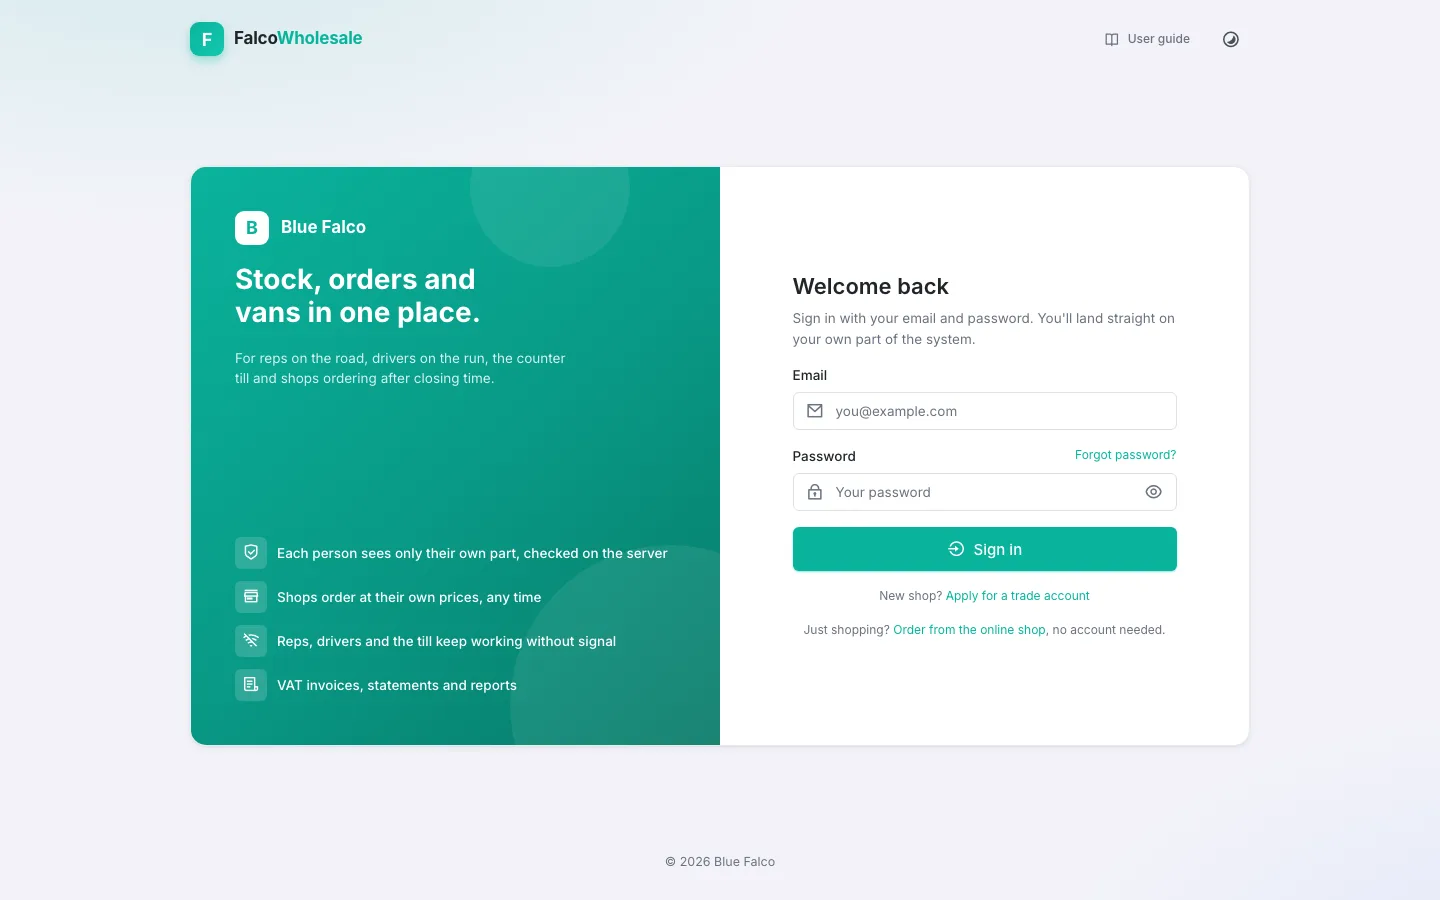
Everyone uses the same sign-in page at /falcowholesale (/login shows it too). Opening any app while signed out (for example /rep on a rep's phone) shows it too, and brings you back to that app afterwards.
| Person | Signs in at | Lands on | Device |
|---|---|---|---|
| Owner / admin Office Warehouse | /falcowholesale | The console, /falcowholesale, showing only the screens their role allows | Computer Tablet |
| Sales rep | /falcowholesale | The rep app, /rep | Phone |
| Driver | /falcowholesale | The driver app, /driver, with only their own van run | Phone |
| Cashier | /falcowholesale, then their 4-digit PIN at the till | The till on its own, full screen, /epos | Till |
| Shop owner | /falcowholesale with the login the office gave them | Their trade portal, /shop | Phone Computer |
| Anyone | No sign-in needed | The online shop, /store | Phone Computer |
Sign in, reset a password, apply for a trade account
- Open /falcowholesale. Type your email and password, Sign in. The eye shows what you typed.
- You land on your own part straight away: office and warehouse staff on the console, each with only their own screens.office staff on the console with only their screens, reps on the rep app, drivers on their run, cashiers on the till, shops on their portal.
- Admins with two-step sign-in then type the 6-digit code from their authenticator app (or paste it).
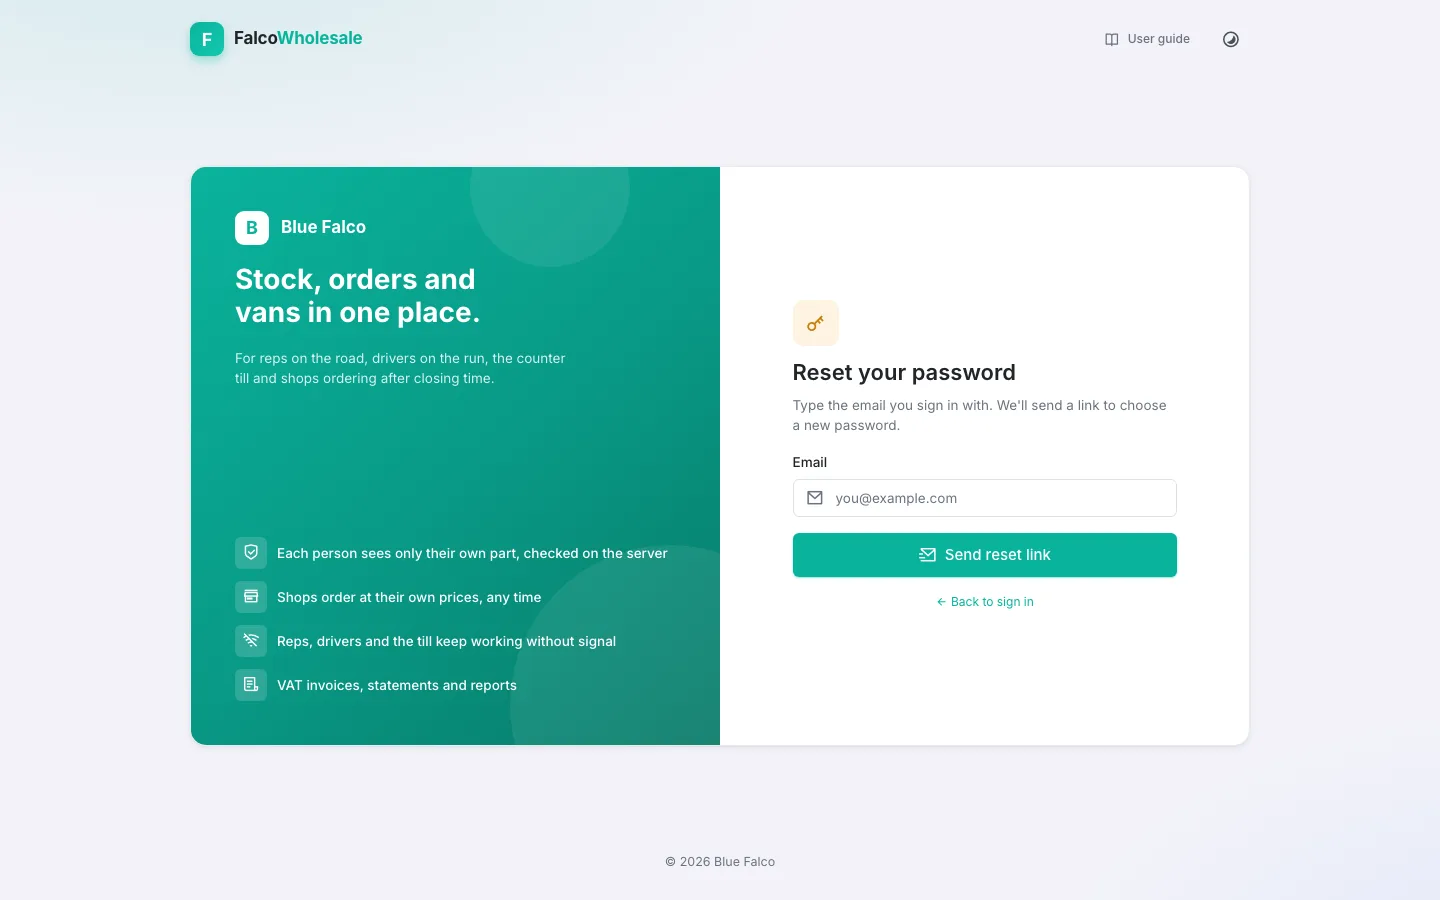
- Forgotten it? Forgot password?, type your email: a link to choose a new one arrives by email.
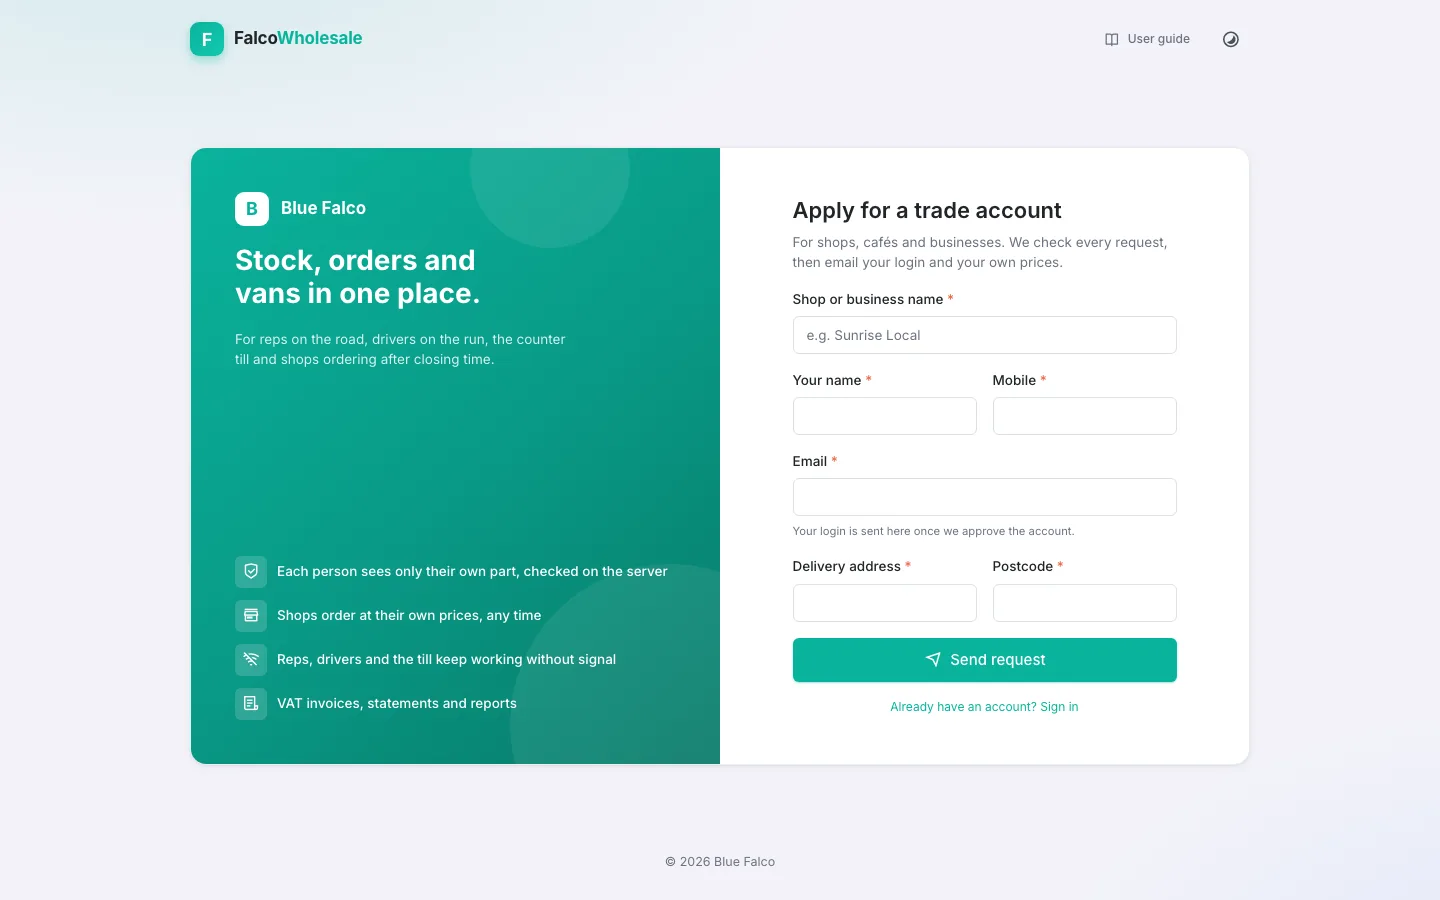
- A shop without a login: Apply for a trade account with the shop's details. The office approves it and emails the login.
- To leave: your name (top right) › Sign out in the console, or the sign-out icon on the phone apps. It returns to the sign-in page.
How it all fits together
Stock comes in from suppliers, goes out to shops on their invoiceson the vans or over the counter, and the money comes back. Each stage below is a guide inside the app (Help & how-to).
A sale, from the shop to the money
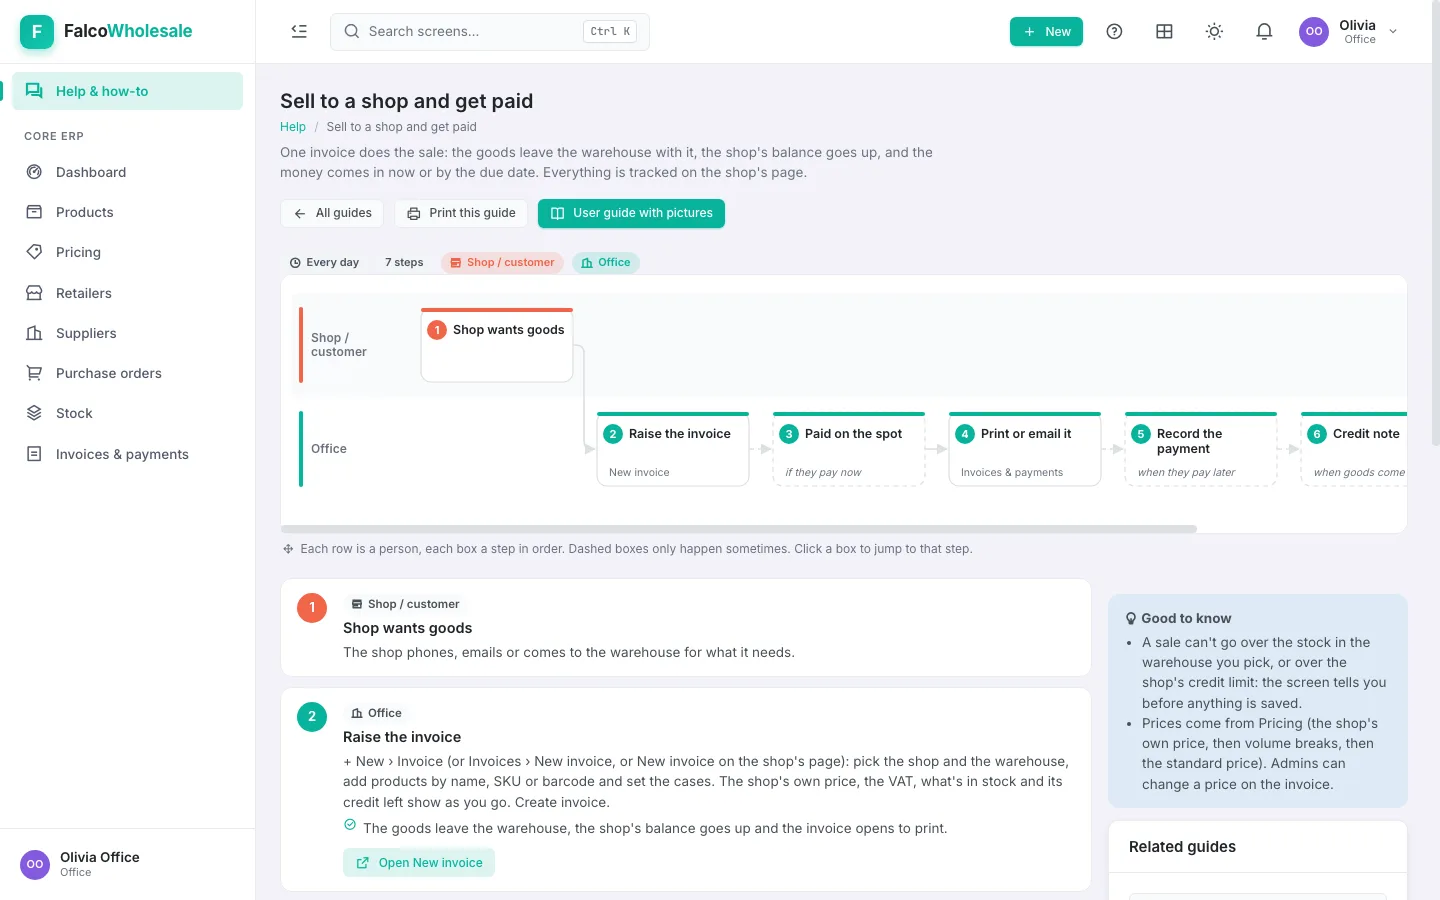
One invoice does the sale: the goods leave the warehouse with it and the shop pays now or by its due date. Each row is a person; each box is one step.
An order, from the shop to the money
Who touches an order, in order. Each row is a person; each box is one step they do.
Delivery day
A day in the business
A normal day from first thing to closing, showing who does what and where. Times are only a guide.
Owner / admin
The setup you do once, then what you look at every day and every month. All on the office computer, in the console.
Find your way around the console
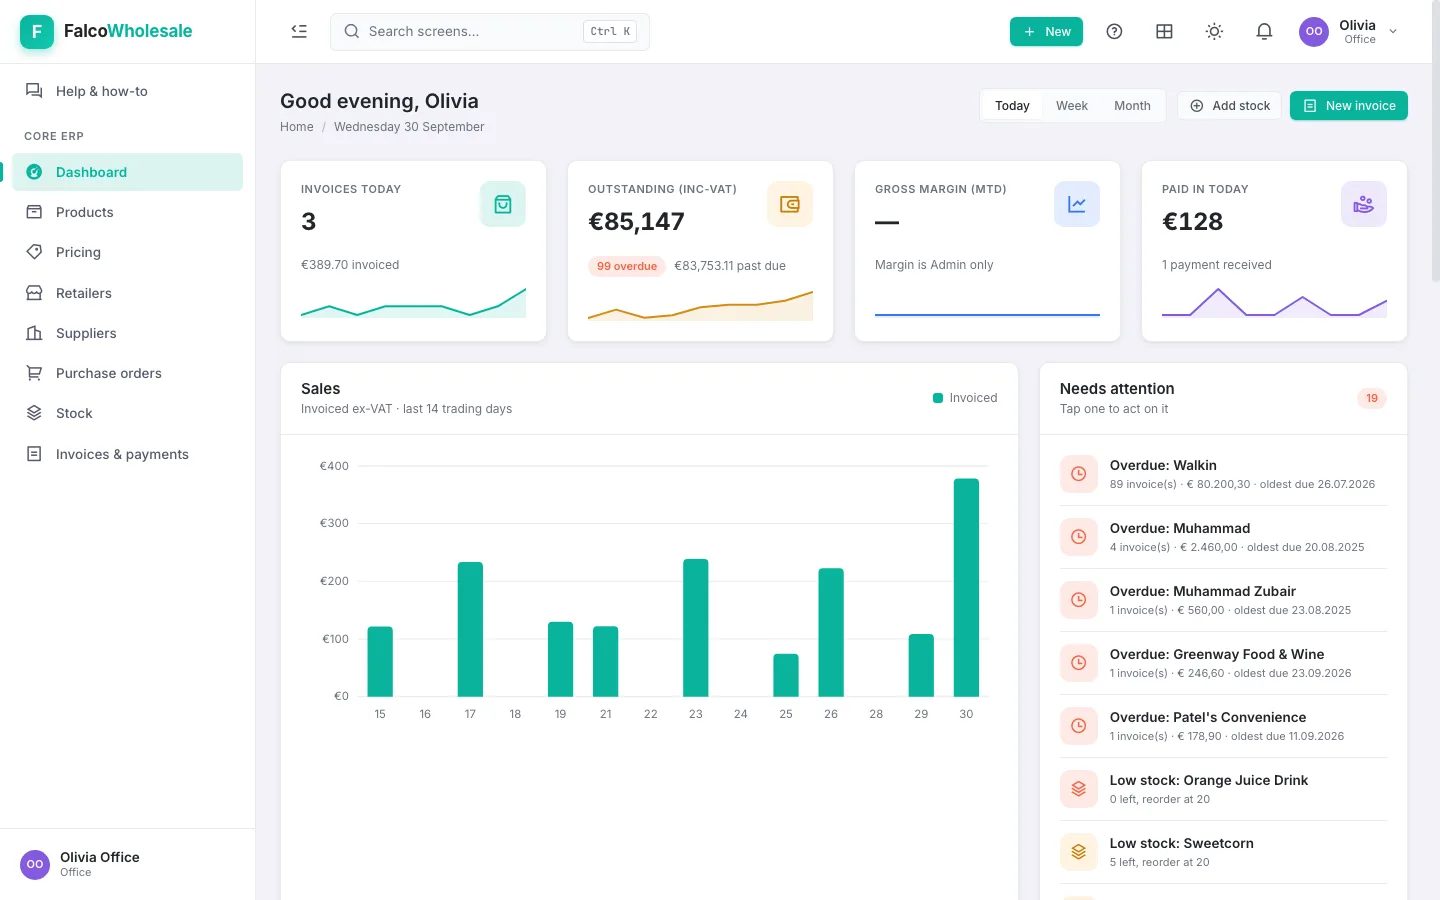
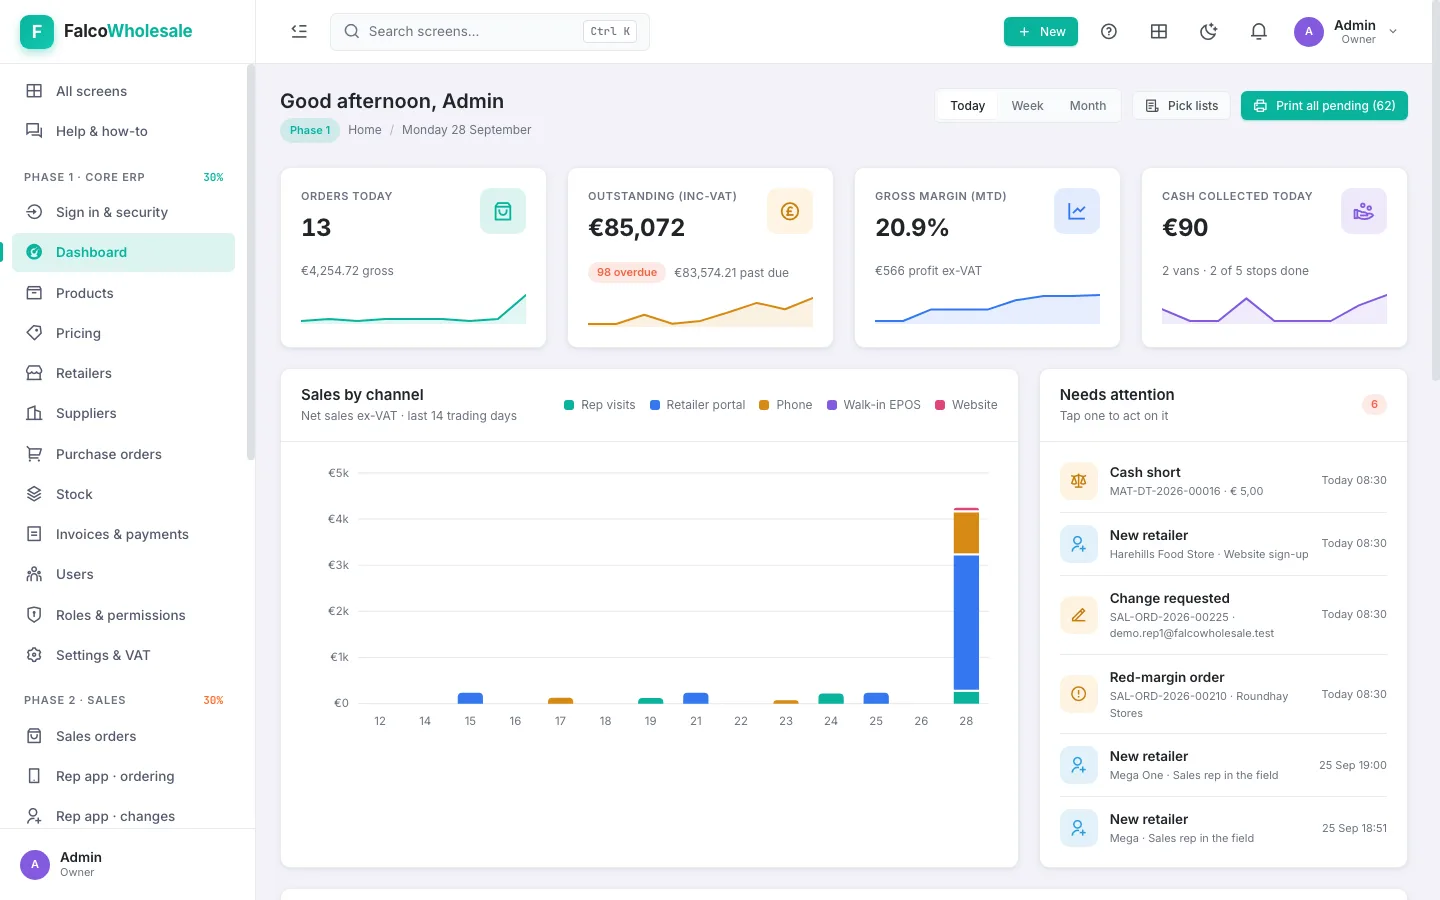
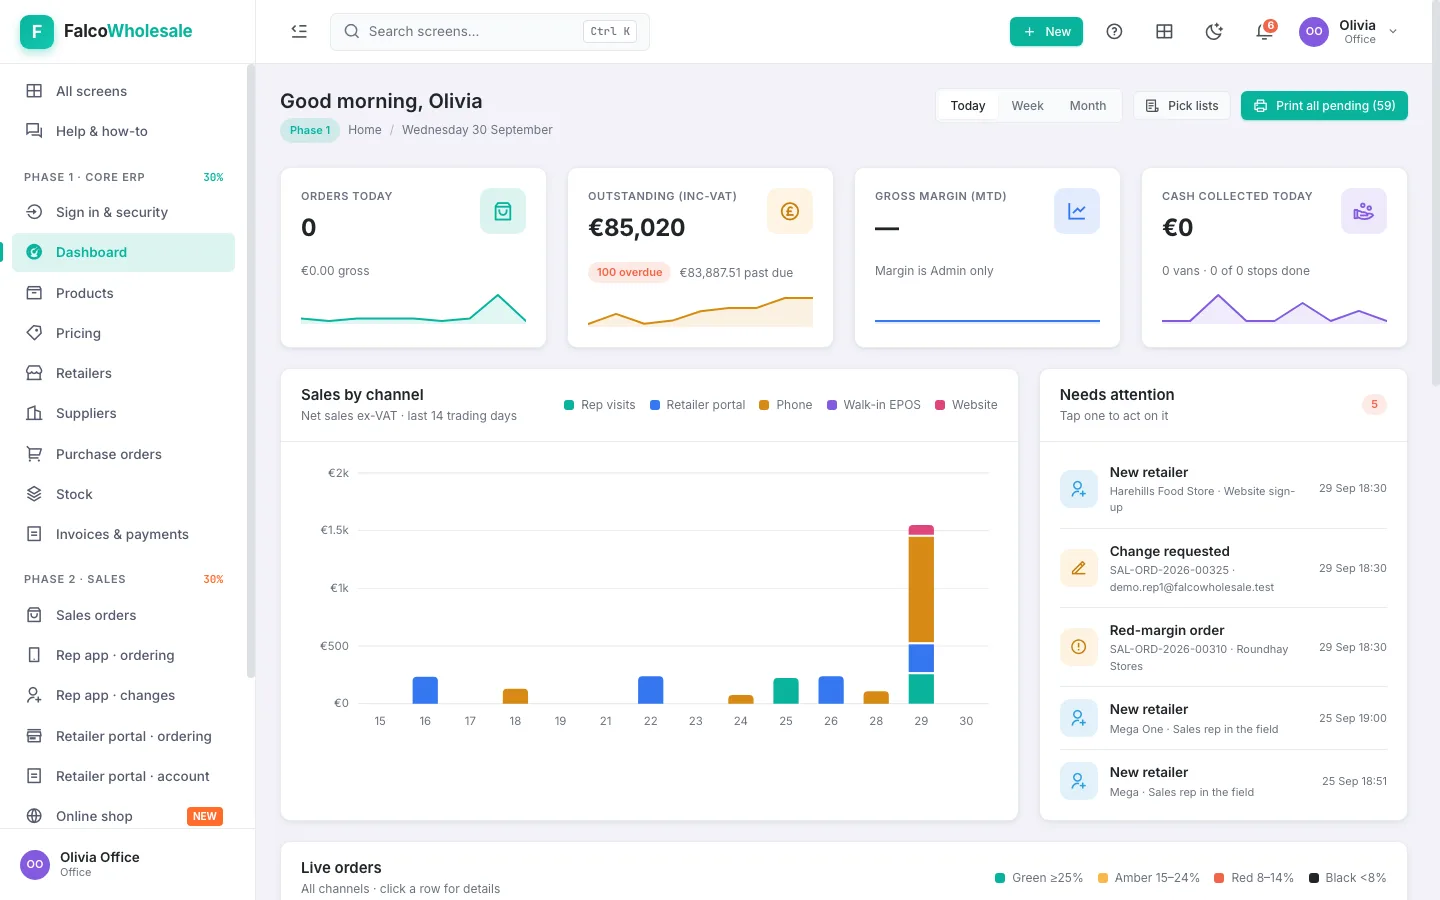
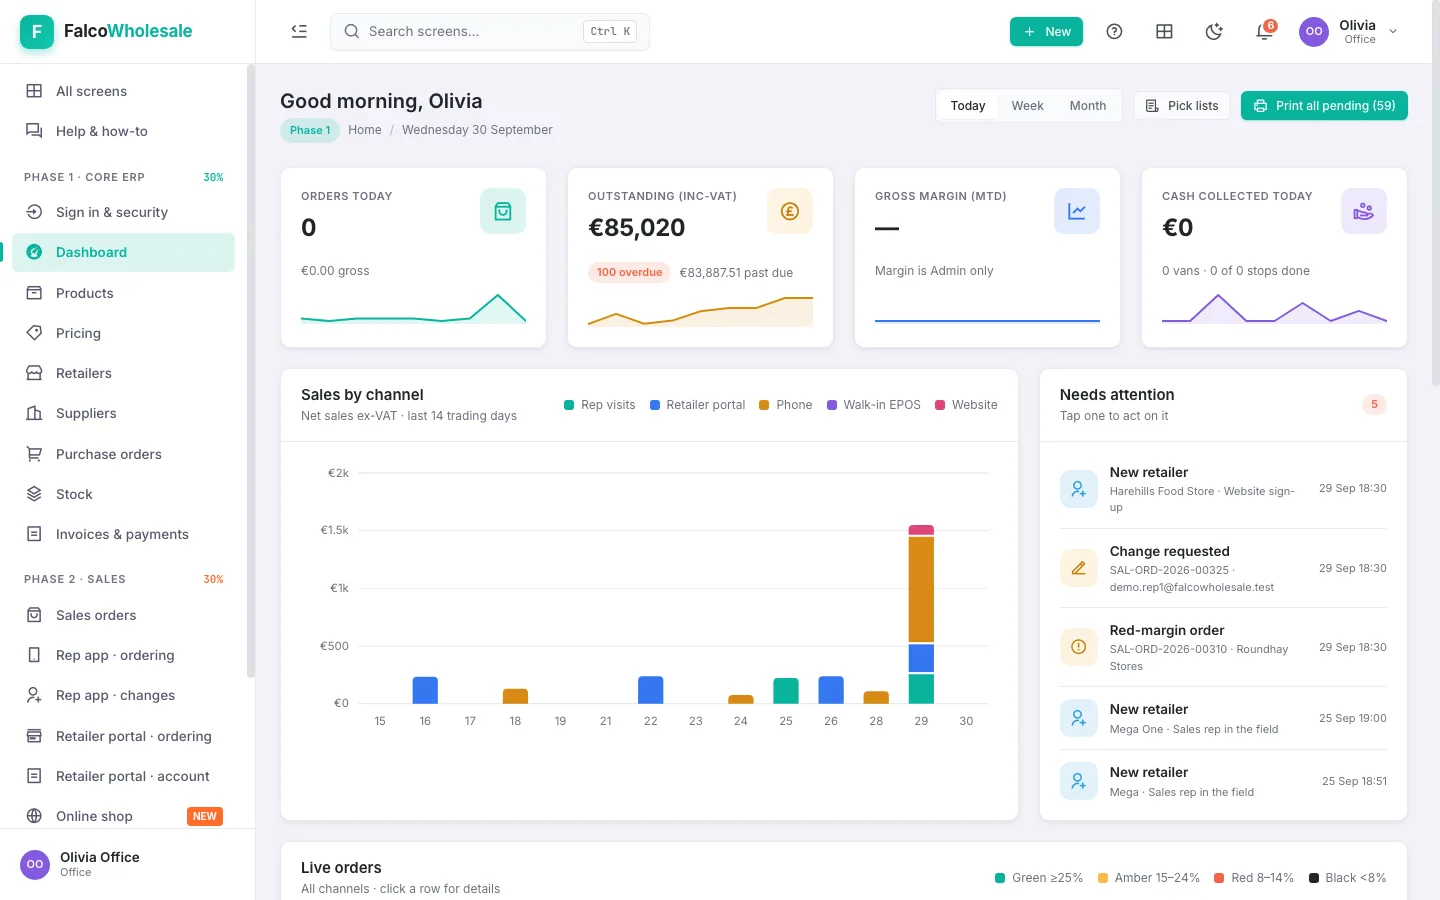
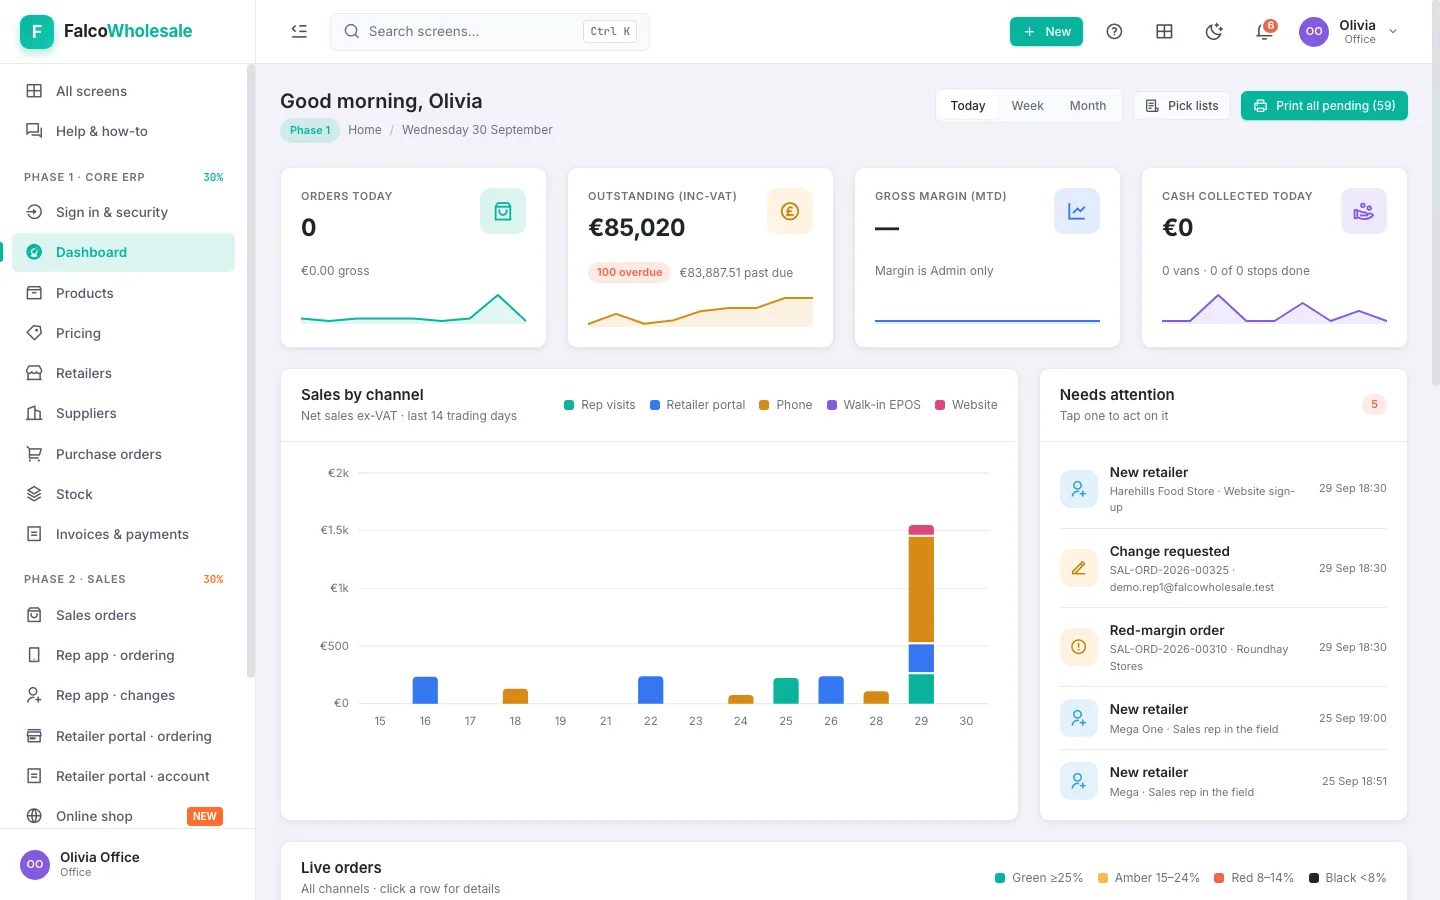
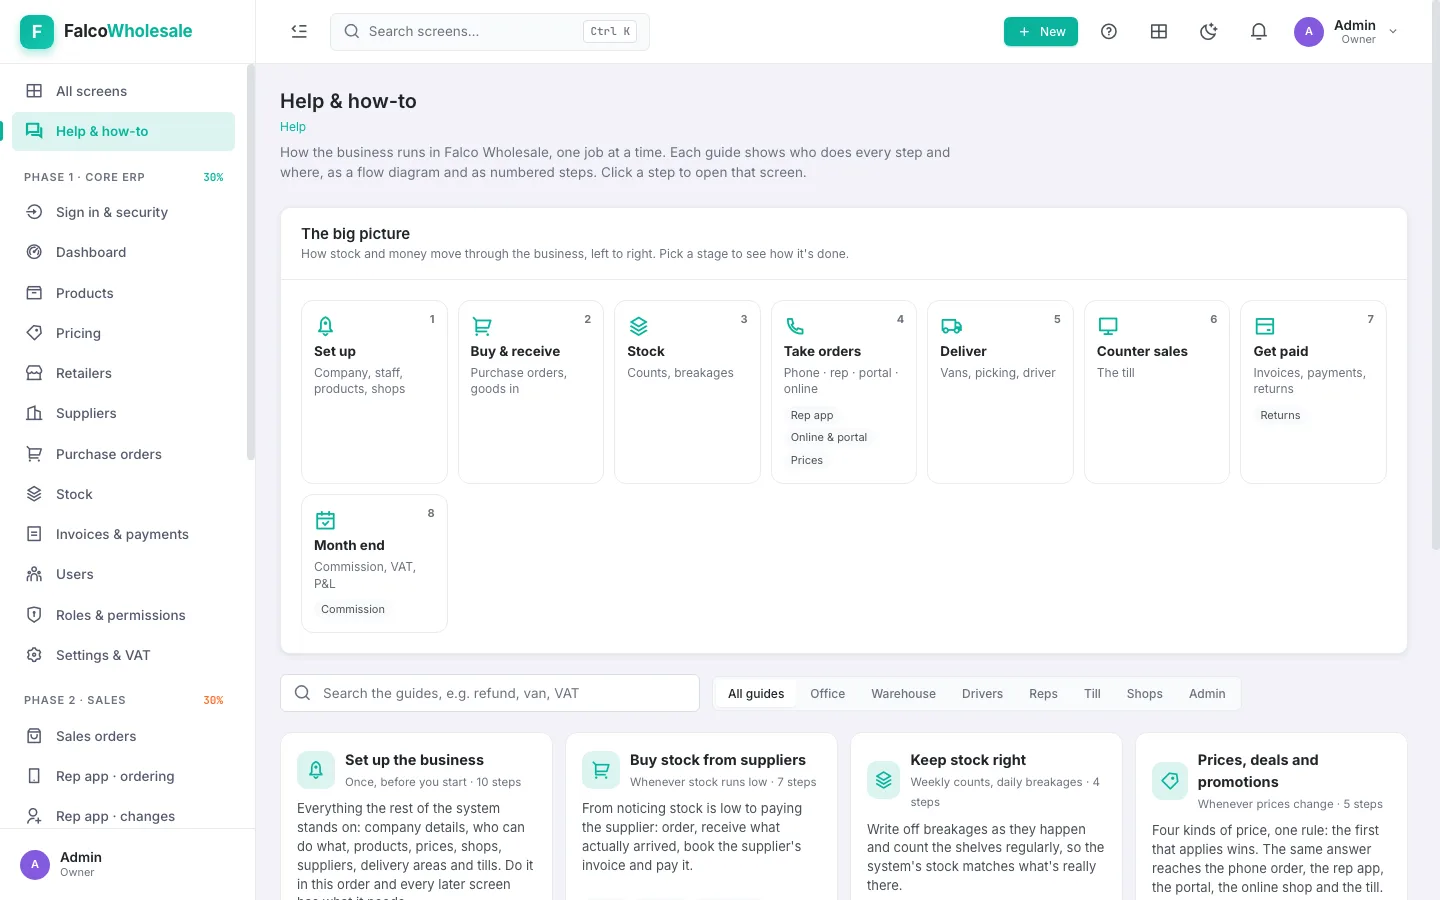
- Sign in and open /falcowholesale. The menu on the left lists the screens your role uses: the dashboard, products, pricing, retailers (your shops), suppliers, purchase orders, stock, and invoices & payments.Core (products, stock, buying, invoices, settings), Sales (orders, reps, the shop portal, the online shop) and Delivery (vans, warehouse, the till, commission, reports).
- The Search screens box at the top (or Ctrl K) jumps to any screen or record by name.
- + New starts a phone order, an invoice, a product, a shop, a purchase order and more from anywhere.
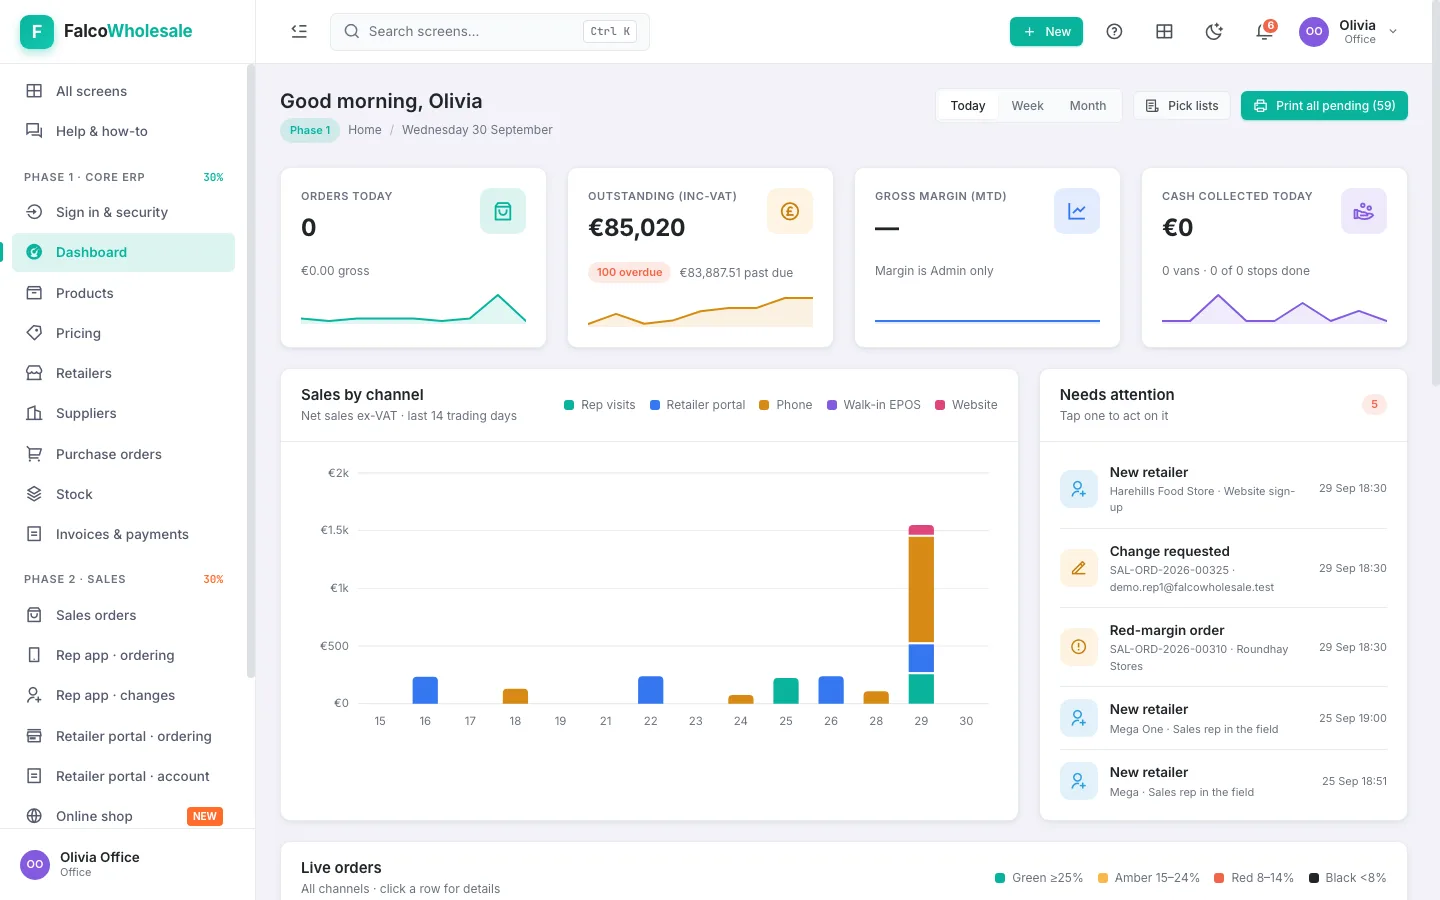
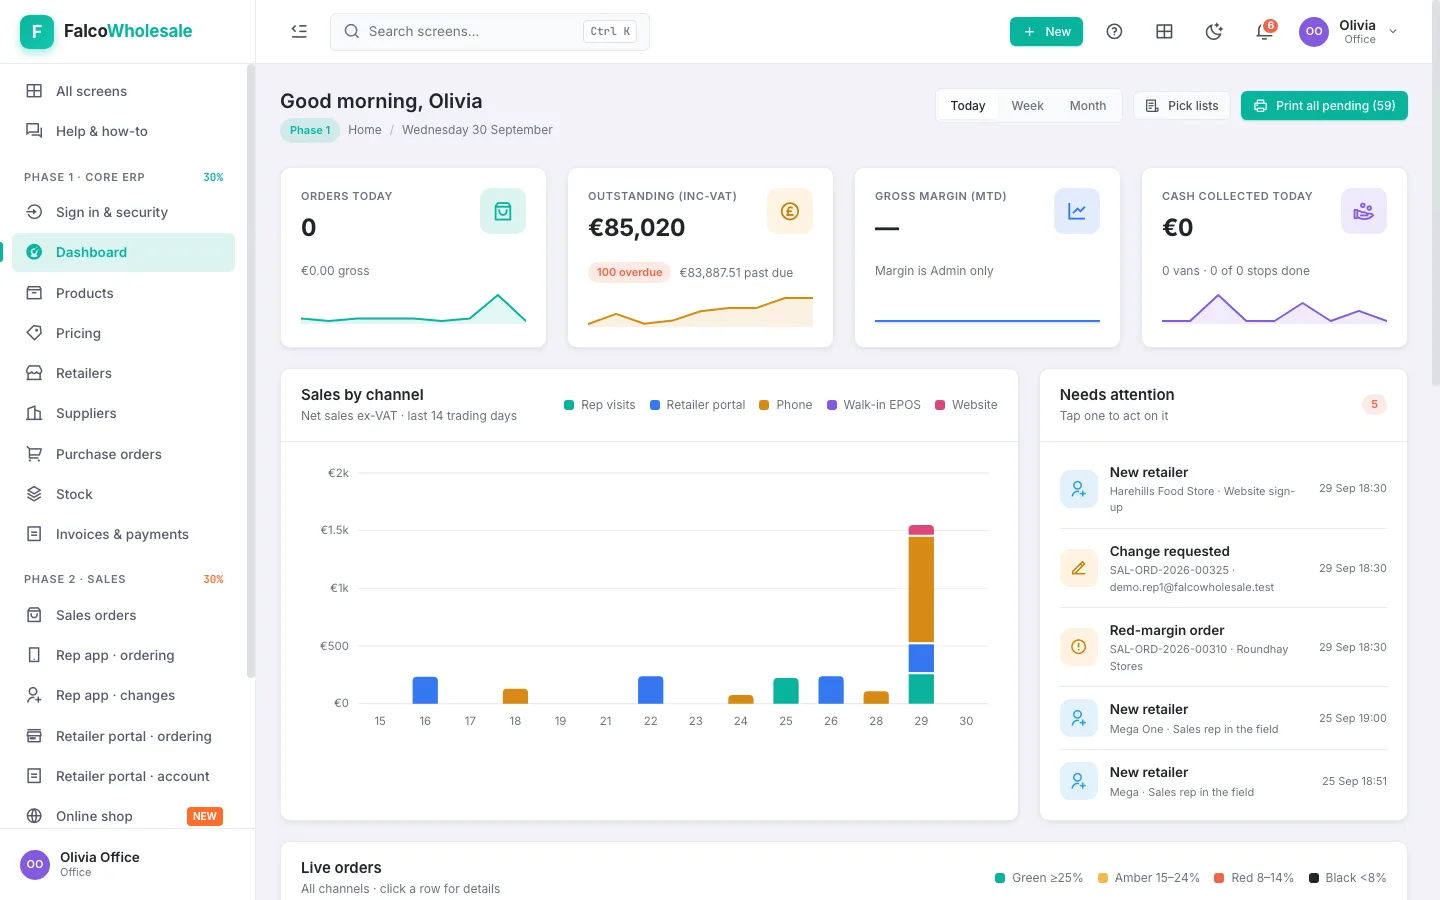
- The bell shows alerts (new web orders, flagged orders, a van short on cash). The moon switches dark mode.
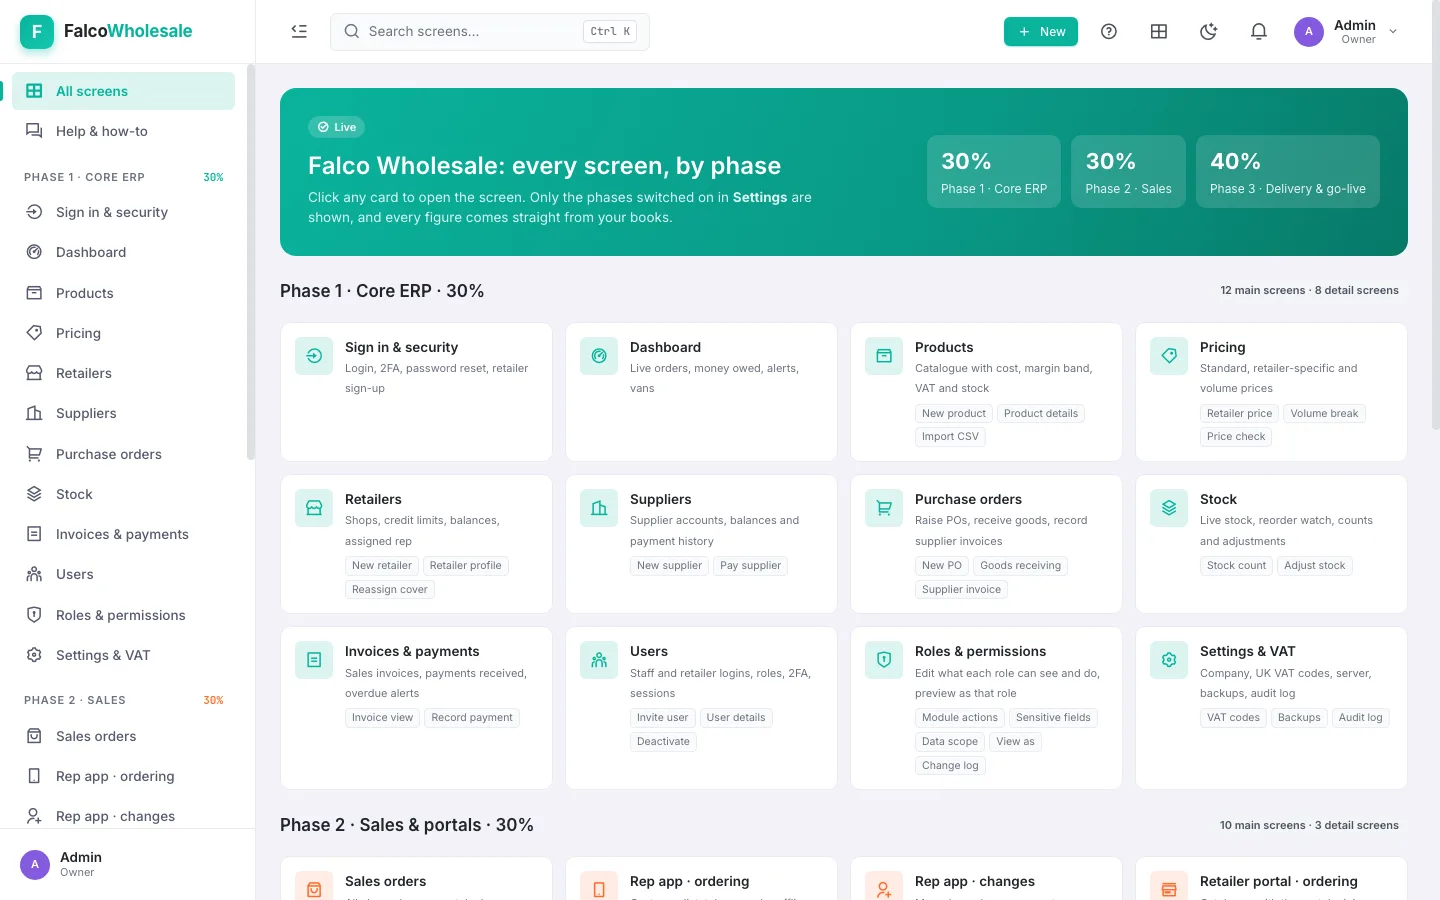
- All screens shows every screen as a card with what it's for.
Company details, VAT and which parts are switched on
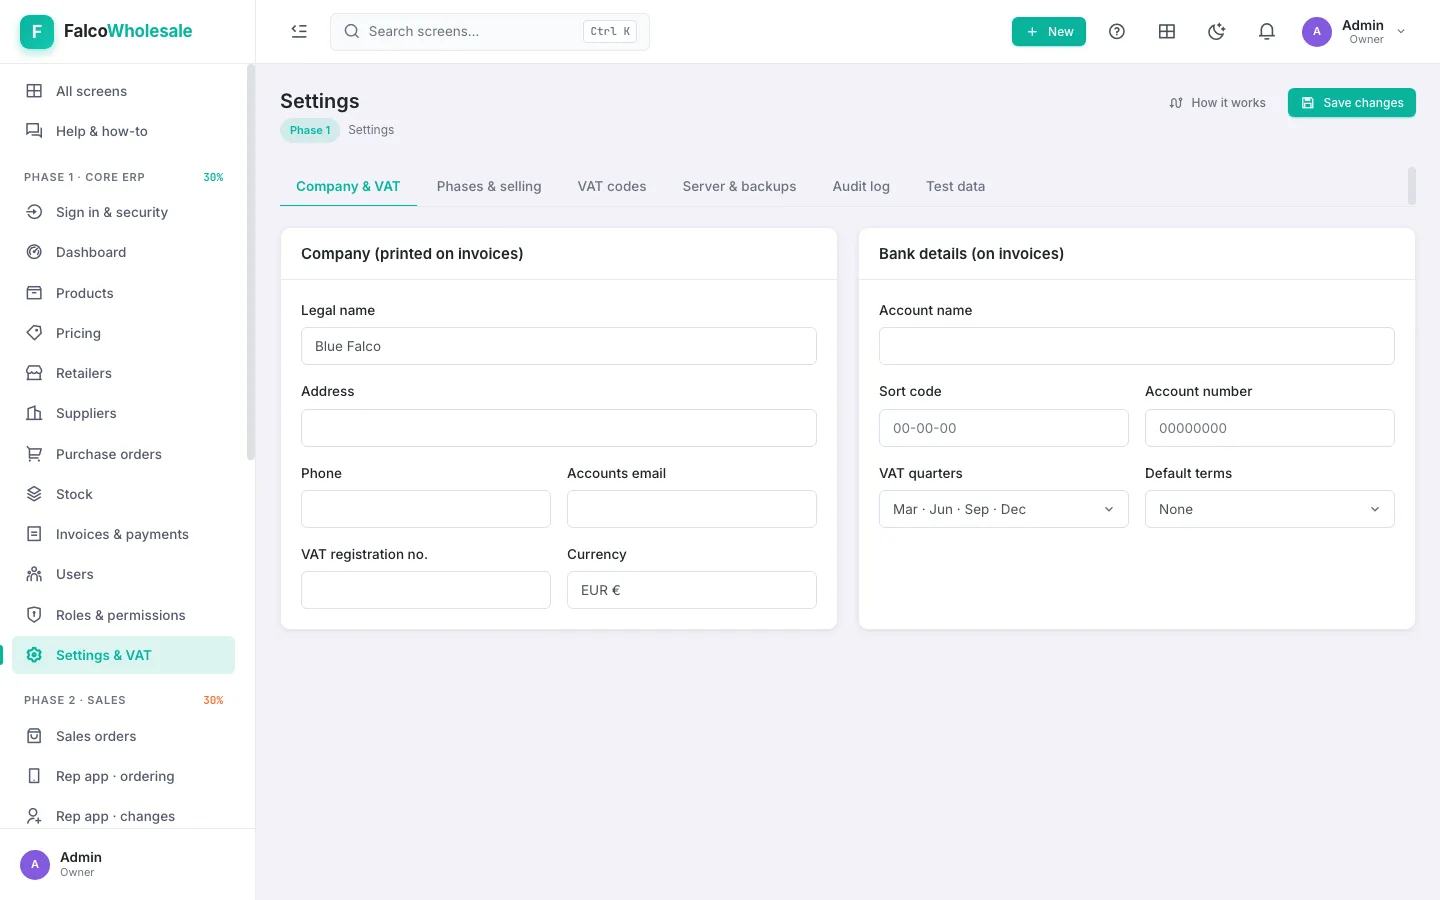
- Open Settings & VAT. On Company & VAT enter the legal name, address, phone, accounts email, VAT number and the bank details. They print on invoices, and shops see them under How to pay.
- Selling rules: the portal minimum order, the rep's maximum discount and the margin colours (Green / Amber / Red / Black).
- VAT codes: give each code the account VAT posts to. Without an account a code charges no VAT.
Add your staff and decide what each role sees
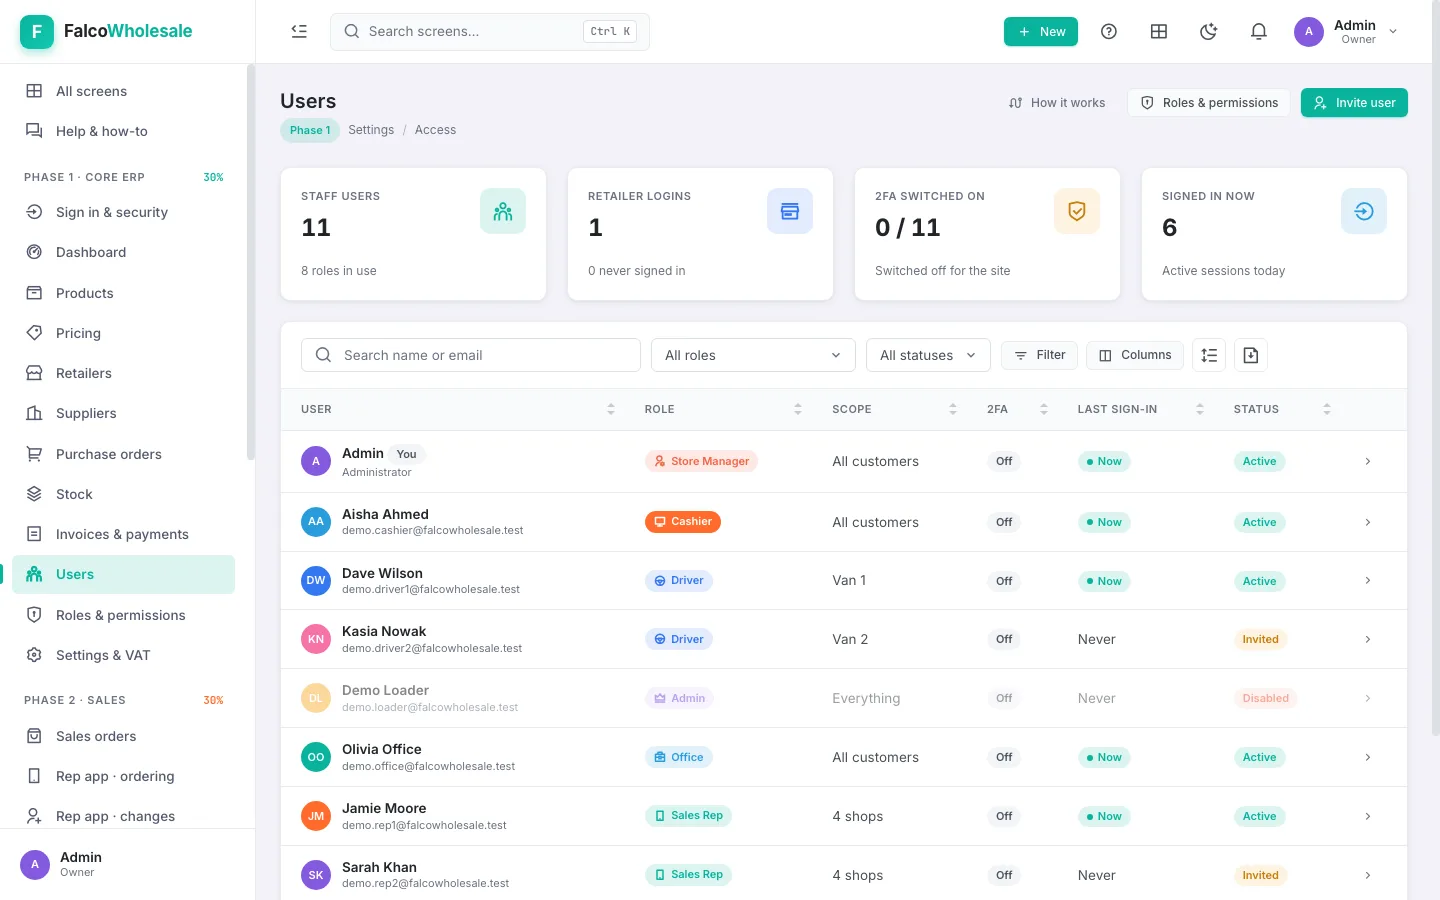
- Users › Invite user: name, email and a role: Office, Warehouse, Sales Rep, Driver, Cashier, Till Supervisor or Admin. They get an email to set their password.
- The role decides what they see: office staff sell, buy and take payments; warehouse staff receive, move and count stock but can't change prices or products.reps get the rep app, drivers the driver app, cashiers the till, everyone else the console.
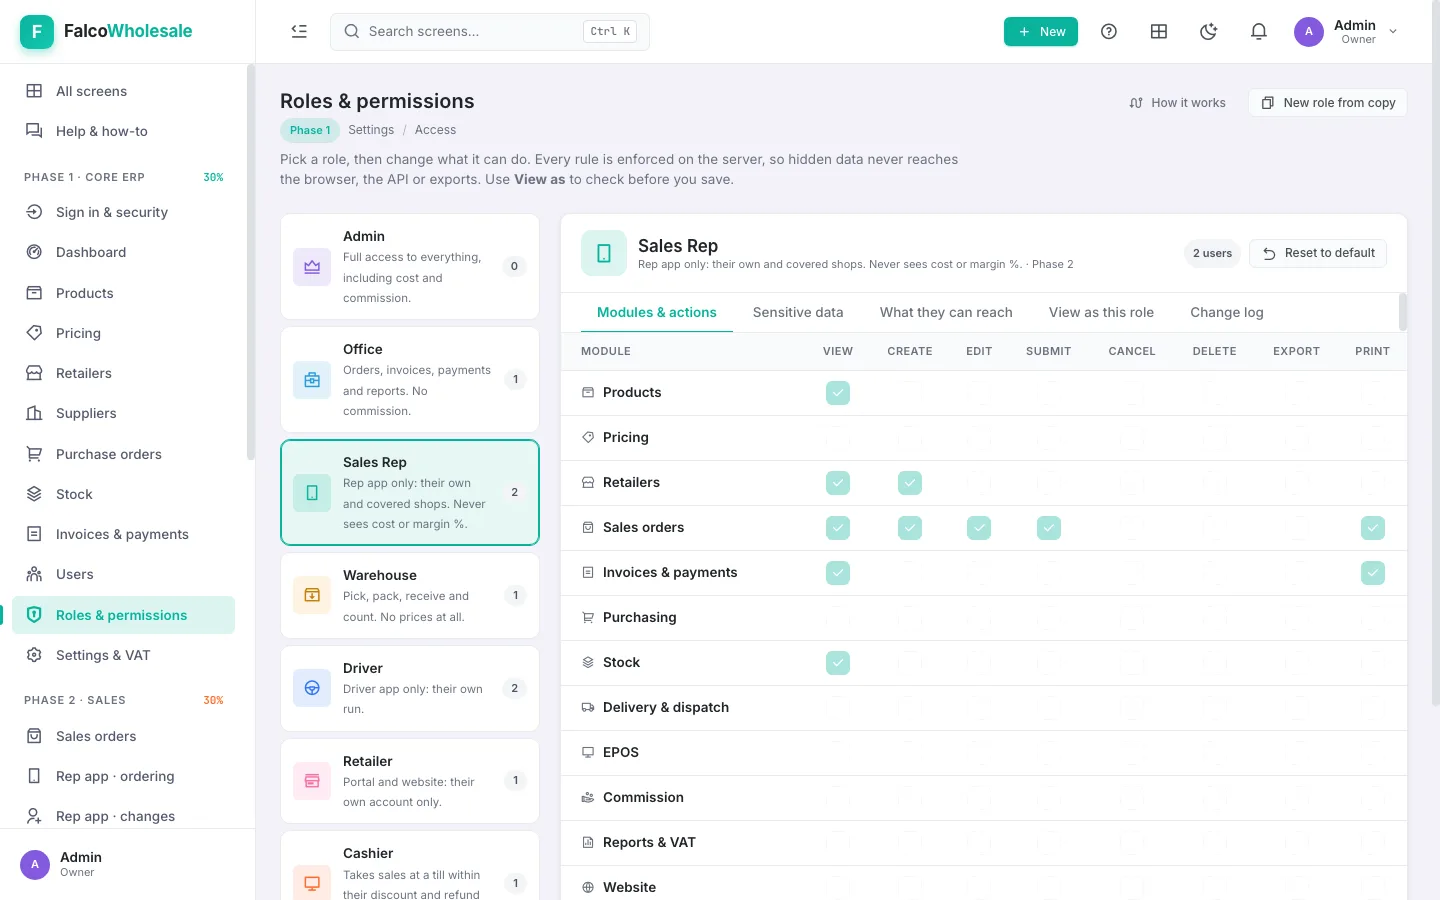
- Roles & permissions: pick a role and tick what it may View, create, change and delete, module by module. Untick View and those screens vanish from that role's menu. Cost price and margin can be hidden per role.
- View as this role shows the console exactly as that role sees it. New role from copy makes, say, a "Senior office""Senior rep".
- To stop someone signing in, disable them in Users: they're signed out at once.
- Someone can't get the reset email (a cashier, a driver)? Open them › Set password, type a strong password twice and give it to them in person. They're signed out everywhere and use it next time. Only admins can do this.
- Admins can do everything (FW Admin, and the system's own System Manager and Administrator logins): every screen and every job.
Products and categories
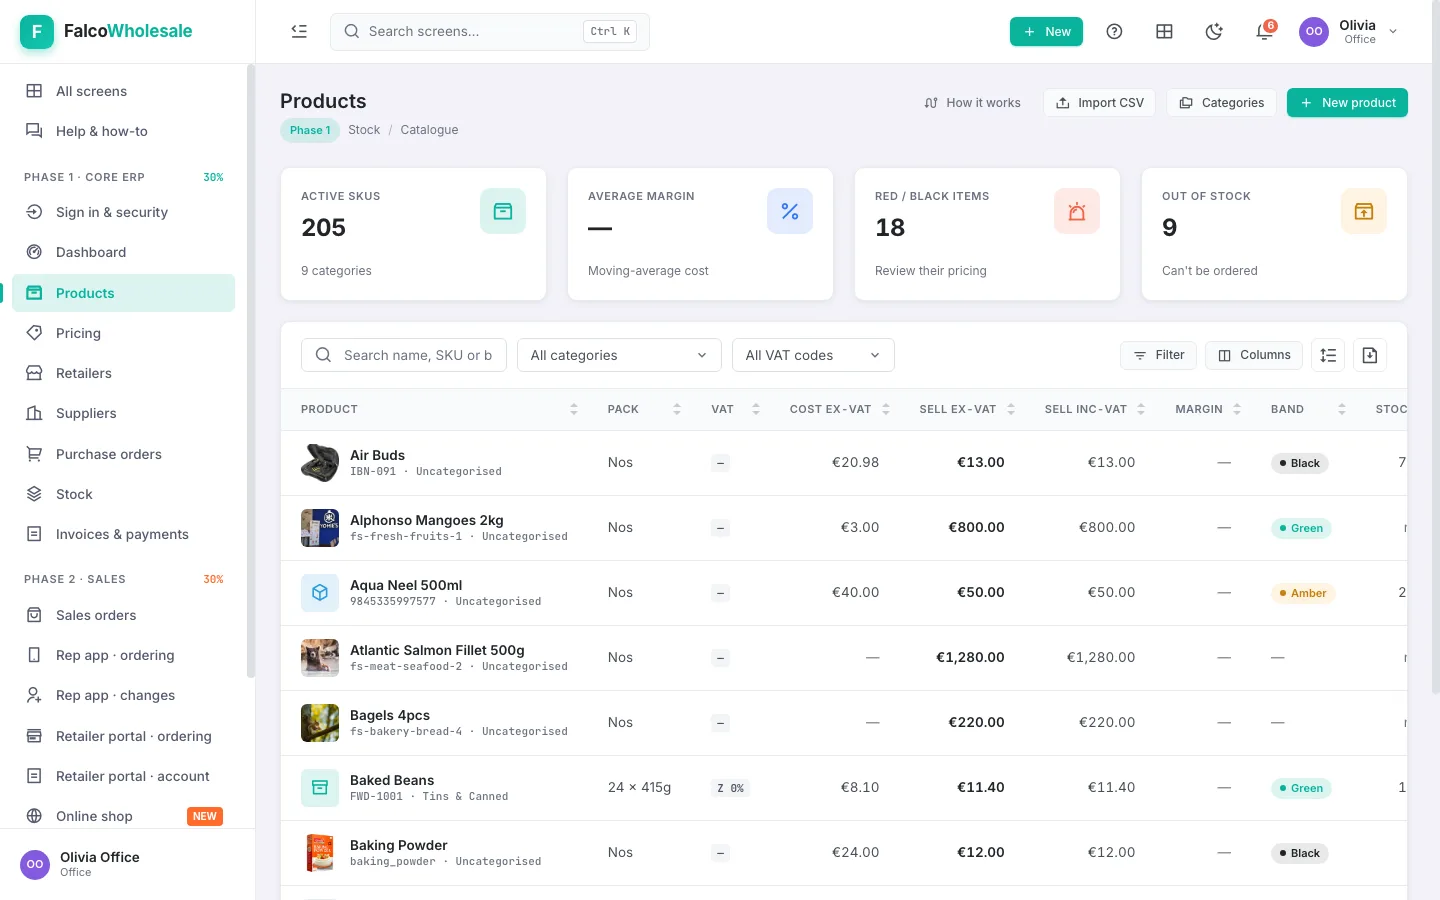
- Products lists the catalogue with stock and the margin colour of each product. Filter by category or colour; Import CSV loads many at once (download the template first).
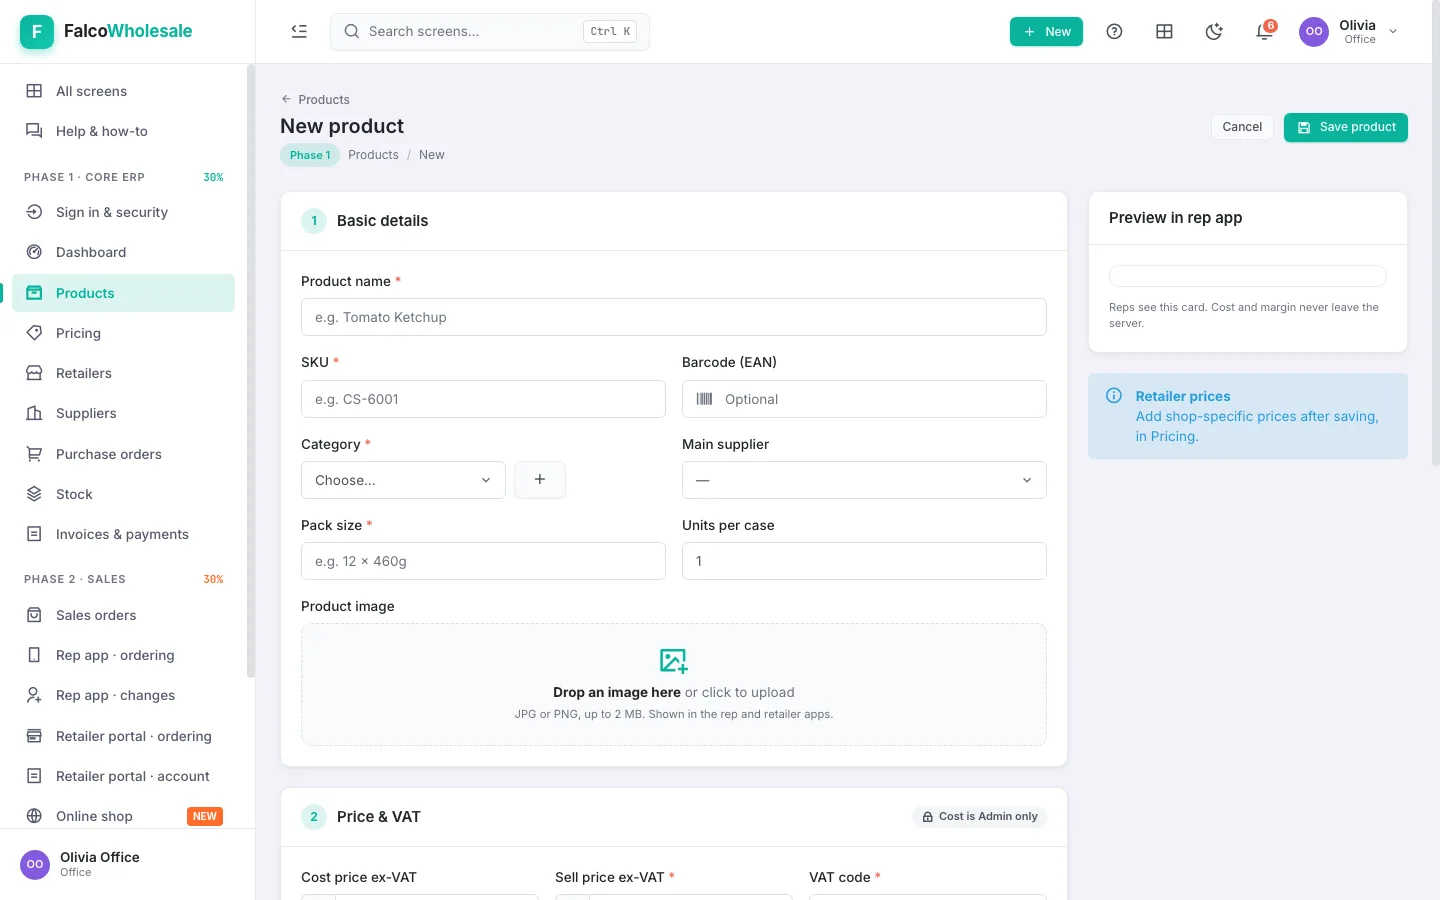
- New product: code (SKU), name, category, size, the units it's sold in (a single, a box, a carton: see Cartons, boxes and singles), cost, price and VAT code. The margin colour updates as you type.
- Tick Available to order so it can be sold, Publish online for the online shop (with its retail price), or Sold by weight at EPOS with a PLU for loose produce at the till.
- Add opening stock to start with what's on the shelf.
Cartons, boxes and singles: one product, several units
In wholesale the same product goes out in different sizes: a carton to a shop, a box now and then, a single bottle to someone who only needs one. You set this up once on the product, and from then on every screen lets you pick the unit, each at its own price, and the stock always adds up.
| Unit | Holds | Price | What it means |
|---|---|---|---|
| Bottle (base unit) | 1 | 2.10 | The smallest you ever sell. Stock is counted in bottles. |
| Box | 12 bottles | 24.00 | Cheaper per bottle than singles (2.00 each). |
| Carton (main unit) | 48 bottles | 92.00 | What you normally sell and buy; the cheapest per bottle (1.92). |
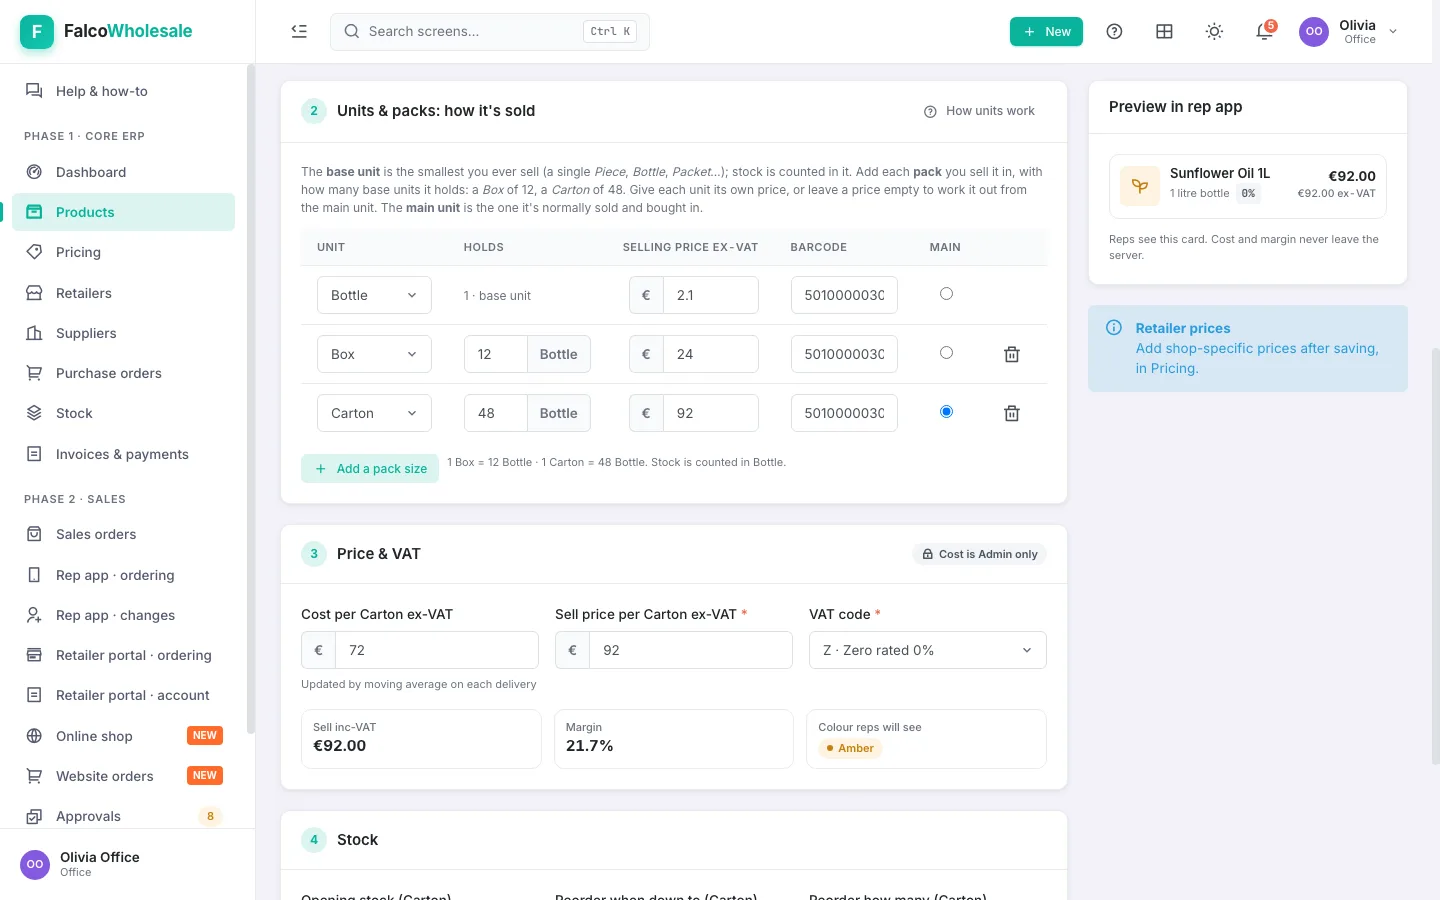
- Open Products › New product (or a product › Edit) and go to Units & packs.
- First row: the base unit, the smallest you sell (Piece, Bottle, Packet…).
- Add a pack size for each bigger size: pick the unit (Box, Carton…) and type how many base units it holds (12, 48).
- Give each unit its selling price. Leave one empty and it's worked out from the main unit (a carton of 48 at 92.00 makes a bottle 1.92). Add the barcode printed on each size if it has one.
- Tick Main on the unit you normally sell and buy in (usually the carton). The Sell price, cost, opening stock and reorder boxes below are all in that unit. Save product.
Using the units every day
- Selling (New invoice): add the product, it comes in as a carton. Change the unit on the line, or press + Box too / + Bottle too to add another line of the same product in a smaller unit. Scanning a box's barcode adds a box. 1 carton + 2 boxes + 5 bottles take 77 bottles off the shelf.
- Buying: purchase orders and goods-in use the carton unless you pick another unit on the line; 4 cartons received put 192 bottles on the shelf.
- Stock: Add stock, Move stock and Adjust stock have a unit on each line (write off 1 Box). A stock count asks for cartons, boxes and loose bottles separately and adds them up.
- Prices for one shop are per unit too: a shop's own carton price doesn't change what it pays for a box or a bottle.
Prices: what each shop pays, and why
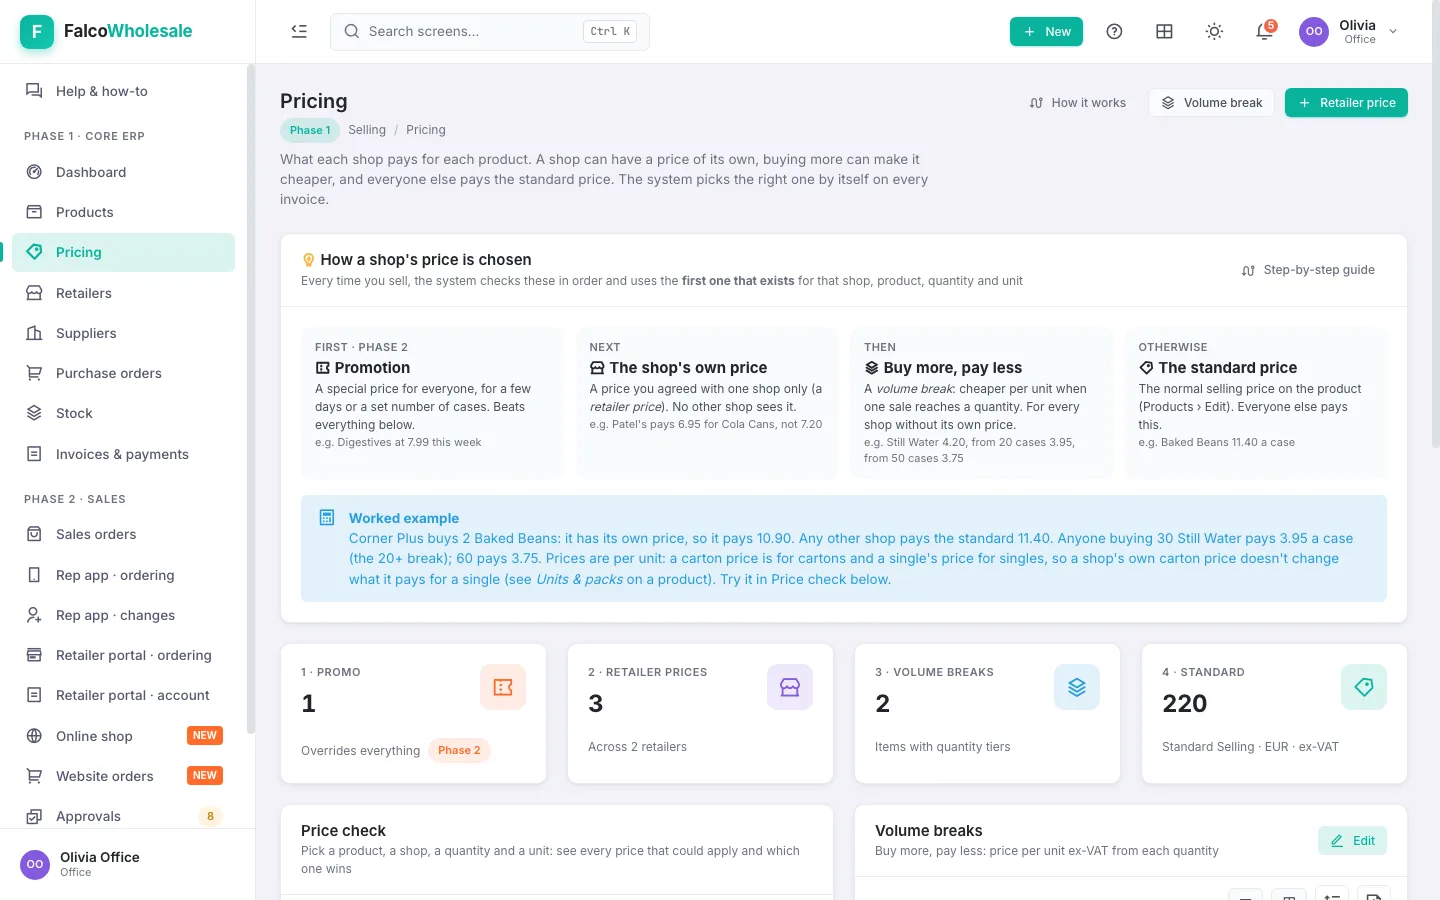
You never type a price when you sell: the system works out what this shop pays for this product, in this unit, for this quantity. It checks these in order and uses the first one that exists (they never add together):
| Kind of price | What it is | Example | |
|---|---|---|---|
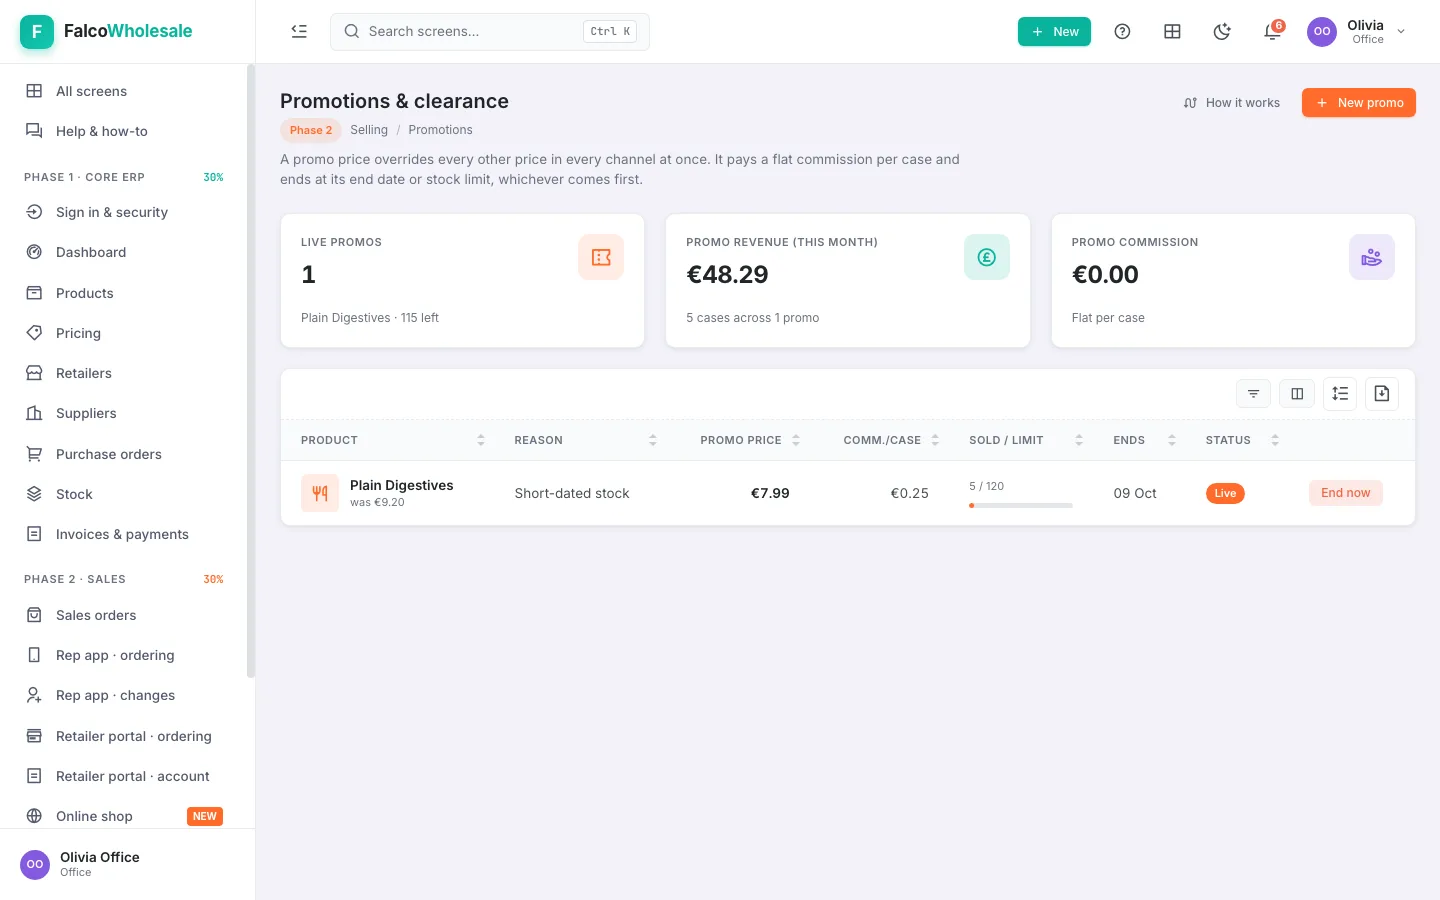
| 0 | Promotion | A special price for everyone for a few days or a set number of cases. Beats everything. | Digestives 7.99 this week |
| 1 | The shop's own price (retailer price) | A price you agreed with one shop. Only that shop pays it; no other shop sees it. | Corner Plus pays 10.90 for Baked Beans |
| 2 | Volume break | Cheaper per unit when one sale reaches a quantity. For every shop without its own price. | Still Water 3.95 from 20 cases, 3.75 from 50 |
| 3 | Standard price | The normal price on the product. Everyone else pays this. | Baked Beans 11.40 |
- Standard price: Products › the product › Edit: the Sell price (and each unit's price under Units & packs).
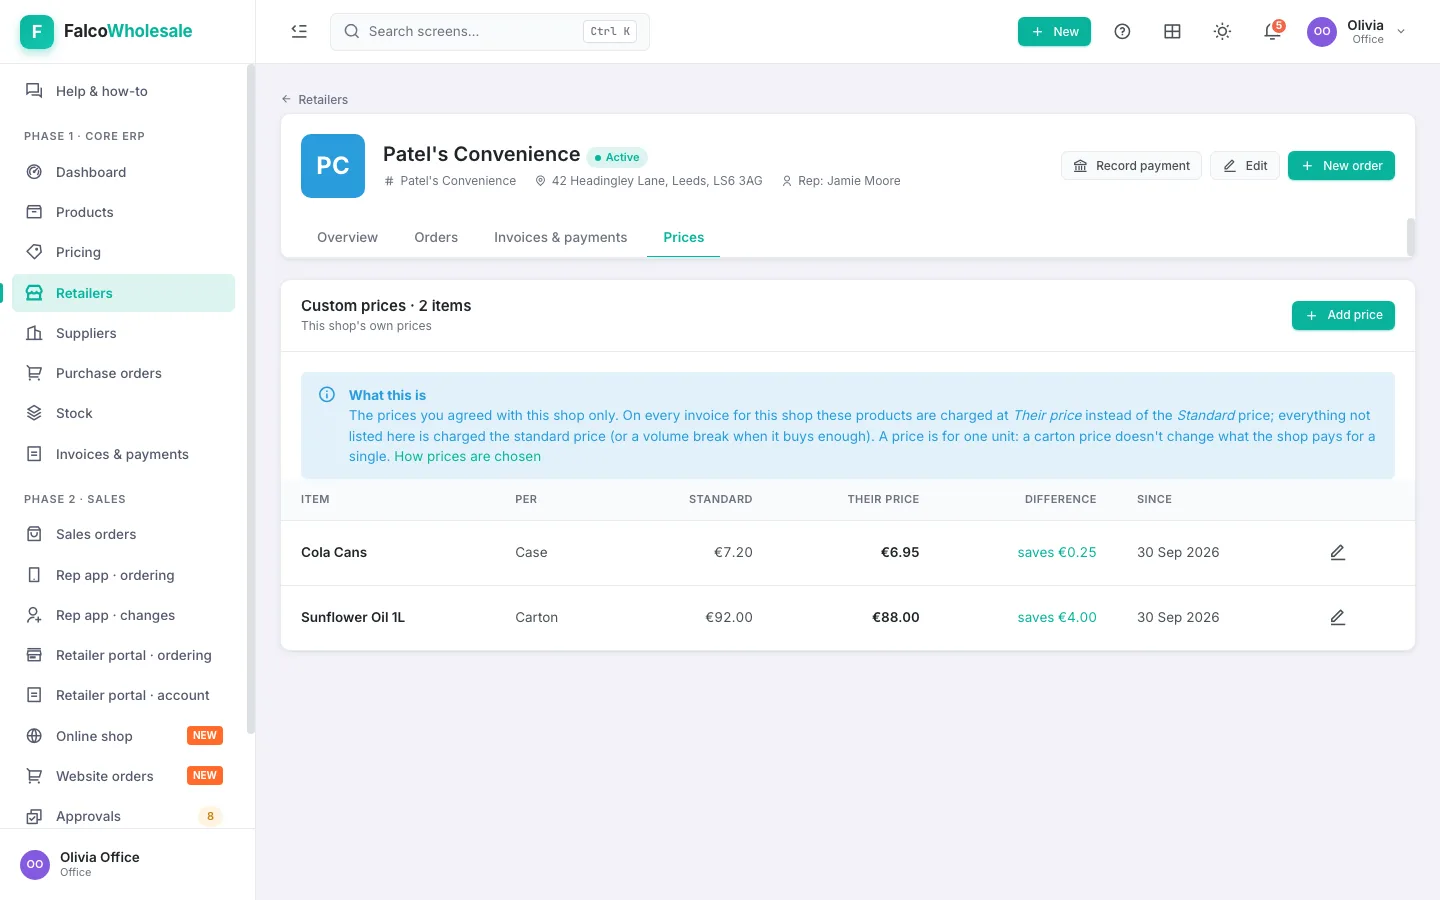
- A shop's own price: Pricing › Retailer price, or open the shop (Retailers › the shop) › Prices tab › Add price. Pick the shop, the product, for which unit, the price and the date it starts. The colour shows if the margin gets thin.
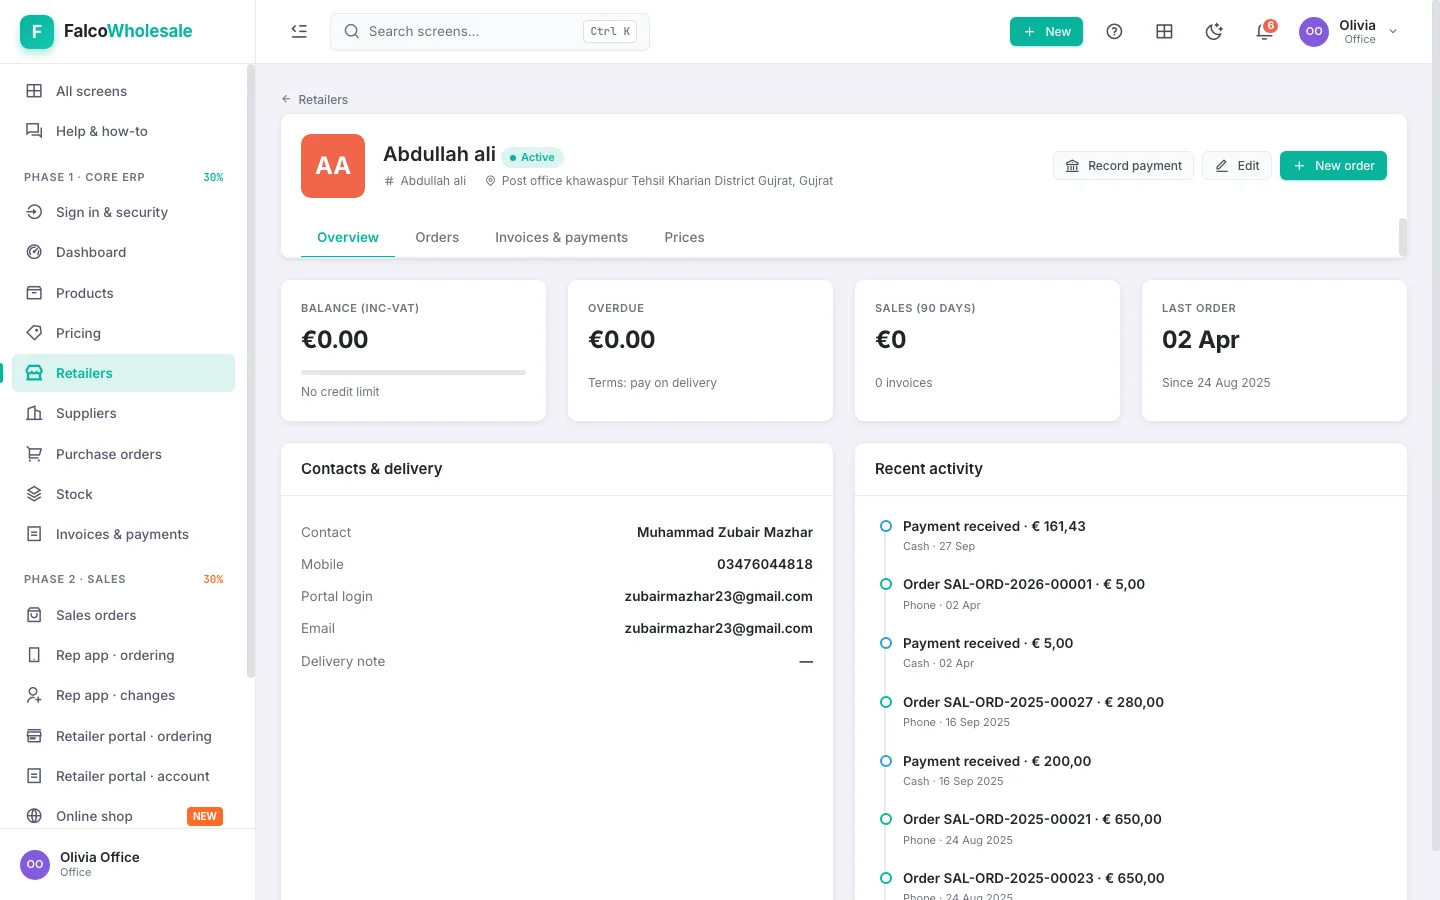
- The shop's Prices tab is simply the list of that shop's own prices: each product, the unit, the Standard price, Their price and how much they save. Anything not listed there, the shop pays the standard price (or a volume break). The pencil changes a price; Pricing › Retailer prices lists every shop's.
- Volume break: Pricing › Volume break: the product, the unit it counts in (e.g. cartons), and tiers (from 20 → 3.95, from 50 → 3.75). Each tier must be cheaper than the one before.
- Promotions: a special price for a set number of days and cases, with an optional commission per case for reps.
- Not sure what a shop pays? Pricing › Price check: pick the product, the shop, a quantity and a unit. It lists every kind of price, shows which one wins and says why.
Shops (trade customers) and their logins
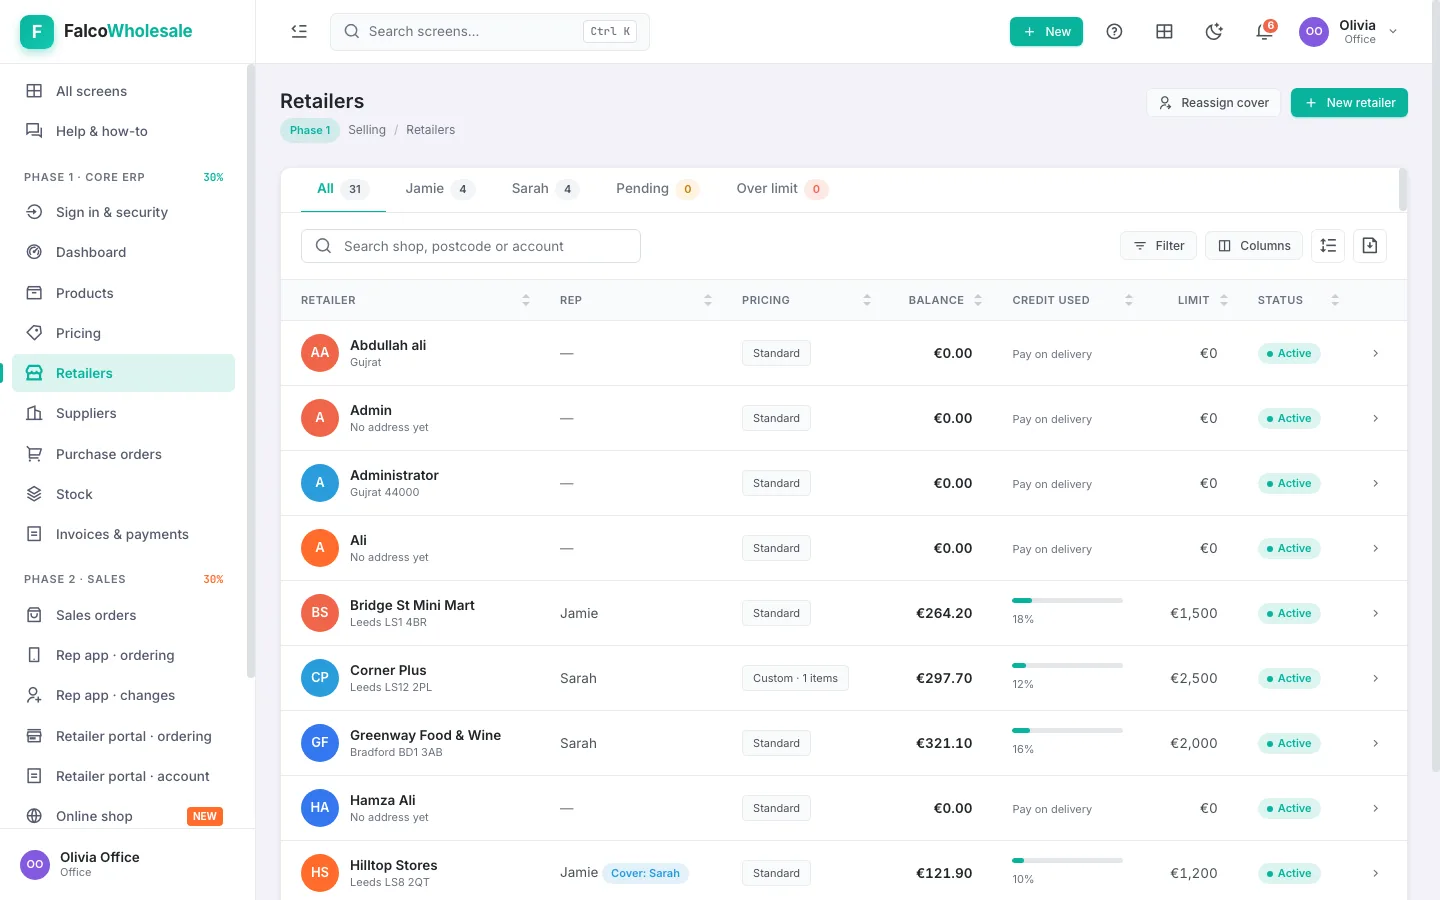
- Retailers lists every shop with its rep, balance and credit limit. A shop over its limit shows in red.
- New retailer: shop name, contact, phone, address and postcode, credit limit and, payment terms and the rep who looks after it. The payment terms set each invoice's due date (30 days if none).
- Tick Portal login and enter the shop's email: the shop gets a login for /shop, where it sees only its own prices, orders and invoices.
- Open a shop to see its profile: balance, overdue, own prices, recent orders and invoices and payments. Record payment takes a payment against its oldest invoices; New invoice sells to it (how).
- A rep on holiday? Reassign cover gives their shops to another rep until a date.
Set up the counter till and its cashiers
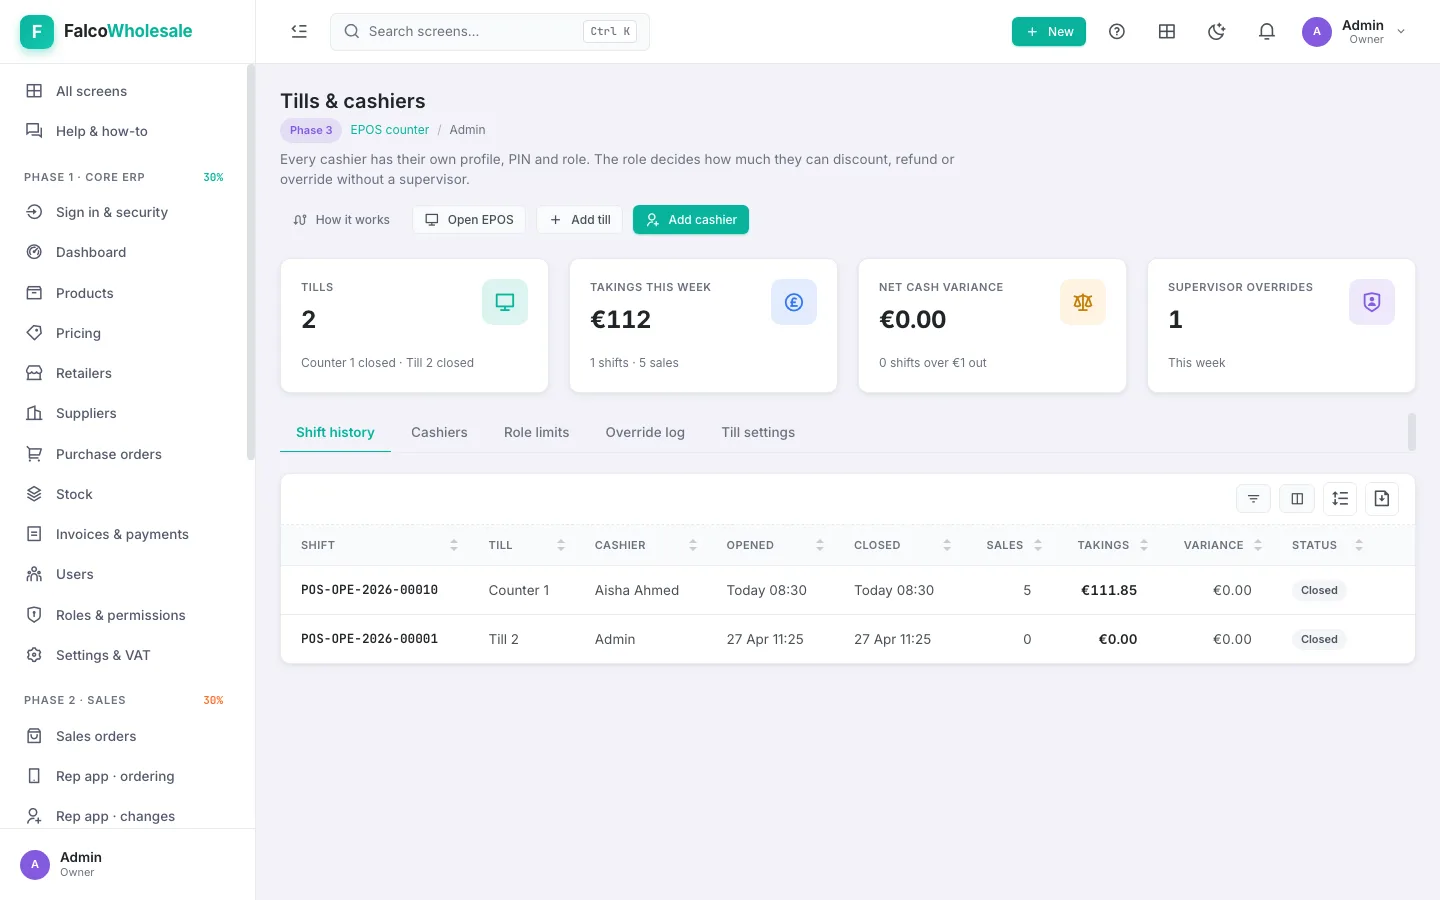
- Add till, e.g. "Counter 1". Each till gets its own settings.
- Add cashiers and supervisors with a 4-digit PIN each (easy PINs like 1234 are refused; the person picks their own PIN the first time). Set the cashier's limits: discount %, refund and cash-out amounts. Anything over needs a supervisor's PIN.
- Till settings: ways to pay (only those that post to a bank or cash account), receipt paper size, auto-lock after idle, cash in/out account, scale labels and quick keys for the busiest products.
Delivery areas and the online shop
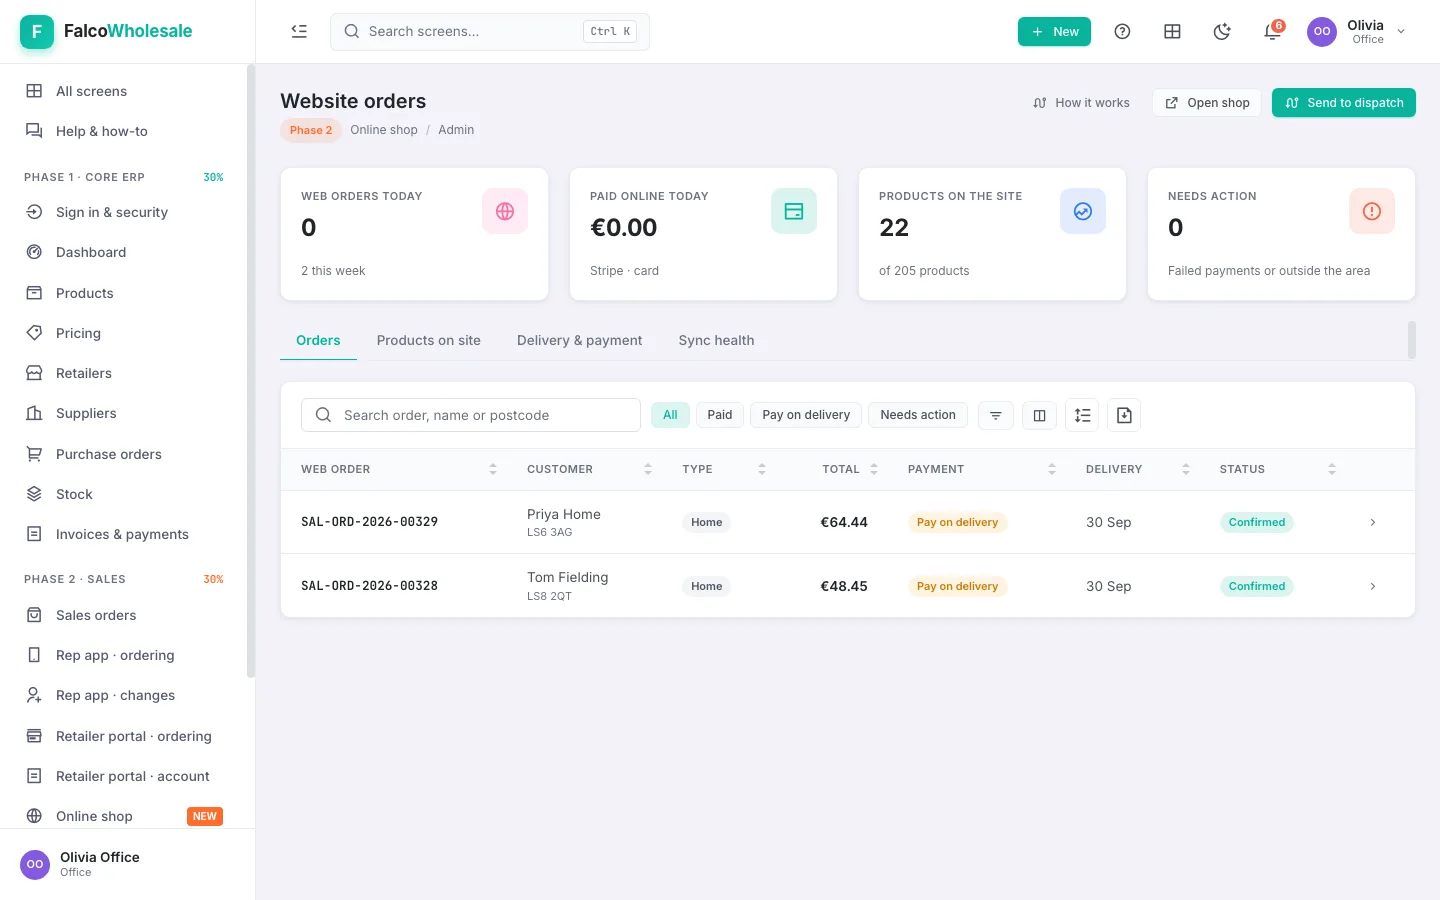
- Website orders › Delivery & payment: switch the shop on, set the minimum order, the delivery fee and free-delivery threshold, the cut-off time and the ways to pay (pay on delivery, on account for trade customers, card when a payment gateway is connected).
- Add delivery zones by postcode, e.g. "Leeds · LS1–LS28". Outside the zones the shop says it doesn't deliver there.
- Products on site decides what's published and featured.
Reports, VAT and commission (month end)
- Reports links to profit & loss, outstanding payments (by 30/60/90 days), sales analysis (by channel, rep, product), cash vs expected and the VAT return.
- VAT return: the boxes for the quarter, ready to file; Export saves them as a spreadsheet.
- Outstanding payments › Email statements sends each overdue shop its statement.
- Commission: each rep's earned, due and paid commission from their invoices, their targets, and the rules (a rate per margin colour). Pay all due makes the payout.
Office
Selling to shops, getting paid, buying and stock.The daily running of orders, vans and money. Everything here is in the console on the office computer (the warehouse does goods in and stock on a computer or tablet).
Take an order by phone
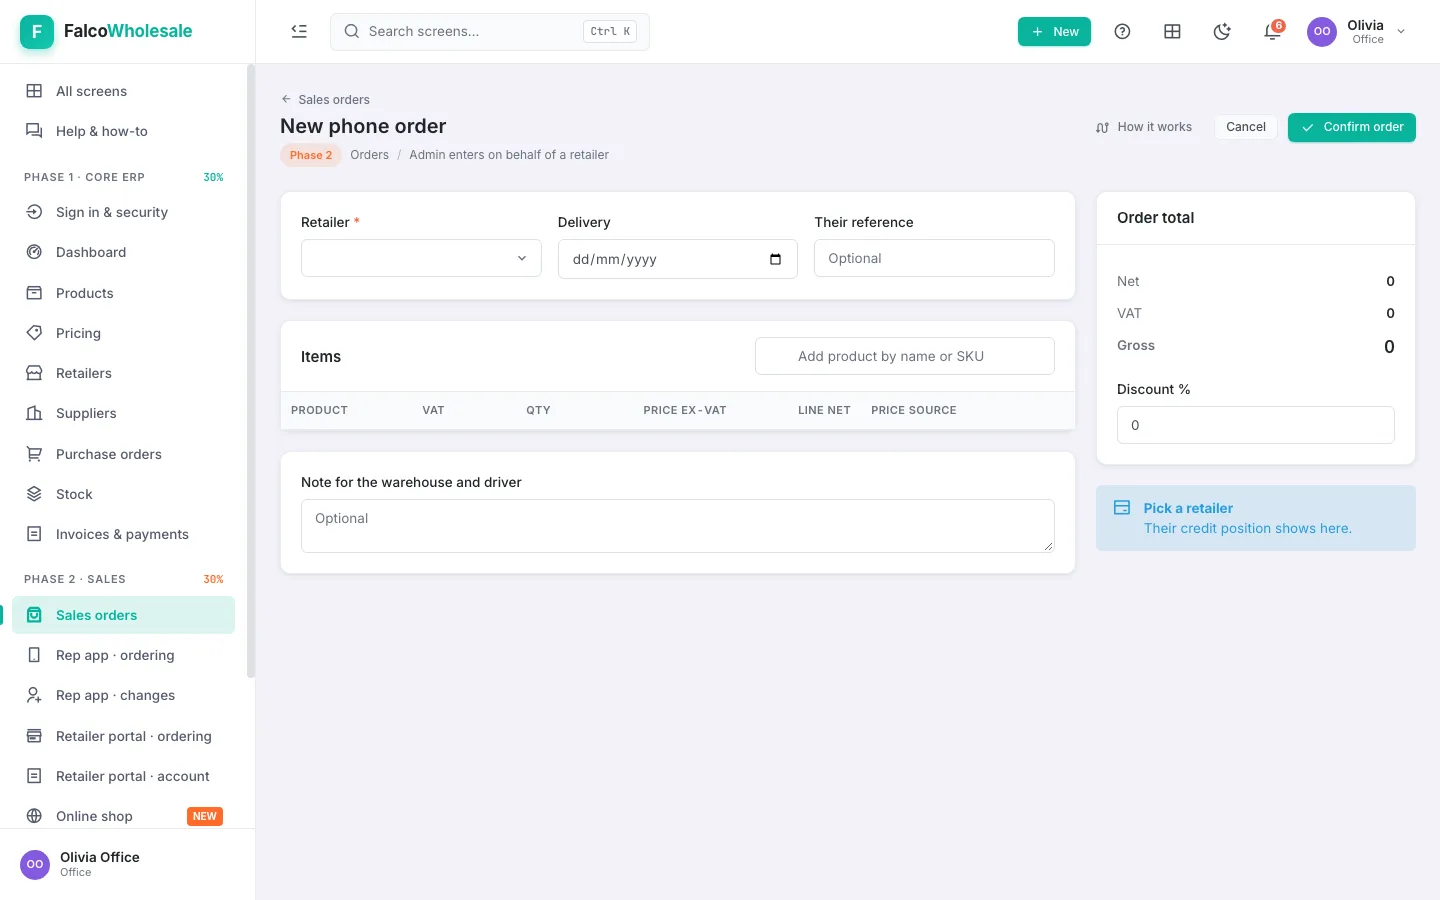
- Open New phone order. Type part of the shop's name or postcode and pick it.
- Add products by name or code with the number of cases. The shop's own price, any promotion and the line's margin colour show at once.
- Check the delivery day, add a reference or note, Submit.
Follow an order from confirmed to paid
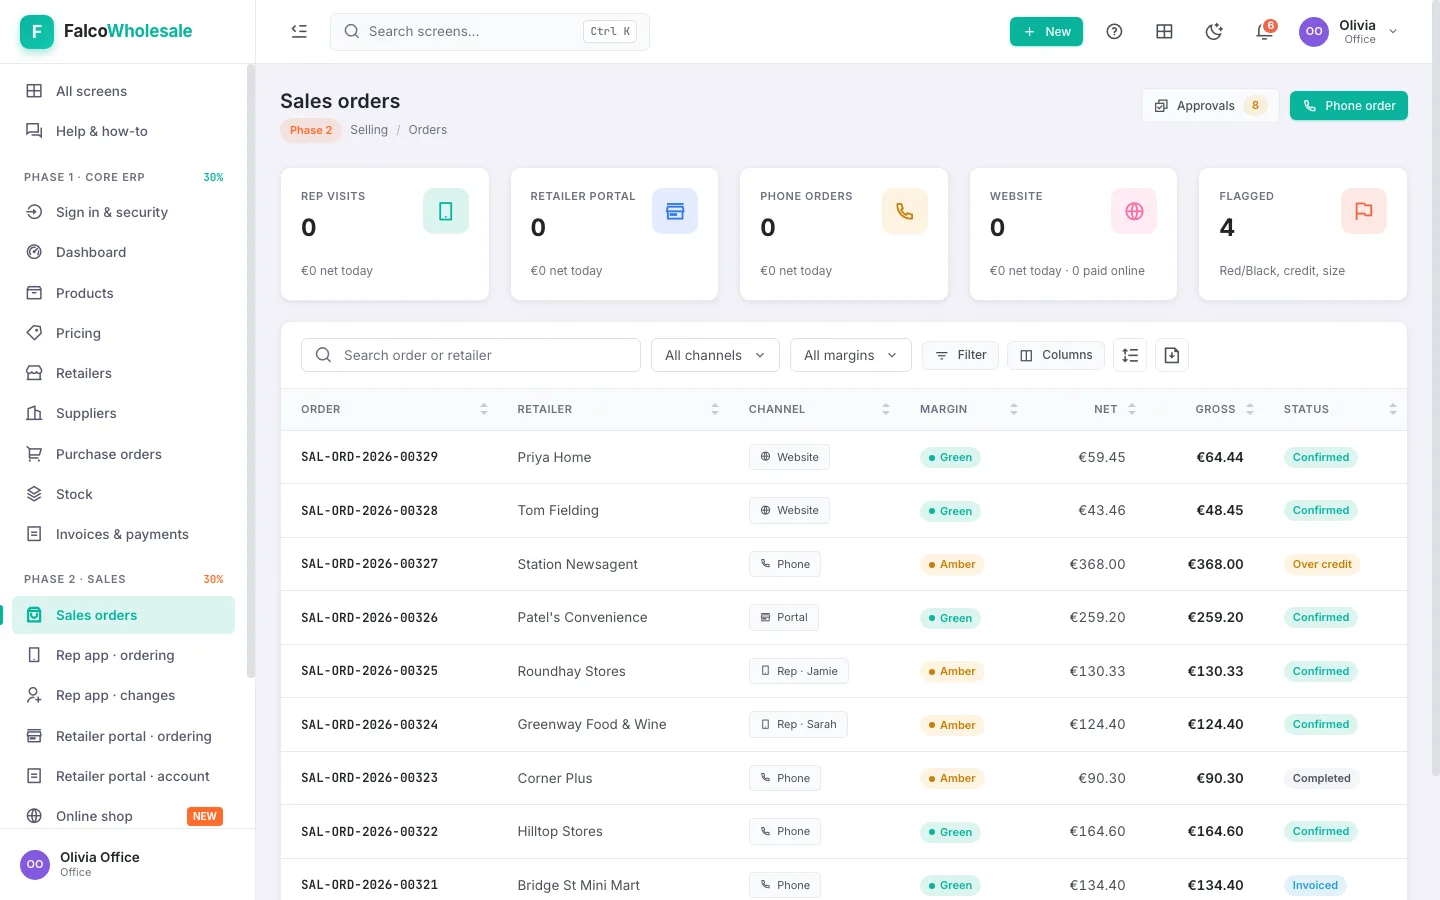
- Sales orders shows every order from every channel (phone, rep, portal, website). Filter by channel, search by shop.
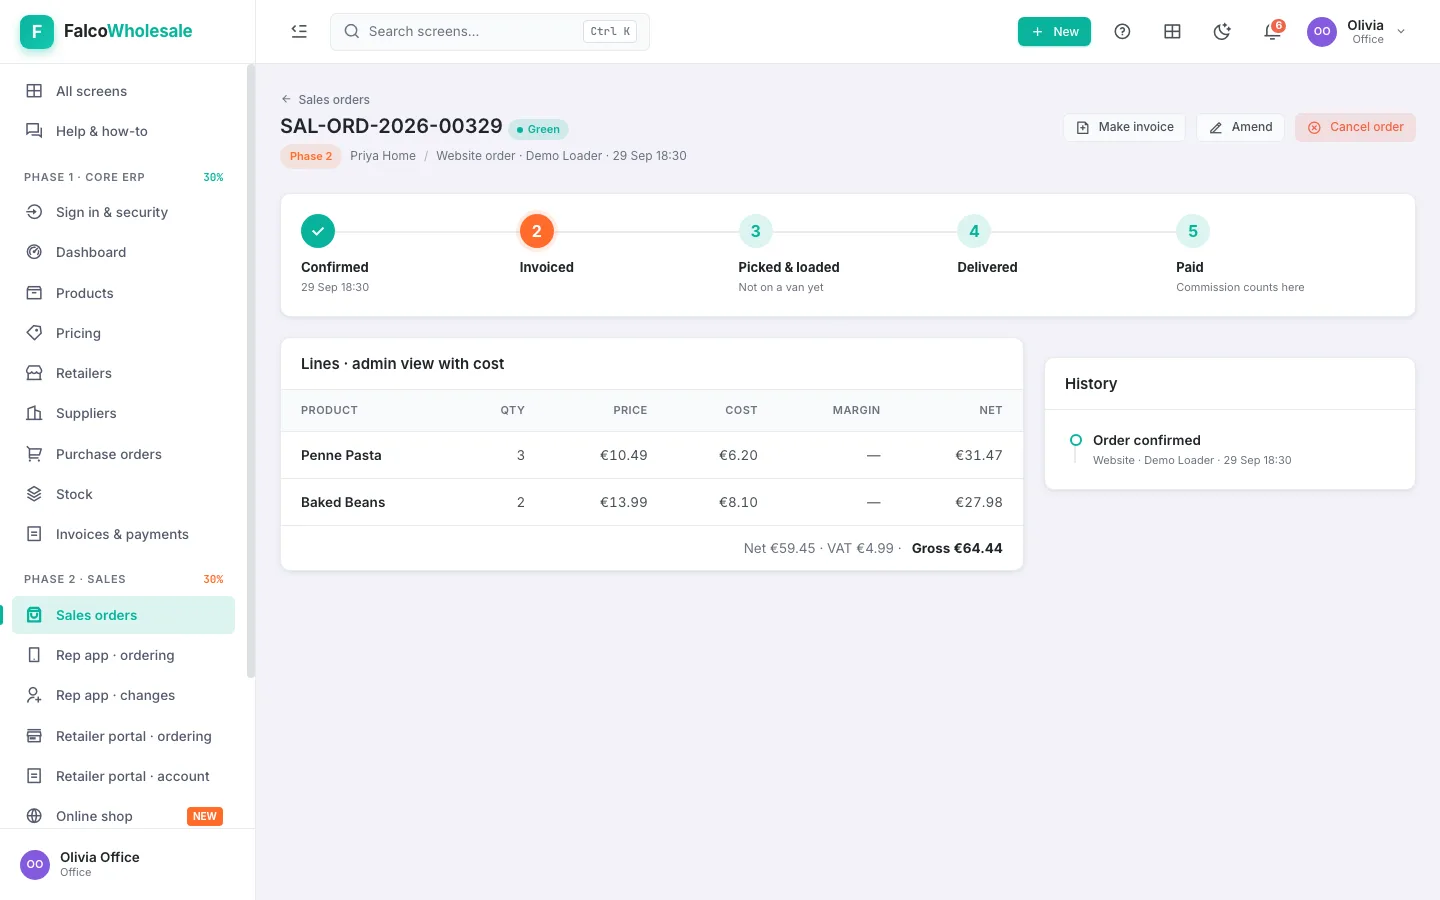
- Click one: the steps across the top show where it is (Confirmed → Invoiced → Picked & loaded → Delivered → Paid), with its lines, margin and history.
- Amend changes quantities (with a reason); Invoice raises the invoice now; Cancel order takes it off its van.
- If a delivery couldn't be booked when the driver recorded it, the order says why and offers Book delivery: fix the cause (e.g. receive the stock), press it.
Approvals: orders to check, rep changes, new shops
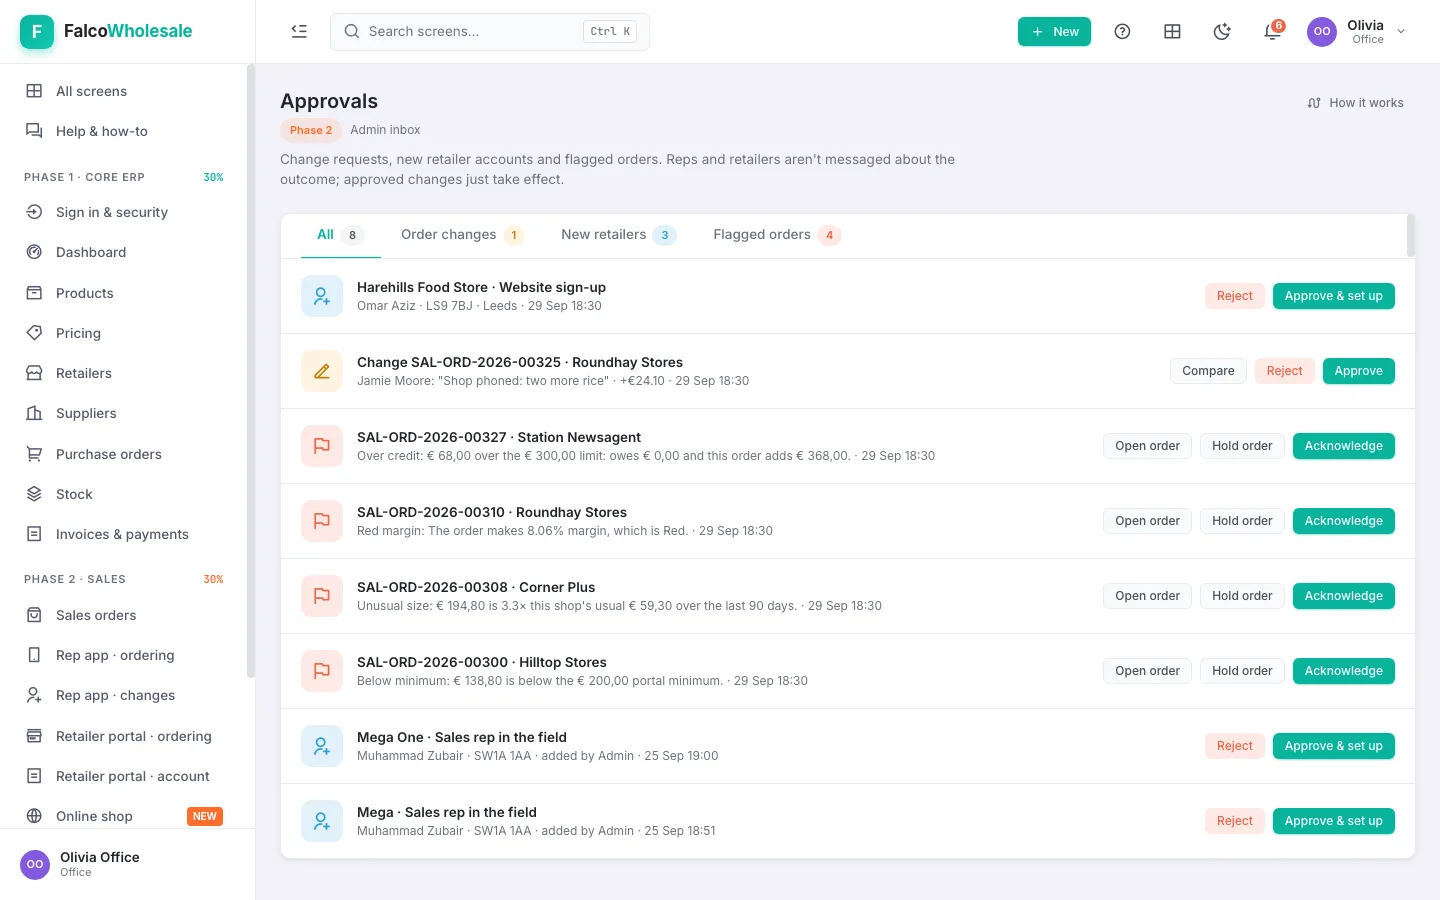
- Flagged orders: over the credit limit, unusually large, or a red/black margin. Approve, or decline with a reason (the shop and rep see it).
- Changes: a rep asked to change an order. Compare shows old and new side by side; approving replaces the order.
- New shops: applications from reps, the sign-in page or the online shop. Approving creates the shop and its login.
Plan the vans and send each driver their run
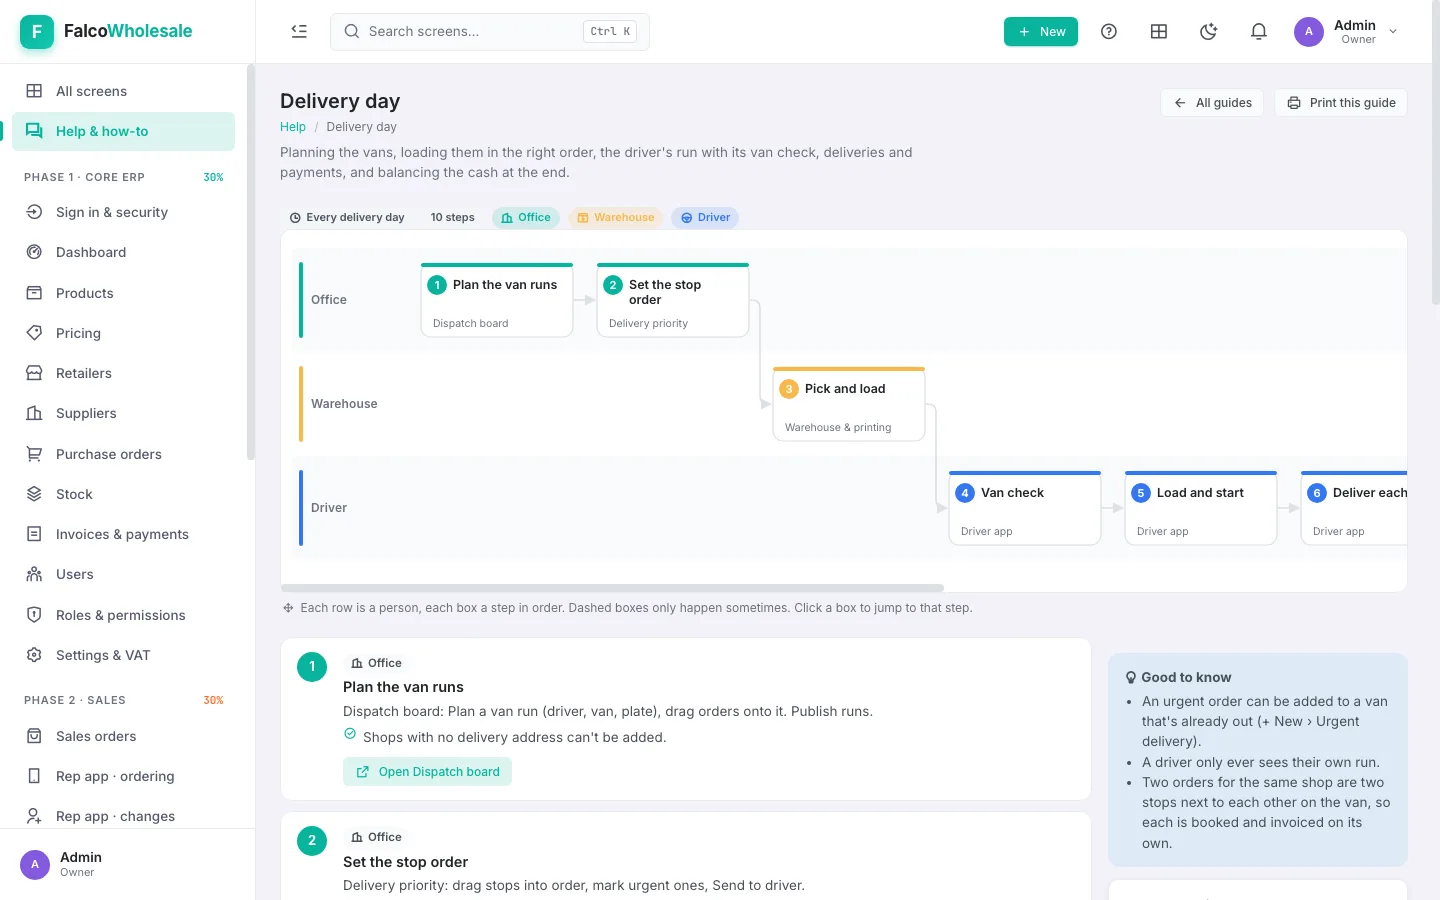
- Dispatch board: orders not on a van are on the left, each van is a lane. Plan a van run: van name, driver, plate, and tick the orders.
- Drag more orders onto a van. Two orders for the same shop become two stops next to each other, so the driver calls once and each order is booked on its own.
- Delivery priority: drag the stops into the order the driver should go, mark any as High, then Send to driver. The driver's phone shows what changed; you see when they've seen it.
- Publish runs releases the day's runs to the drivers and the warehouse. A van without a driver is refused by name.
- A shop needs something today? + New › Urgent delivery puts an order on a van that's already out.
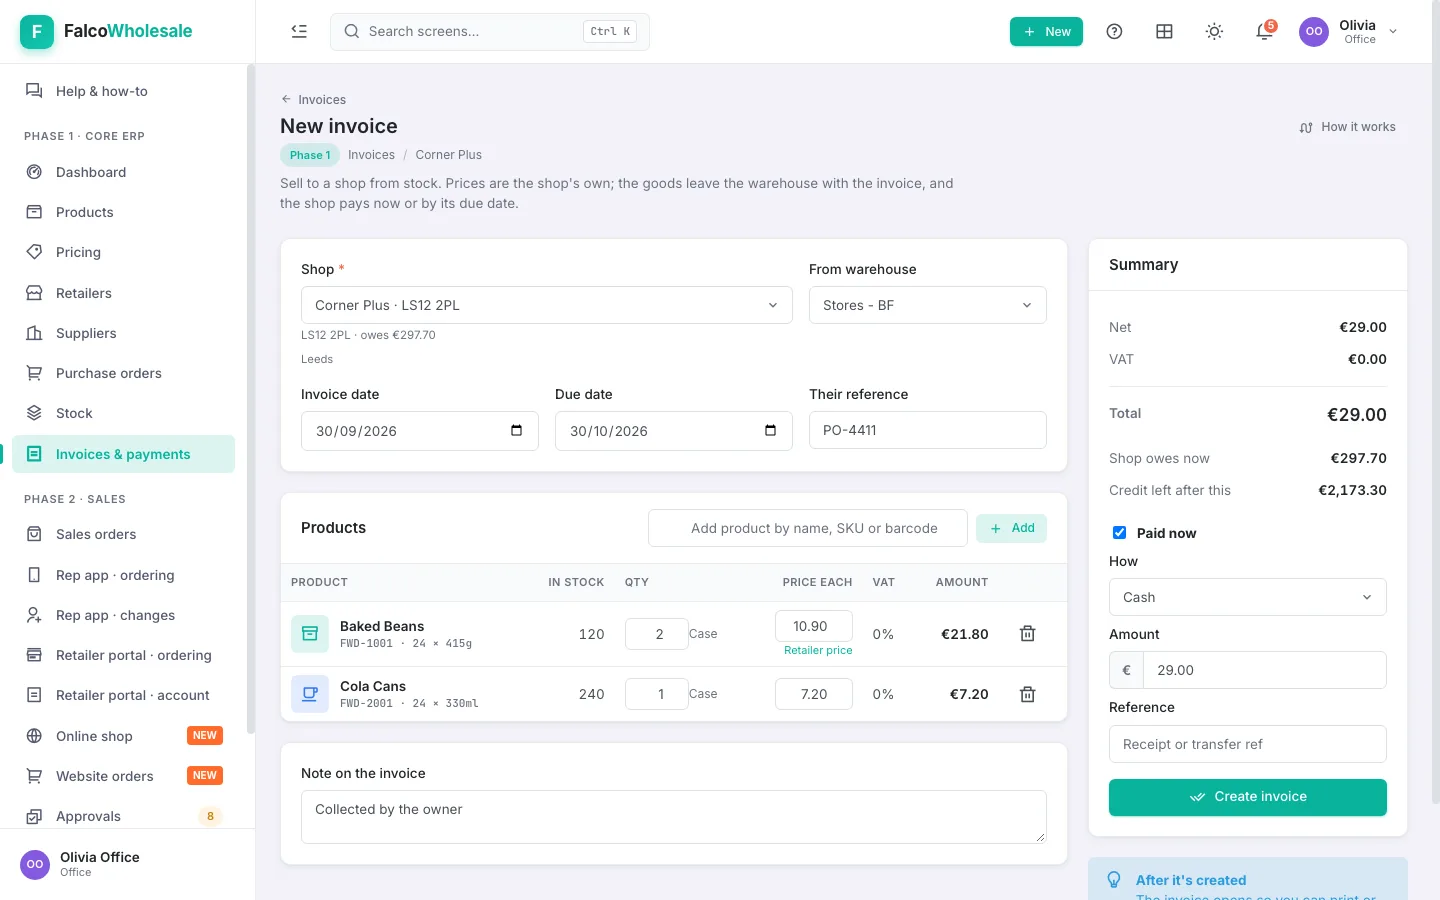
Sell to a shop: New invoice
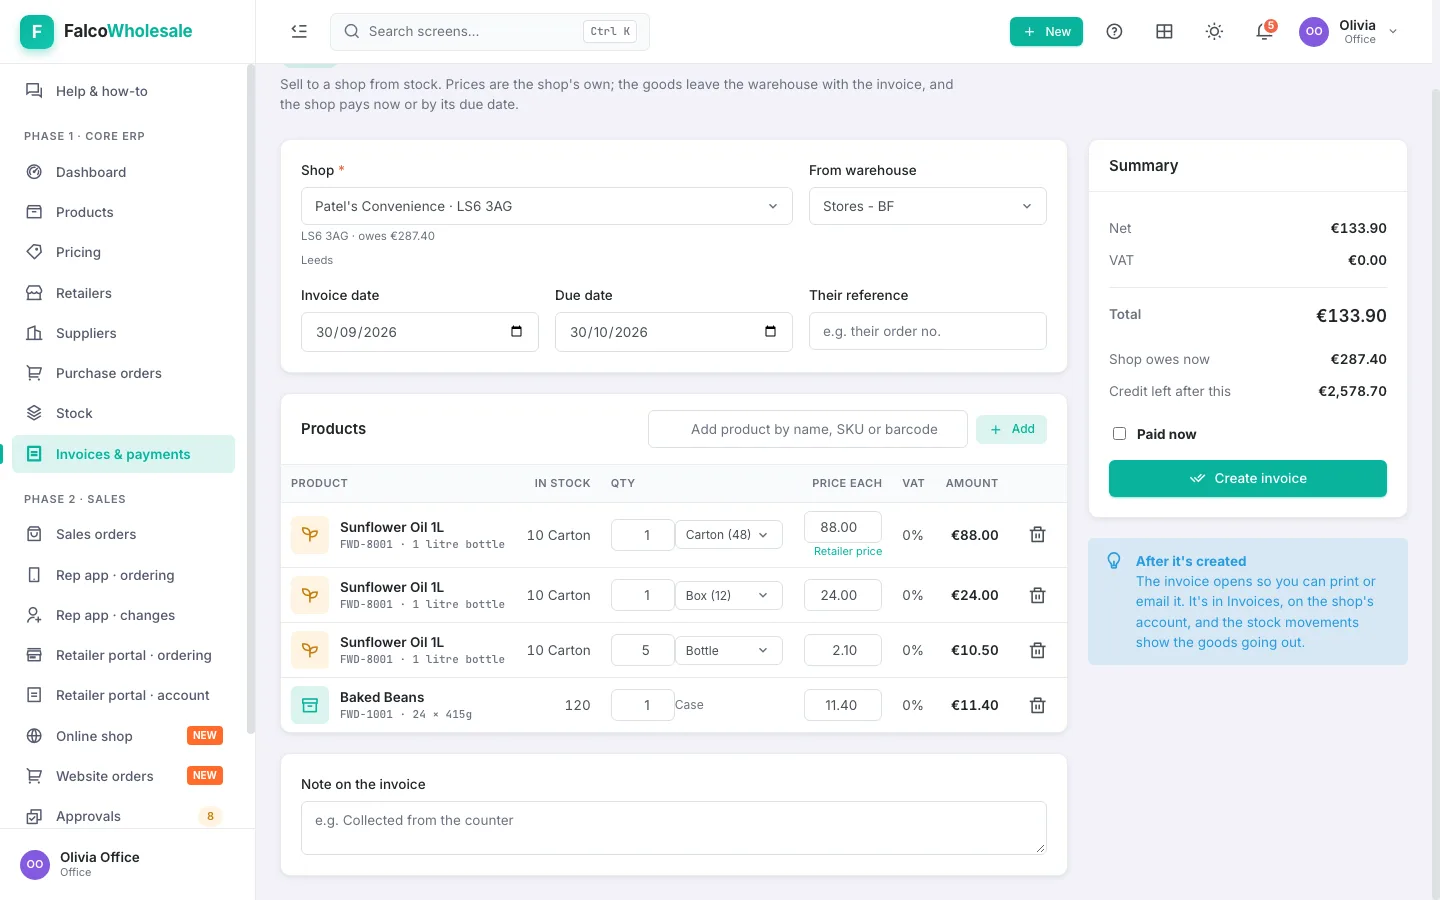
- + New › Invoice, or New invoice on Invoices & payments or on the shop's own page.
- Pick the shop (type part of its name or postcode) and the warehouse the goods leave from. The due date fills in from the shop's payment terms; add their reference (their order number) if they gave one.
- Add each product: type its name or code, or scan its barcode, and press Enter. Set the cases. The shop's own price, the VAT, and how many the warehouse holds show on each line; the same product again just adds a case.
- Check the Summary: the total, what the shop owes now and the credit left after this invoice.
- Paying there and then? Tick Paid now and pick how (cash, card, transfer), the amount and a reference.
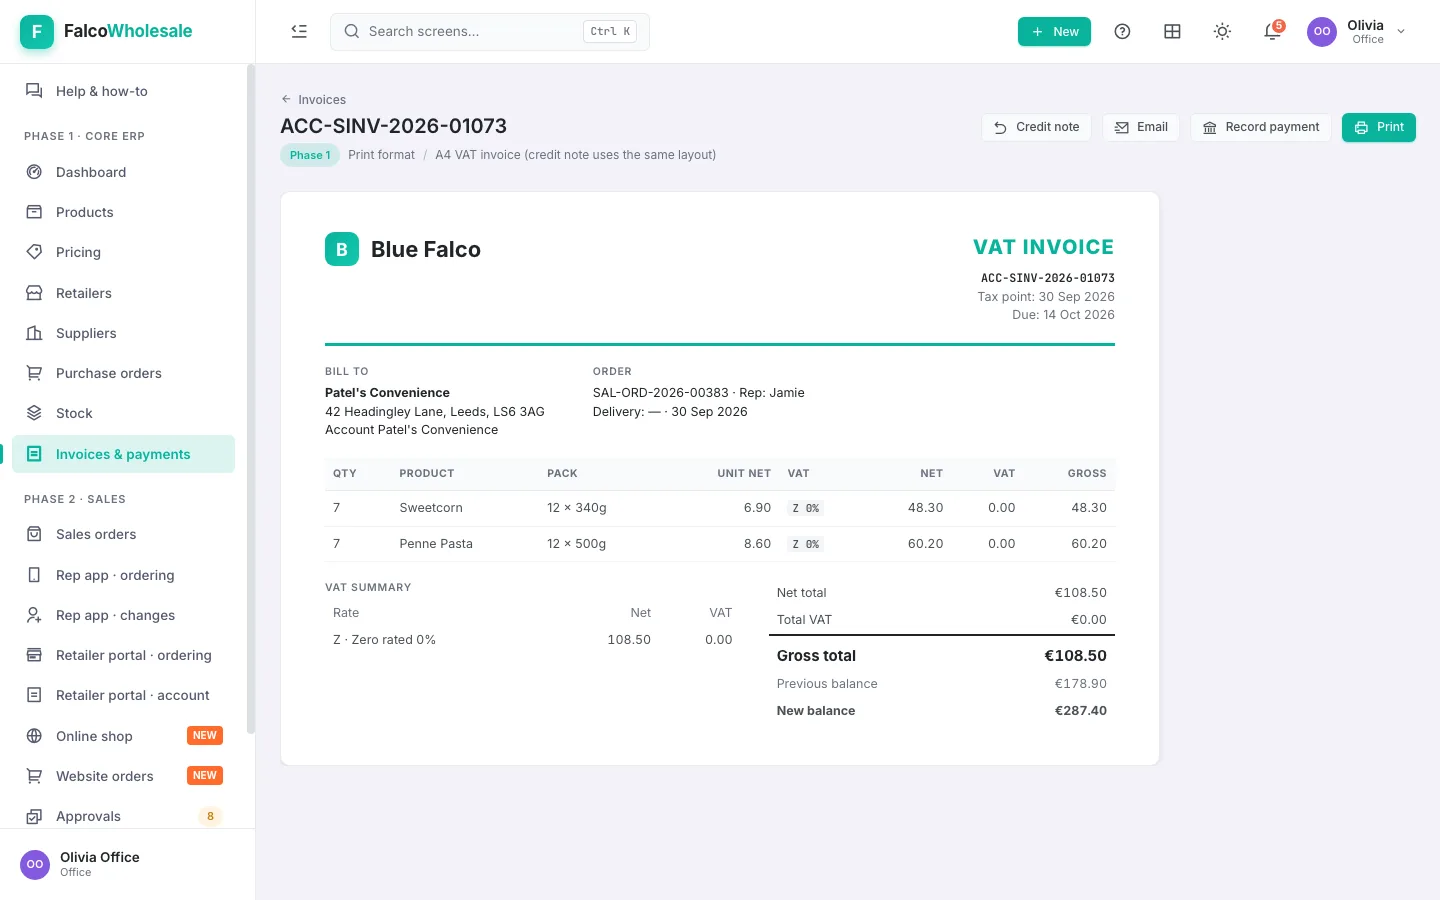
- Create invoice. It opens as the VAT invoice: Print it or Email it to the shop.
Payments, what's owed and credit notes
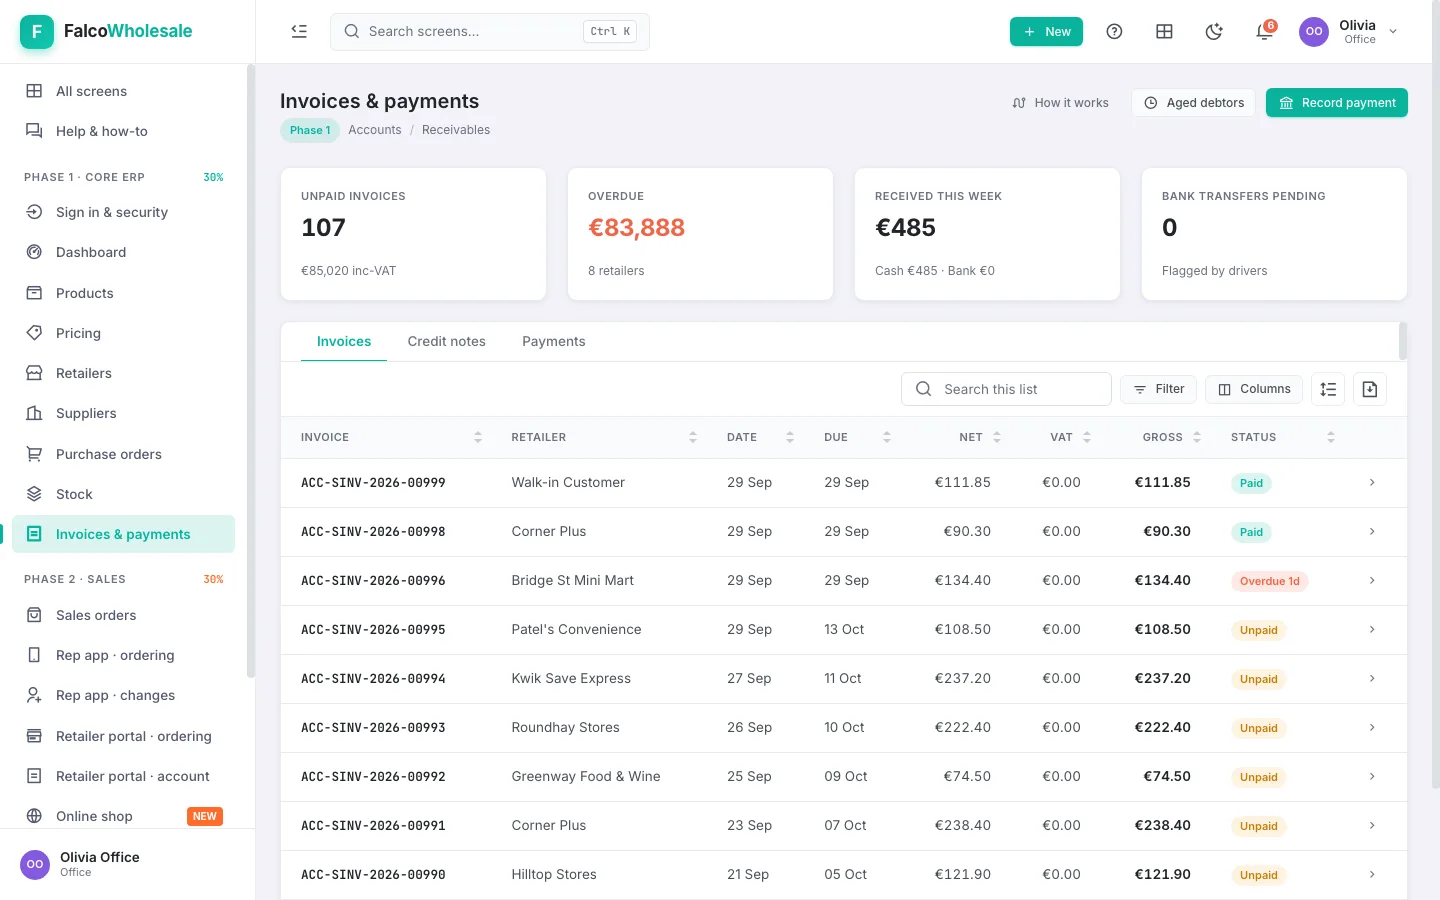
- Orders are invoiced automatically when delivered (or earlier from the warehouse). Invoices & payments lists every invoice; Overdue shows the late ones, and the dashboard lists overdue shops.
- Open an invoice to Print or Email it.
- A shop pays later (transfer, cash, cheque)? Record payment (on Invoices, on the invoice, or on the shop): the amount, how, a reference. It pays off the oldest invoices first. The driver's cash is recorded by the driver app.
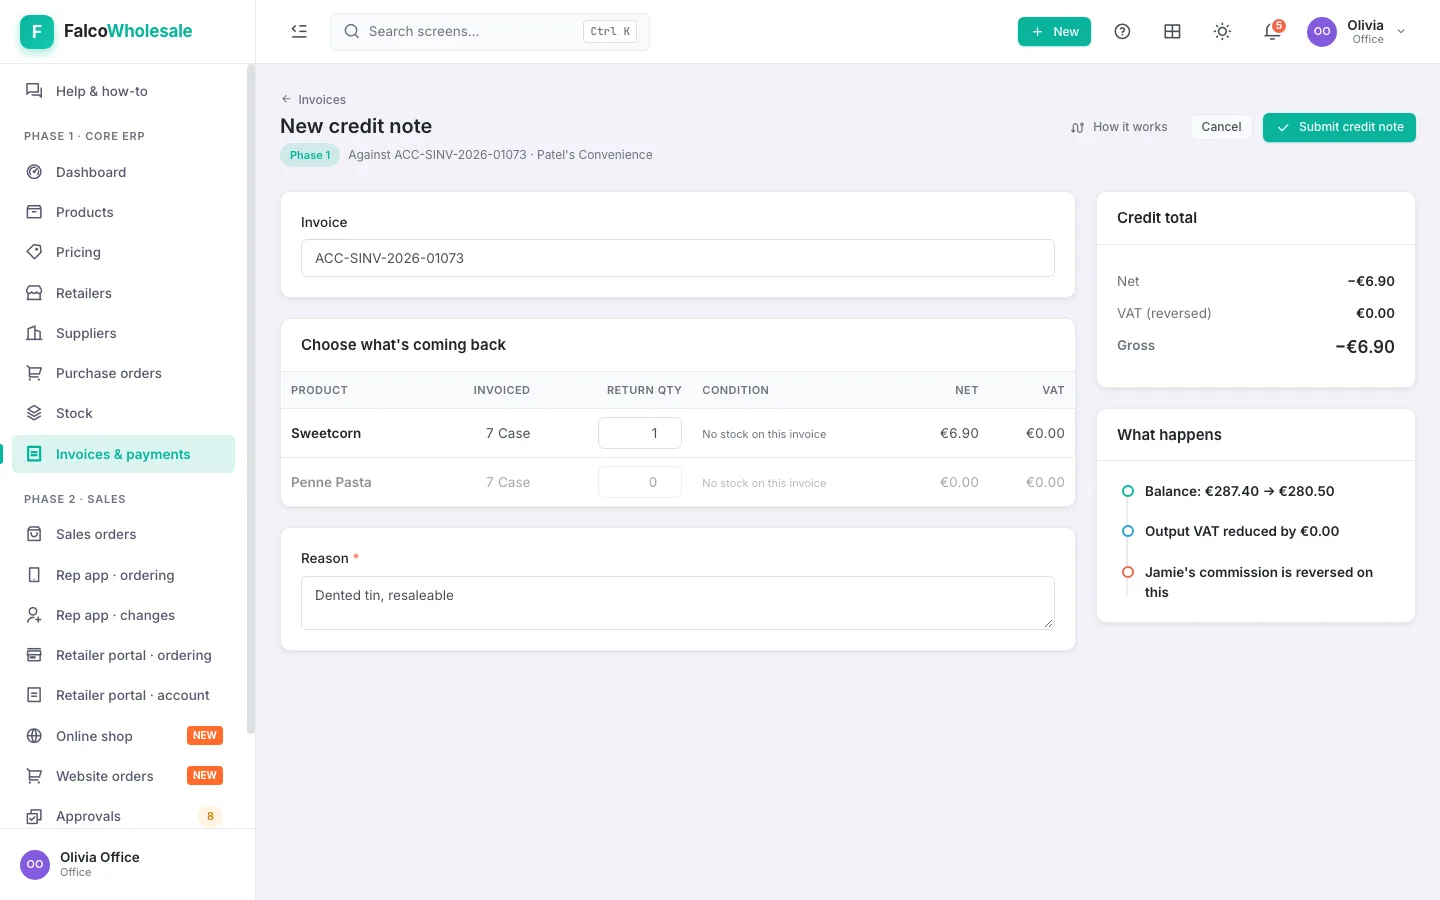
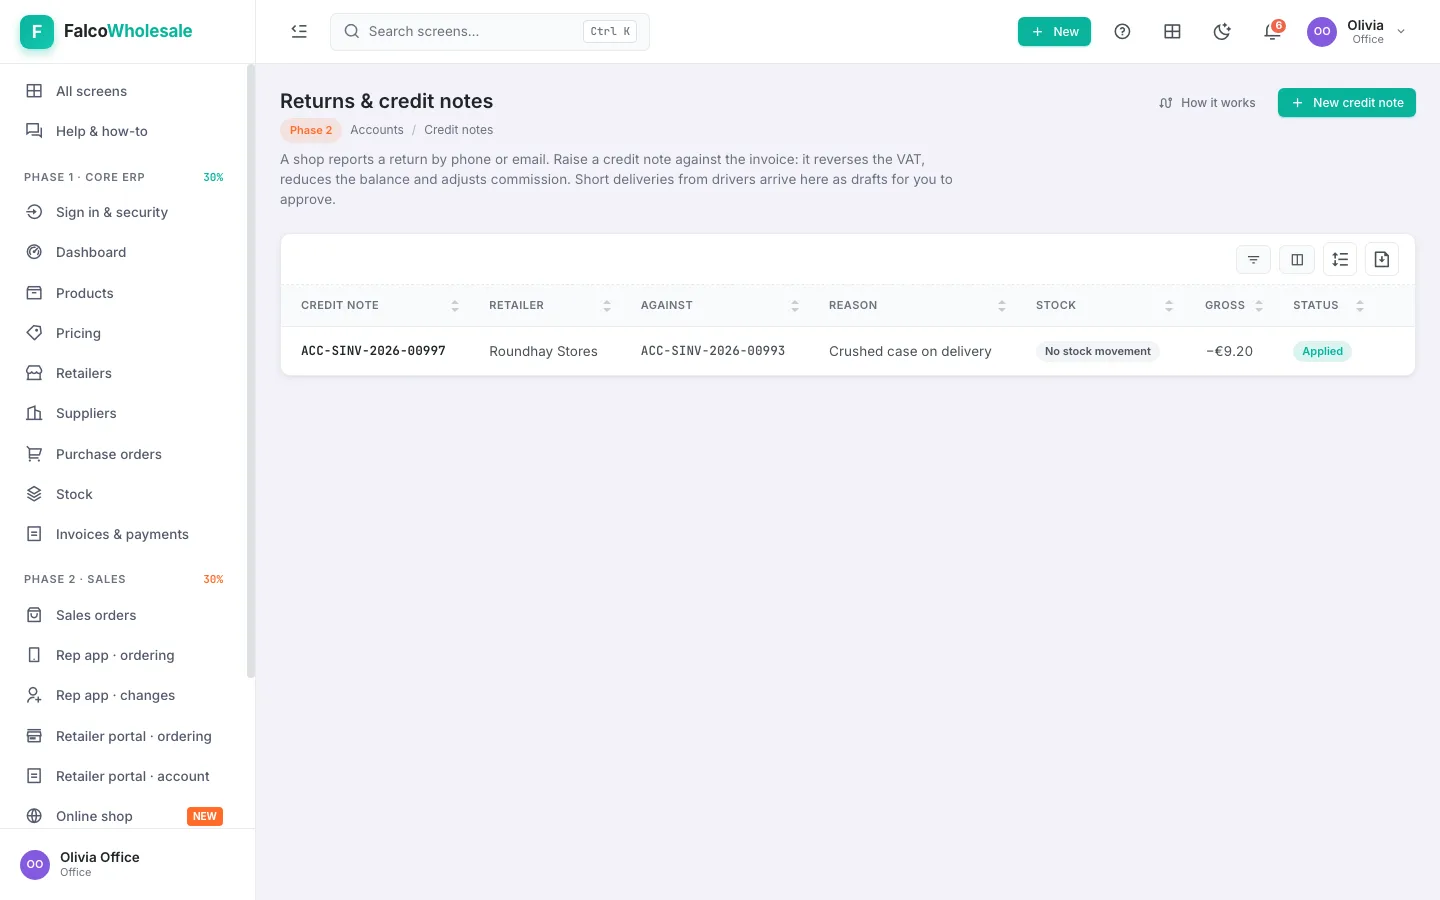
- Goods come back? Open the invoice › Credit note: how many of each line, back to stock (resaleable) or damaged · write off, and why. Submit credit note: the shop's balance comes down and resaleable goods go back on the shelf.
- Returns & credit notes: short or damaged deliveries arrive as drafts. Approve to reduce the shop's balance (and reverse the rep's commission on that line), or discard.
Balance each van's cash
- After drivers end their day, Cash vs expected lists each van: cash the stops said was taken, and what the driver counted.
- A difference is flagged. Resolve it with what happened (e.g. "Found · counting error") and a note.
Buy from a supplier: order, receive, invoice, pay
- Stock suggests what to reorder (below the reorder level): Create PO for all, or New purchase order: supplier, products, cases, cost. Submit & email supplier (or save a draft and send it later from its tracker). Each line has a unit (usually the carton) and a price per unit.
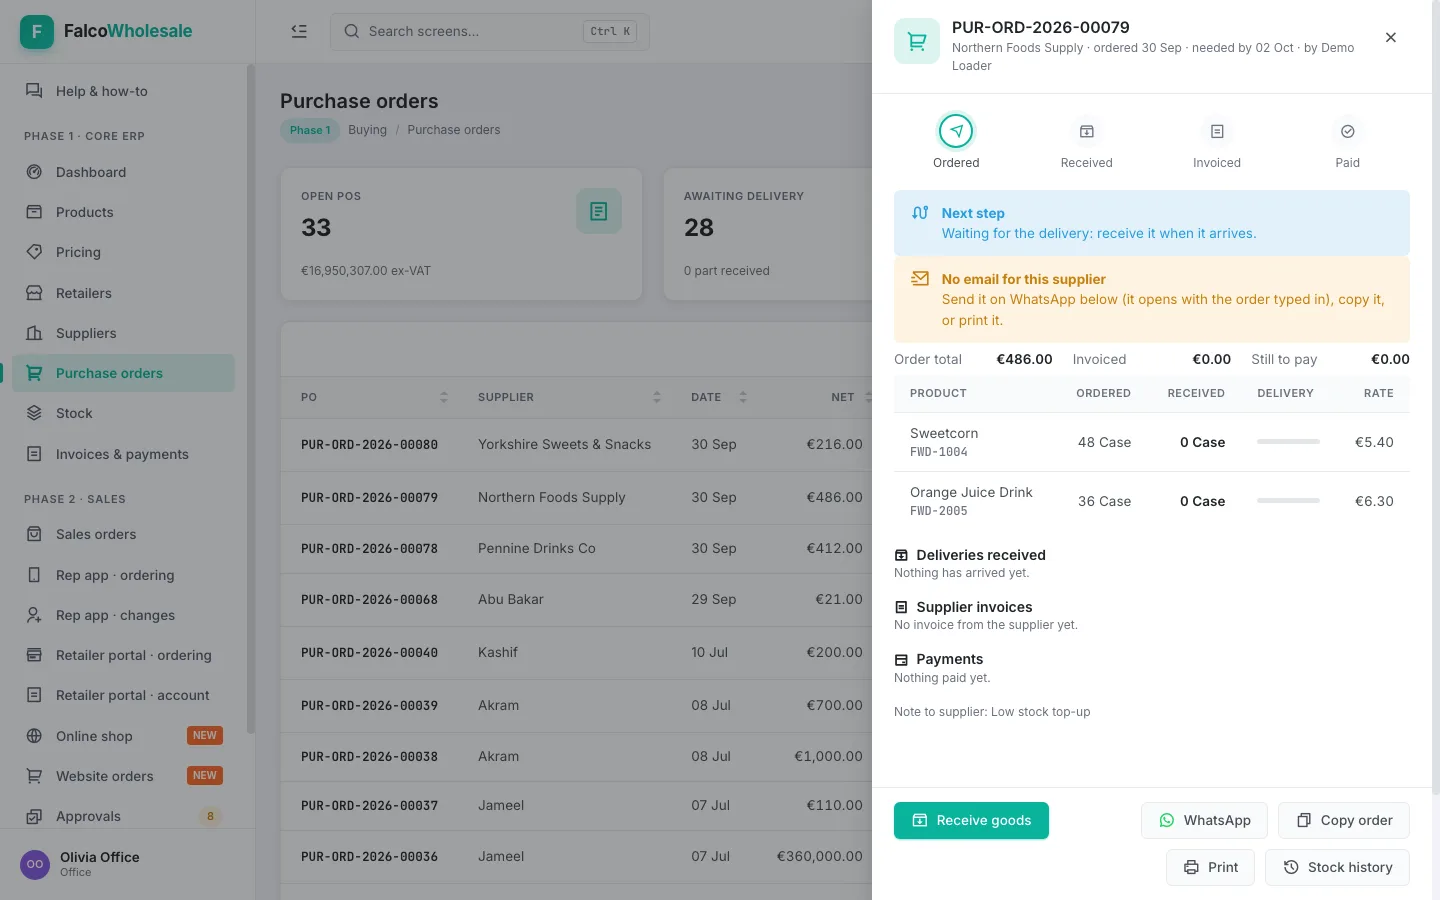
- How the supplier gets it: if the supplier has an email address, it's emailed as soon as you submit (with a PDF, each line as 4 Carton Sunflower Oil 1L @ 72.00, the total, the date you need it and the PO number to quote). Open the PO (click its row) to see whether it went, and press WhatsApp to send the same order to the supplier's mobile (it opens with the order typed in), Copy order to paste it into any message, or Print it: an A4 purchase order with your details, the supplier's, where to deliver, every line with its unit and price, the total and lines to sign, the same page the email carries. Keep the supplier's mobile, orders email and address up to date with Edit on Suppliers.
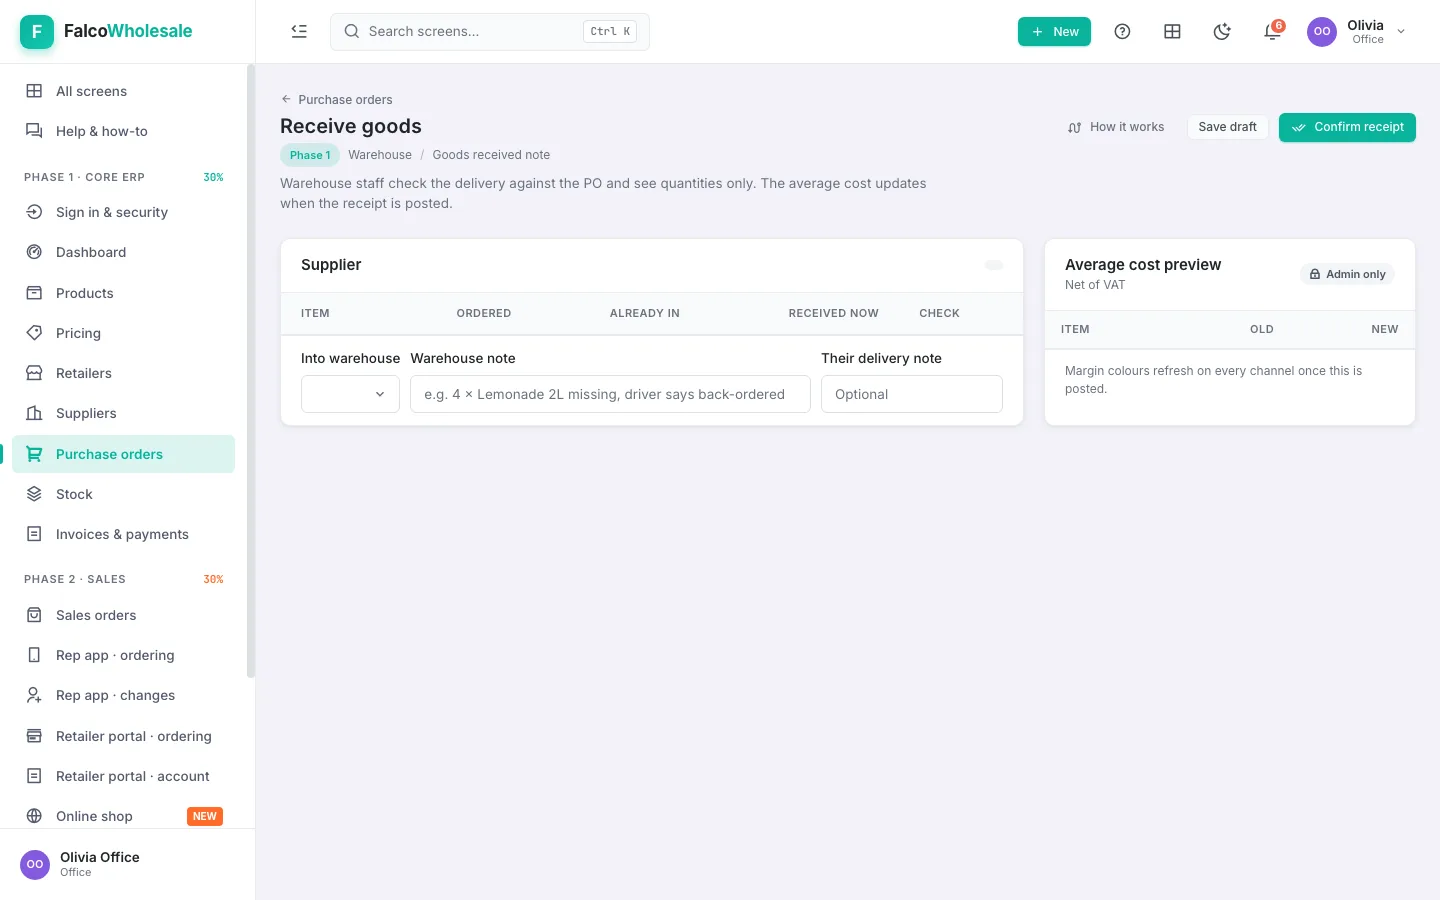
- When the delivery arrives (warehouse): Purchase orders › Receive. Type what you counted for each line, pick the warehouse it went into, add their delivery-note number, Confirm receipt. A part delivery is fine: the rest stays open on the order.
- When the supplier's invoice comes: Add invoice with their invoice number and due date.
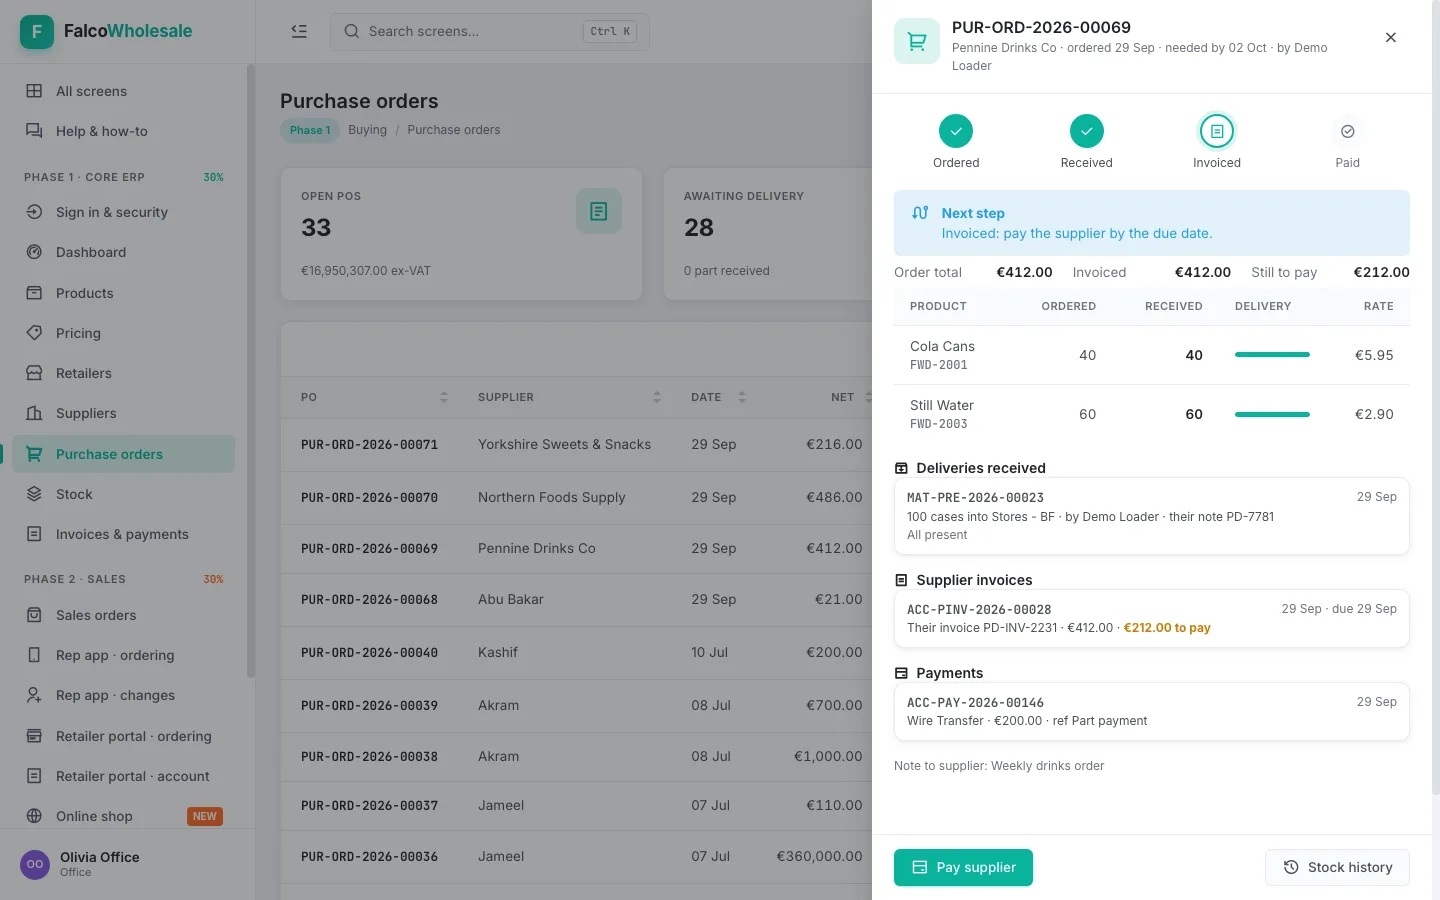
- Pay it: Pay supplier (from the tracker or Suppliers). The oldest invoices are paid first.
- Track any order: click its row. The tracker shows Ordered → Received → Invoiced → Paid, the next step in words and as a button, each line's ordered and received, every delivery (cases, which warehouse, who received it), every supplier invoice and every payment.
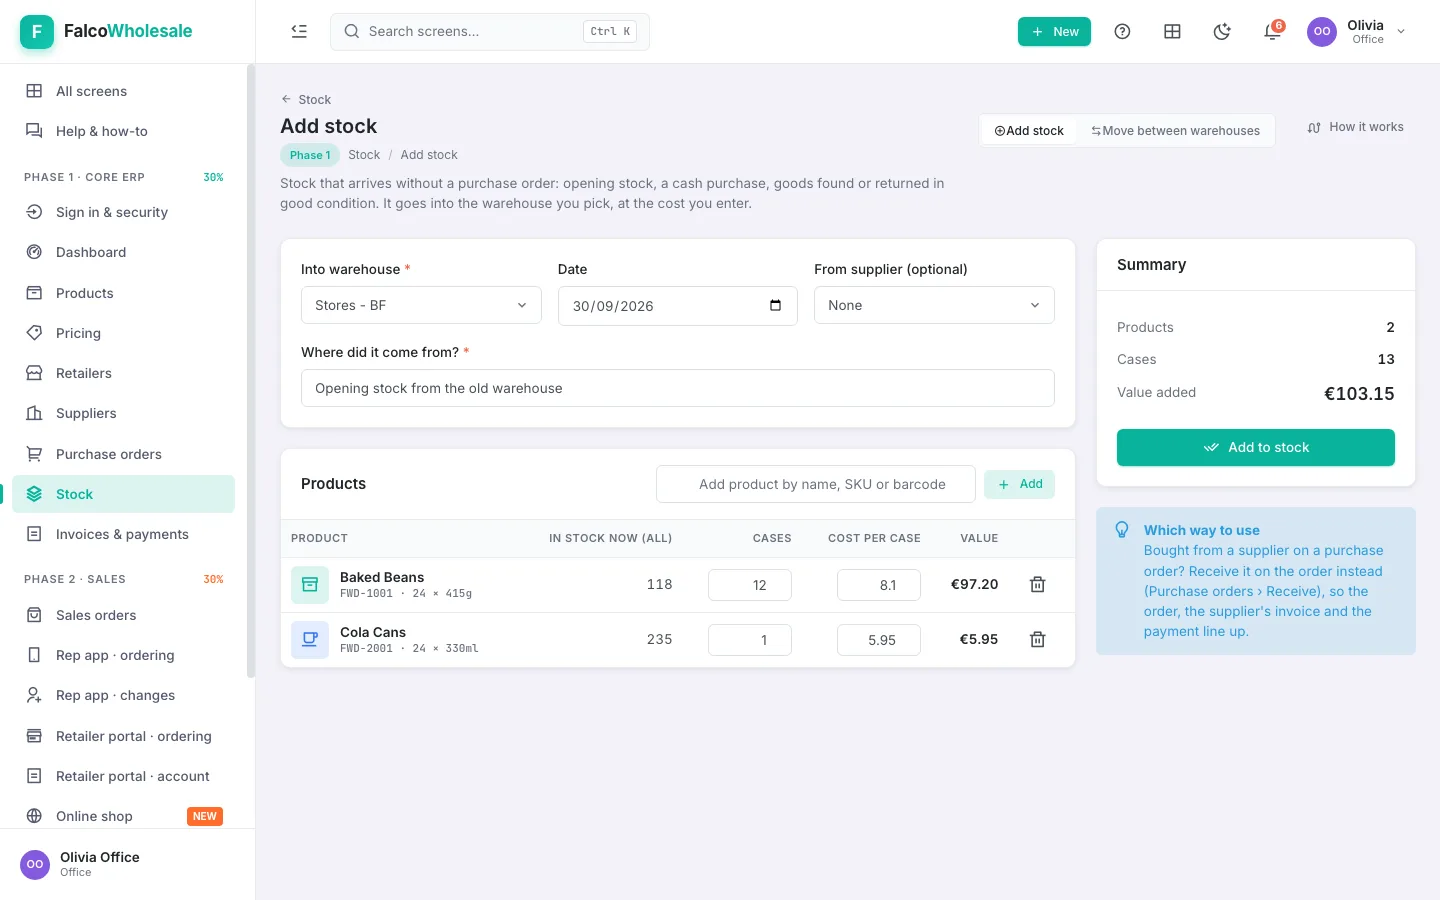
Add stock that didn't come on a purchase order
- For opening stock, a cash purchase at the cash & carry, or goods found or returned in good condition: Stock › Add stock.
- Pick the warehouse, the date (today or earlier), the supplier if there was one, and write where it came from.
- Add each product (type its name, code or scan its barcode, press Enter), the cases and the cost per case (filled with today's cost; warehouse staff don't see or set costs).
- Add to stock.
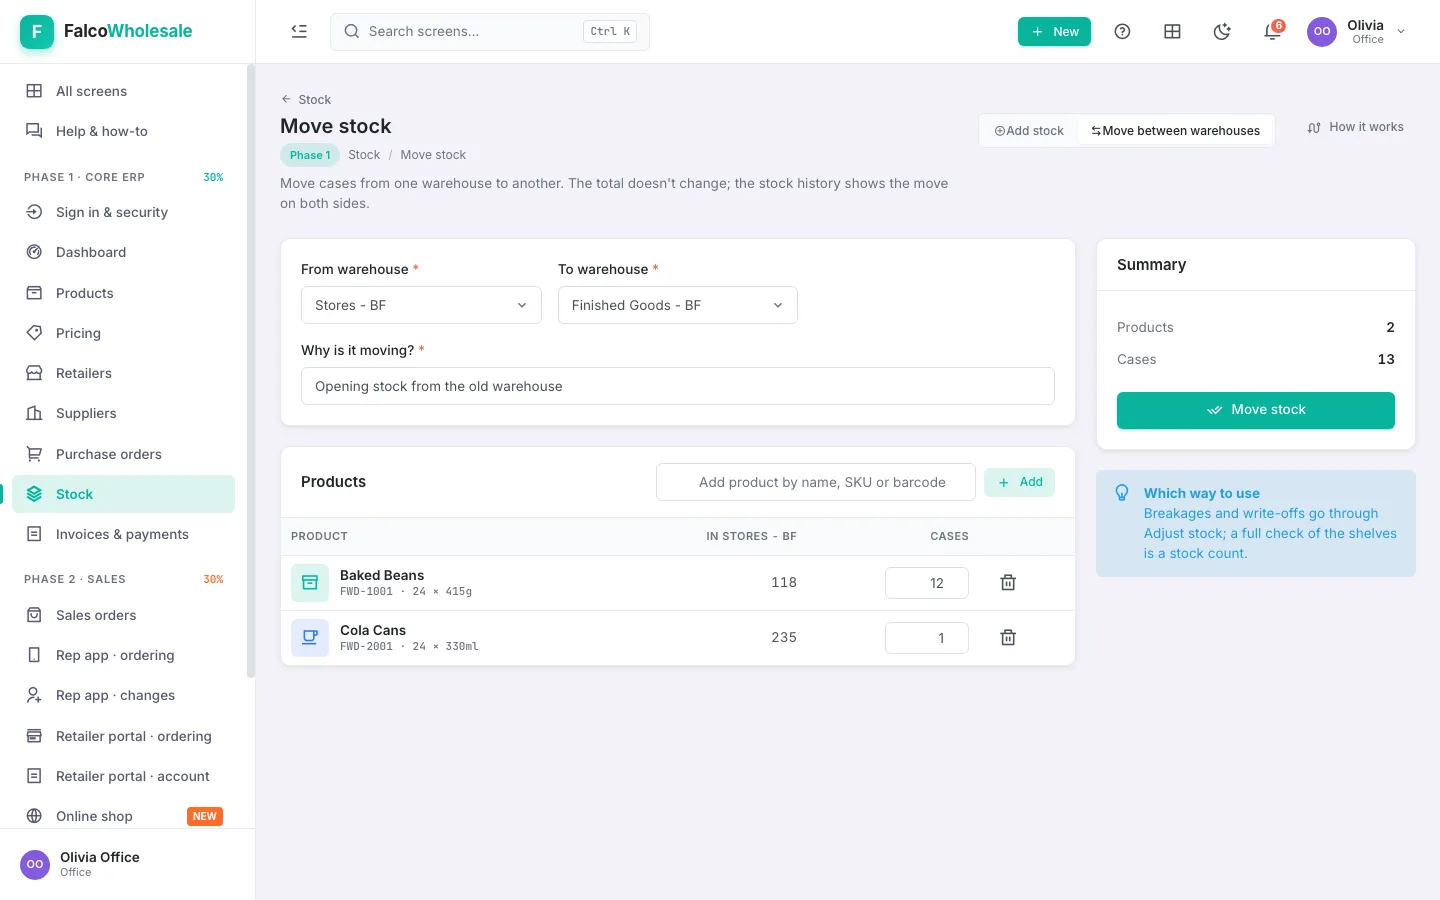
Move stock between warehouses
- Stock › Move stock: the warehouse it leaves and the one it goes to, and why.
- Add the products and cases; each line shows how many the first warehouse holds and warns when you ask for more.
- Move stock.
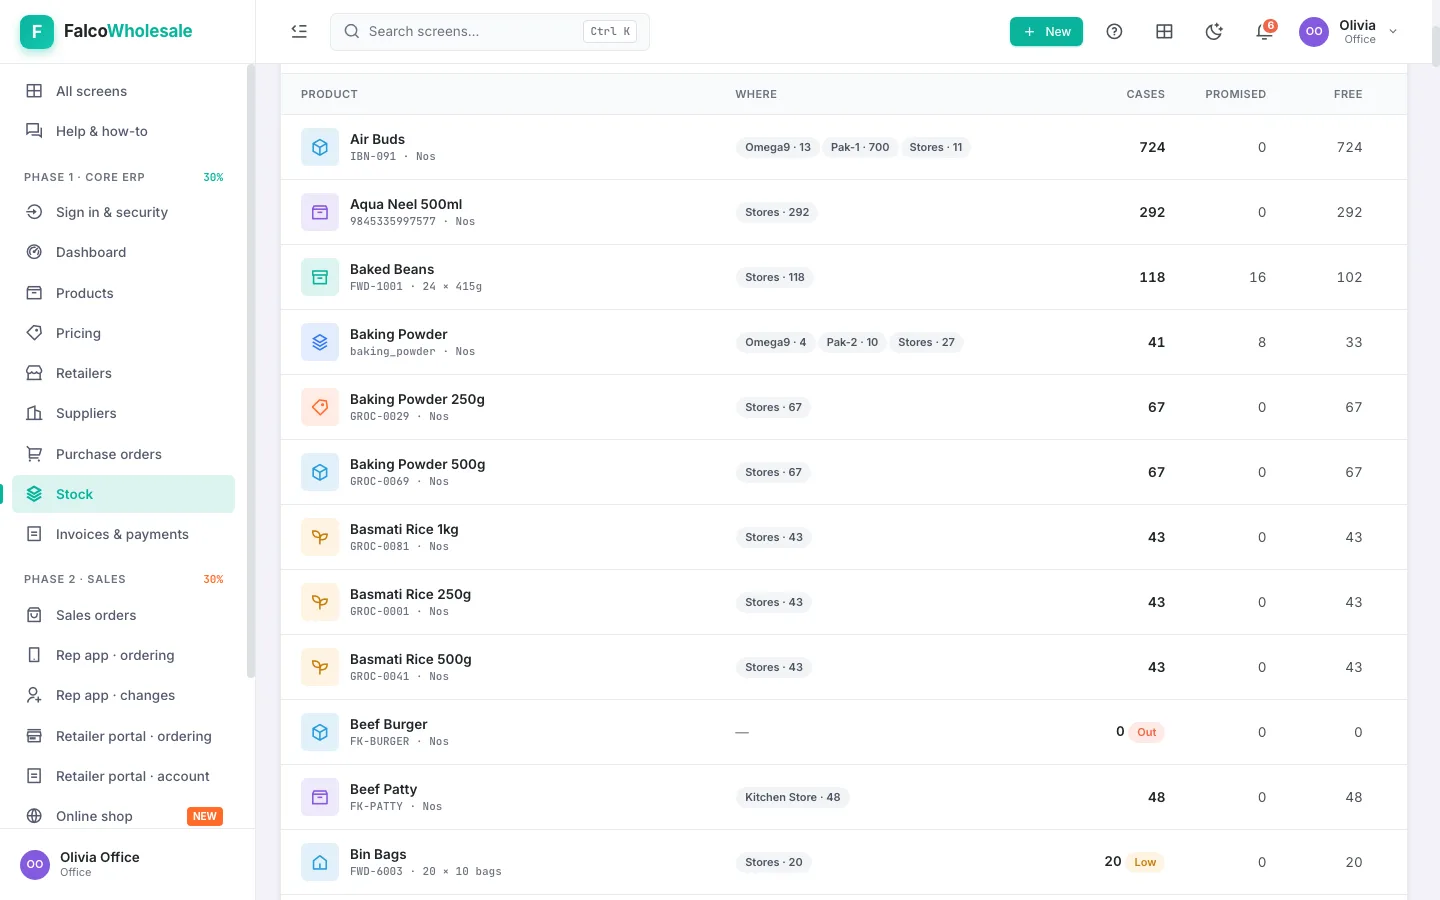
See what's where, and every movement
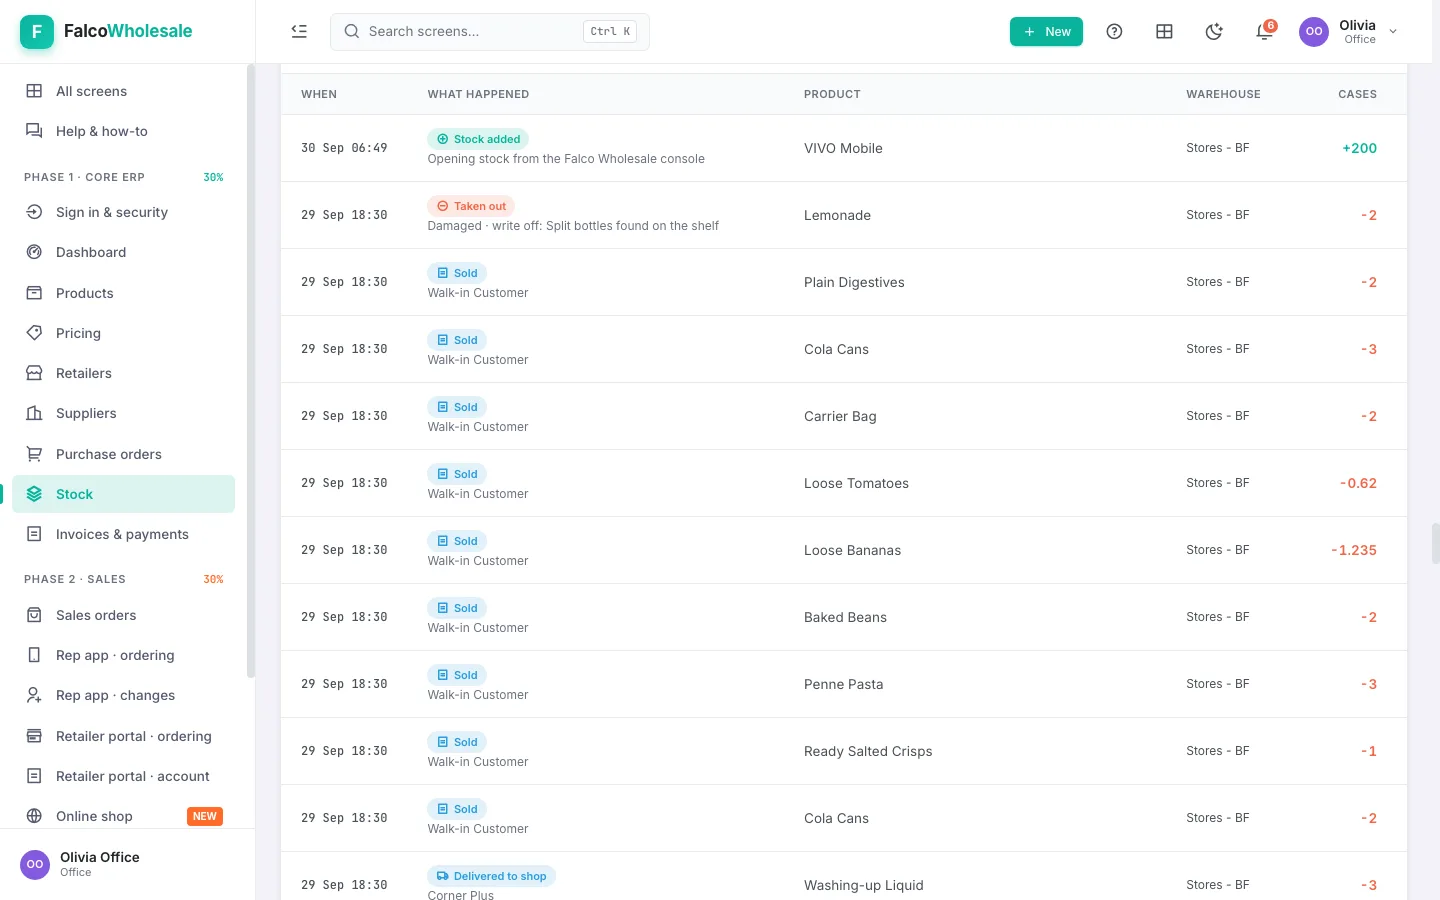
- Stock on hand: every product with how many cases each warehouse holds, what's promised to confirmed orders, what's free, and (for roles that may see cost) its value. Search, pick one warehouse, or show only what's in stock.
- Stock movements: every case in and out, newest first, in plain words: Received from supplier, Sold (on an invoice, with the shop), Delivered to shop, Sold at the till, Stock added, Moved between warehouses, Taken out, Stock count, with the warehouse, the cases, what was left, the document and who did it.
- History on a product shows just that product's movements.
- Breakages and write-offs: Adjust stock. A full check of the shelves: Start stock count, count, then post the differences.
Warehouse
Getting each order off the shelf and onto the right van, in the right order, with its paperwork. Use a computer or a tablet in the warehouse.
Pick each order
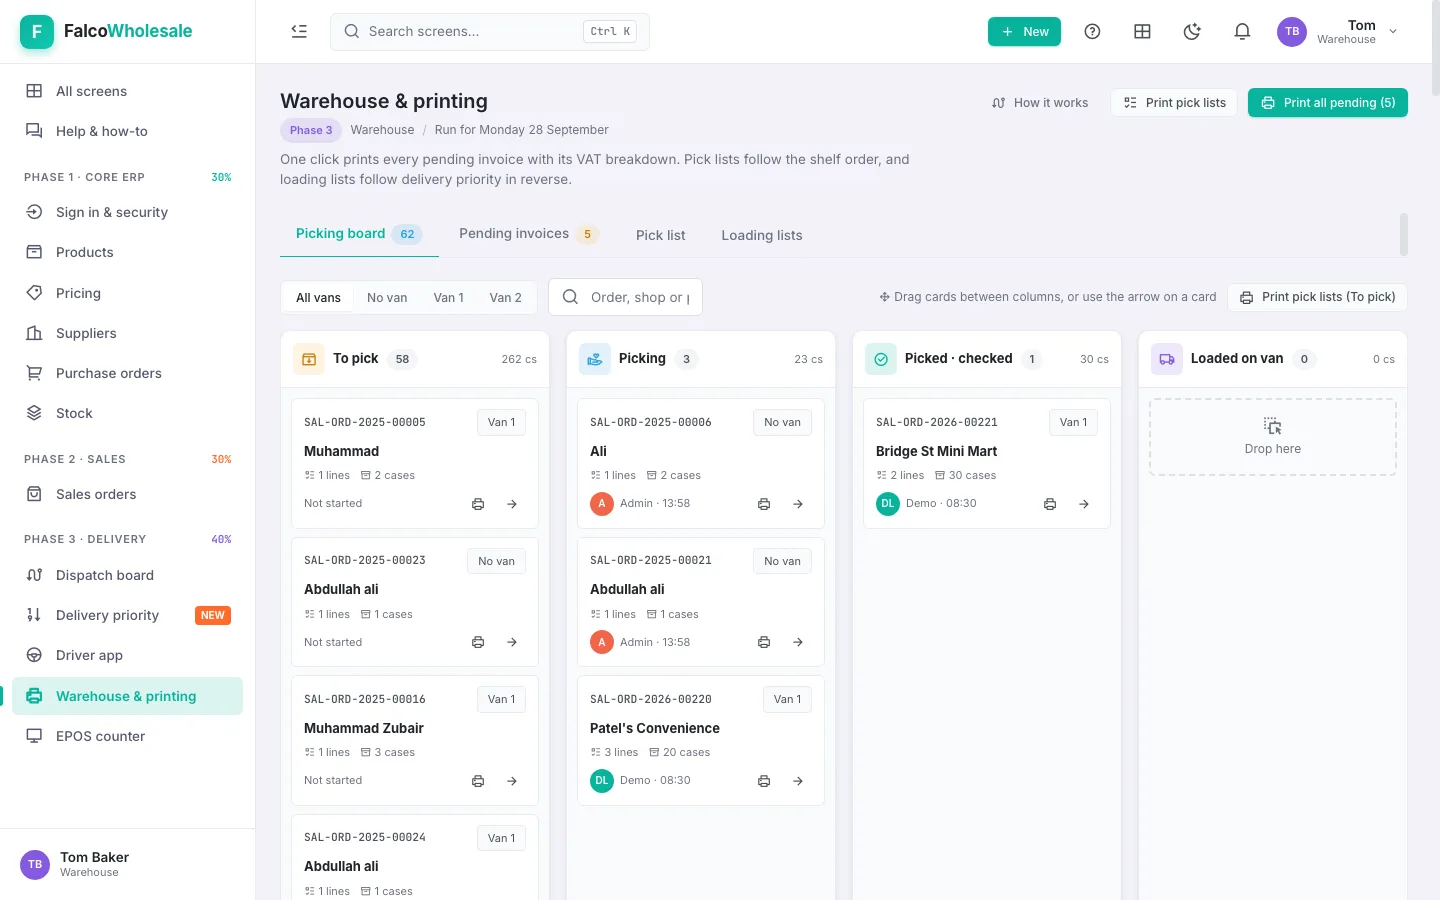
- The Picking board shows today's orders in columns: To pick → Picking → Picked → Loaded.
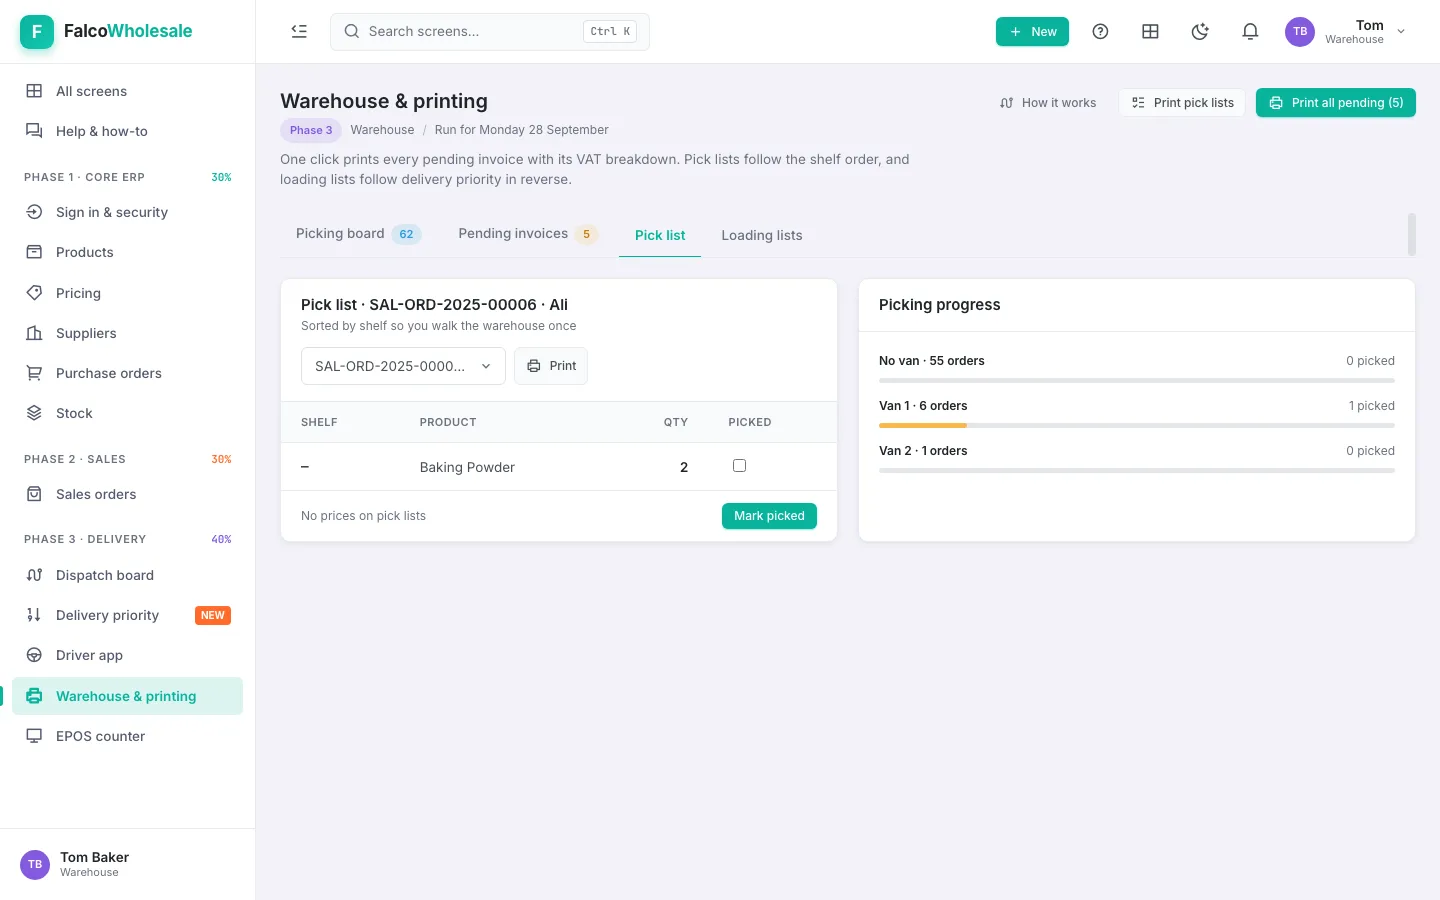
- Open the Pick list for an order: lines sorted by shelf location, with no prices. Print it or pick from the screen.
- Drag the card to Picking as you start and Picked when done. A card can't go to Loaded before it's picked.
Invoices for the van, and loading in the right order
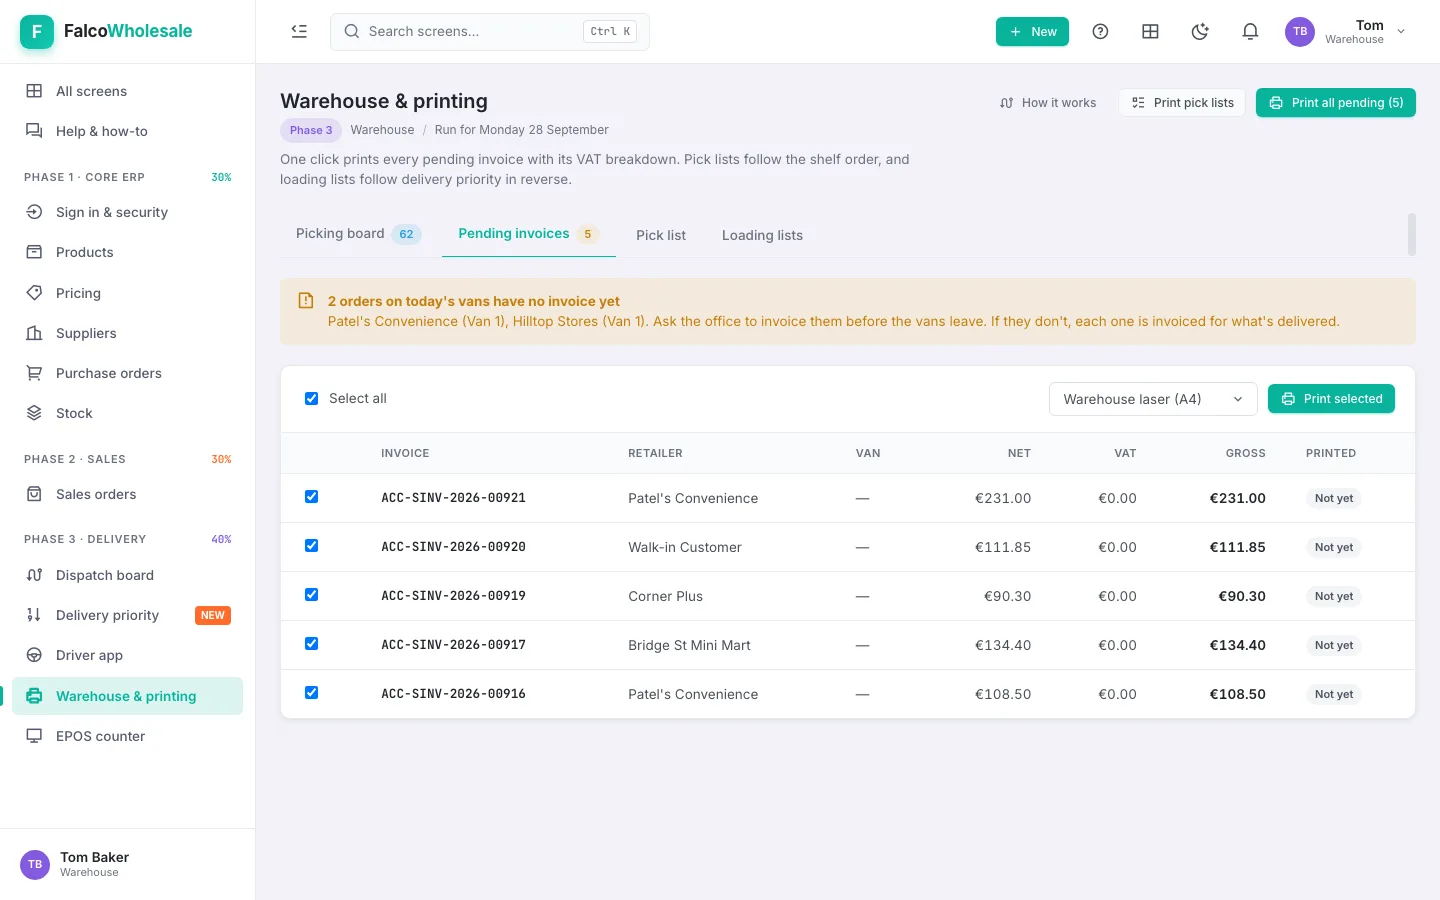
- Pending invoices: if orders on today's vans have no invoice yet, a yellow banner says so. Invoice them now (office staff), then print the selected invoices to go with the van.
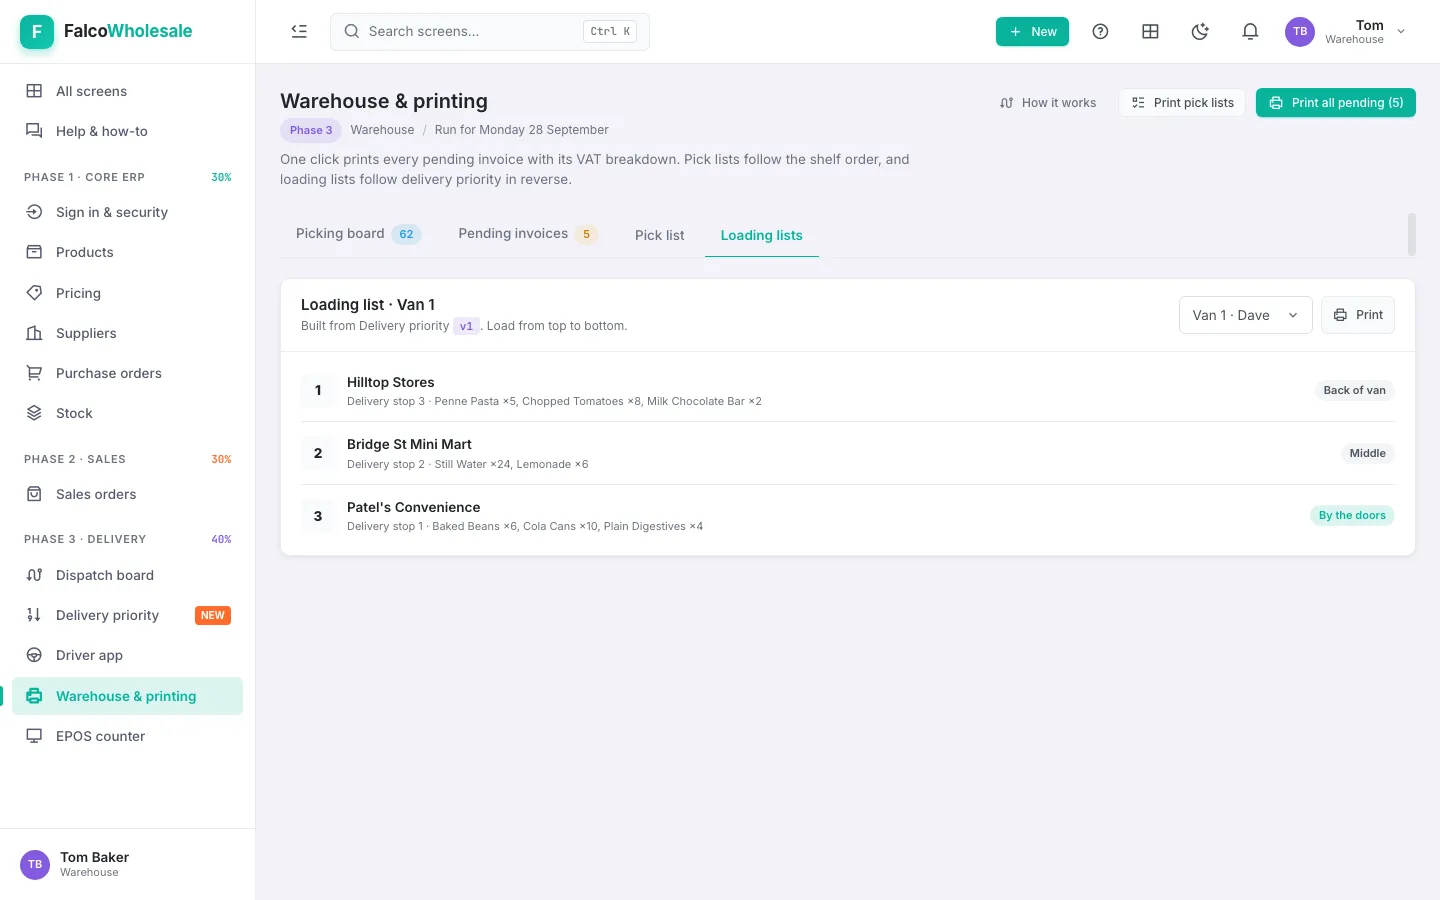
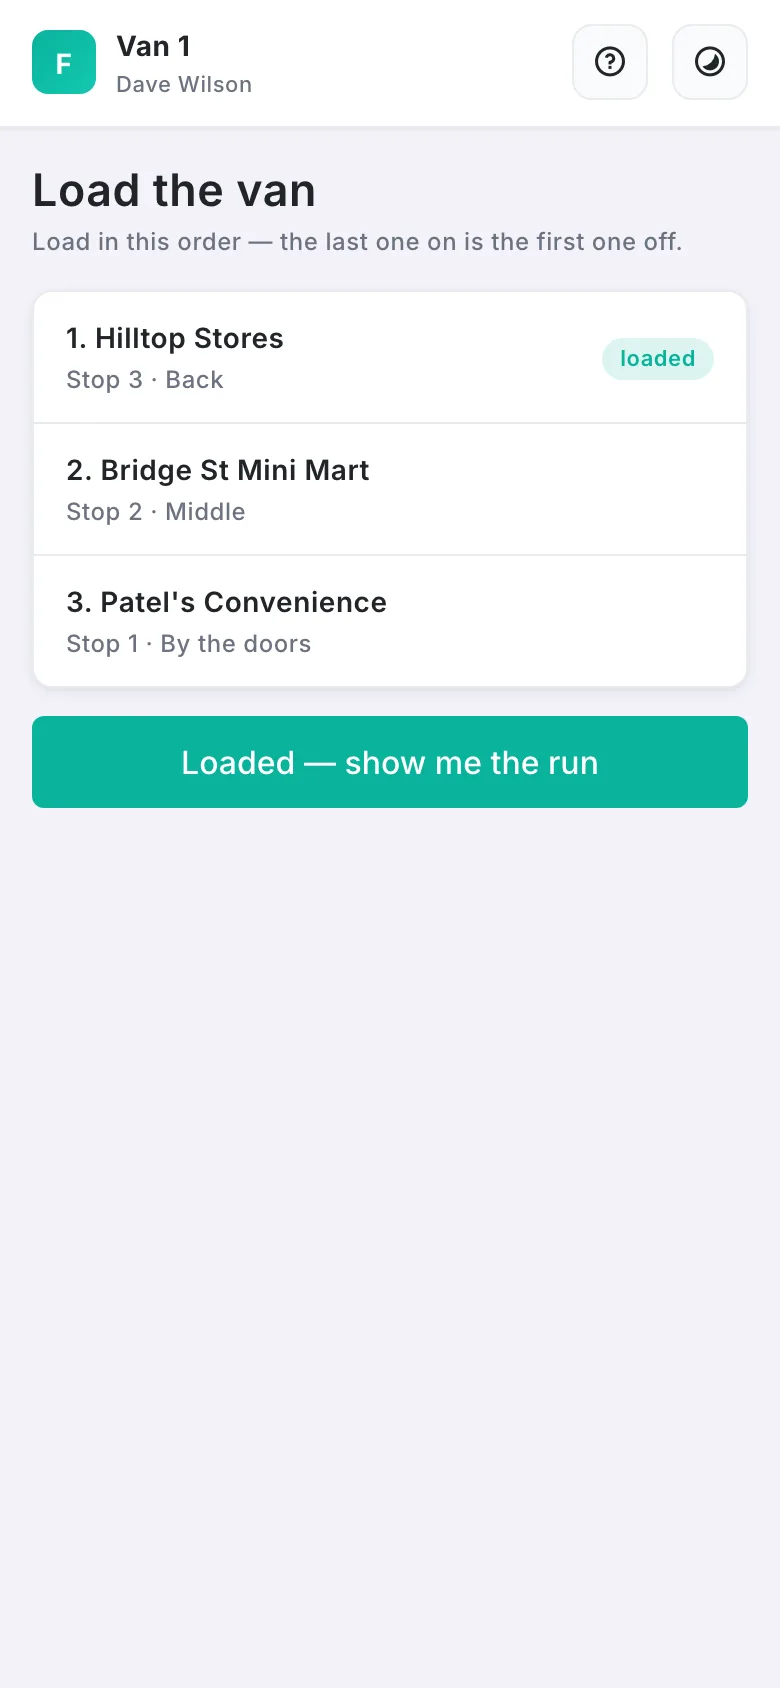
- Loading lists: for each van, the last stop is loaded first (at the back), the first stop last (by the doors).
- Drag each picked order to Loaded as it goes on.
Sales rep
Everything a rep does, on their phone, at the shop. It keeps working with no signal and sends the orders when the connection comes back.
Take an order at a shop
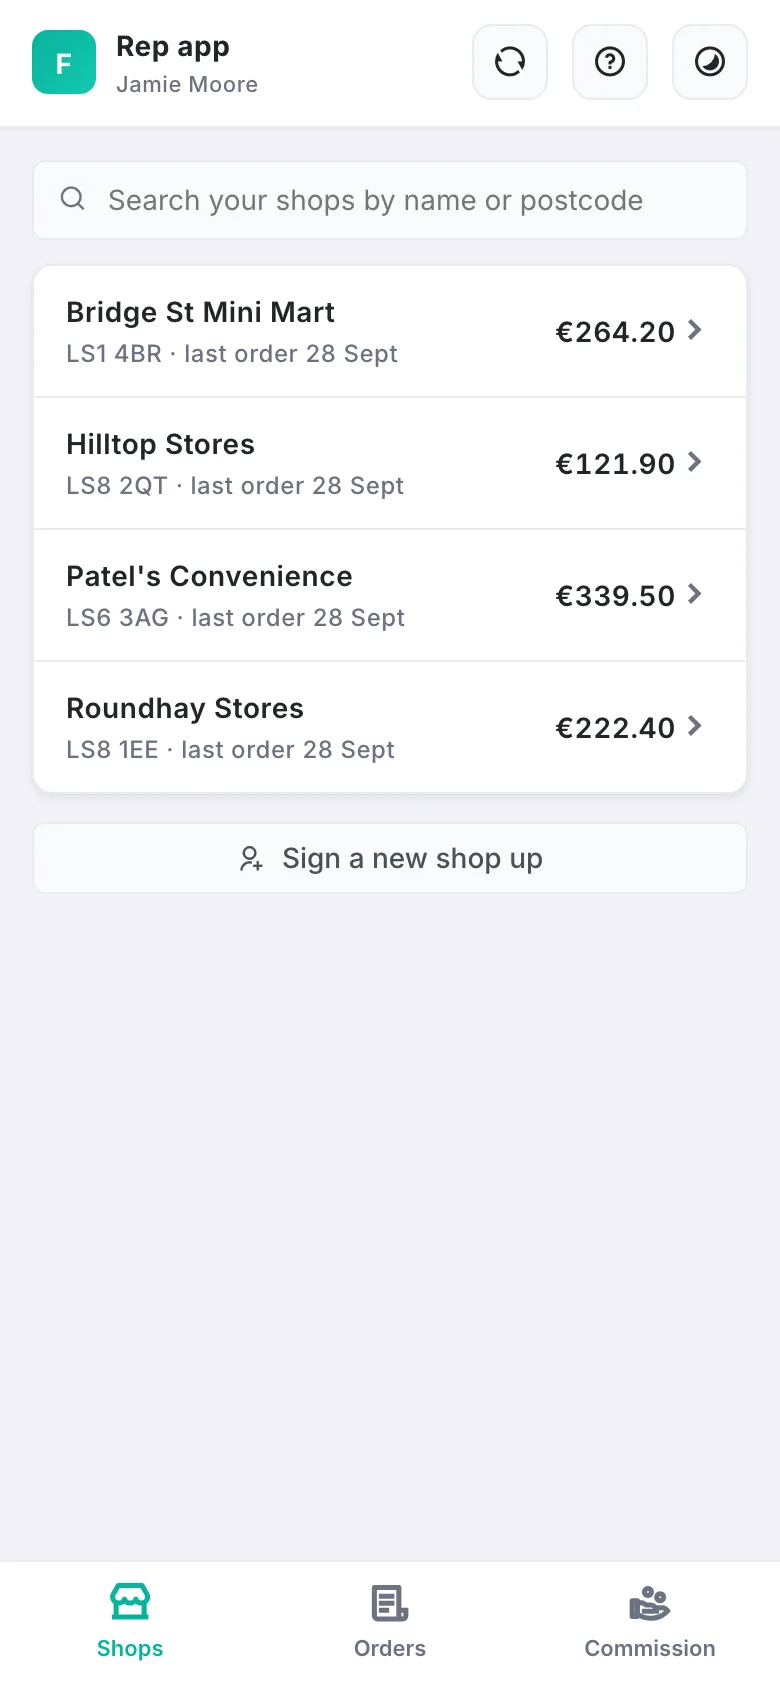
- Shops lists only your shops (plus any you're covering), with each one's postcode, what it owes and when it last ordered. Search by name or postcode.
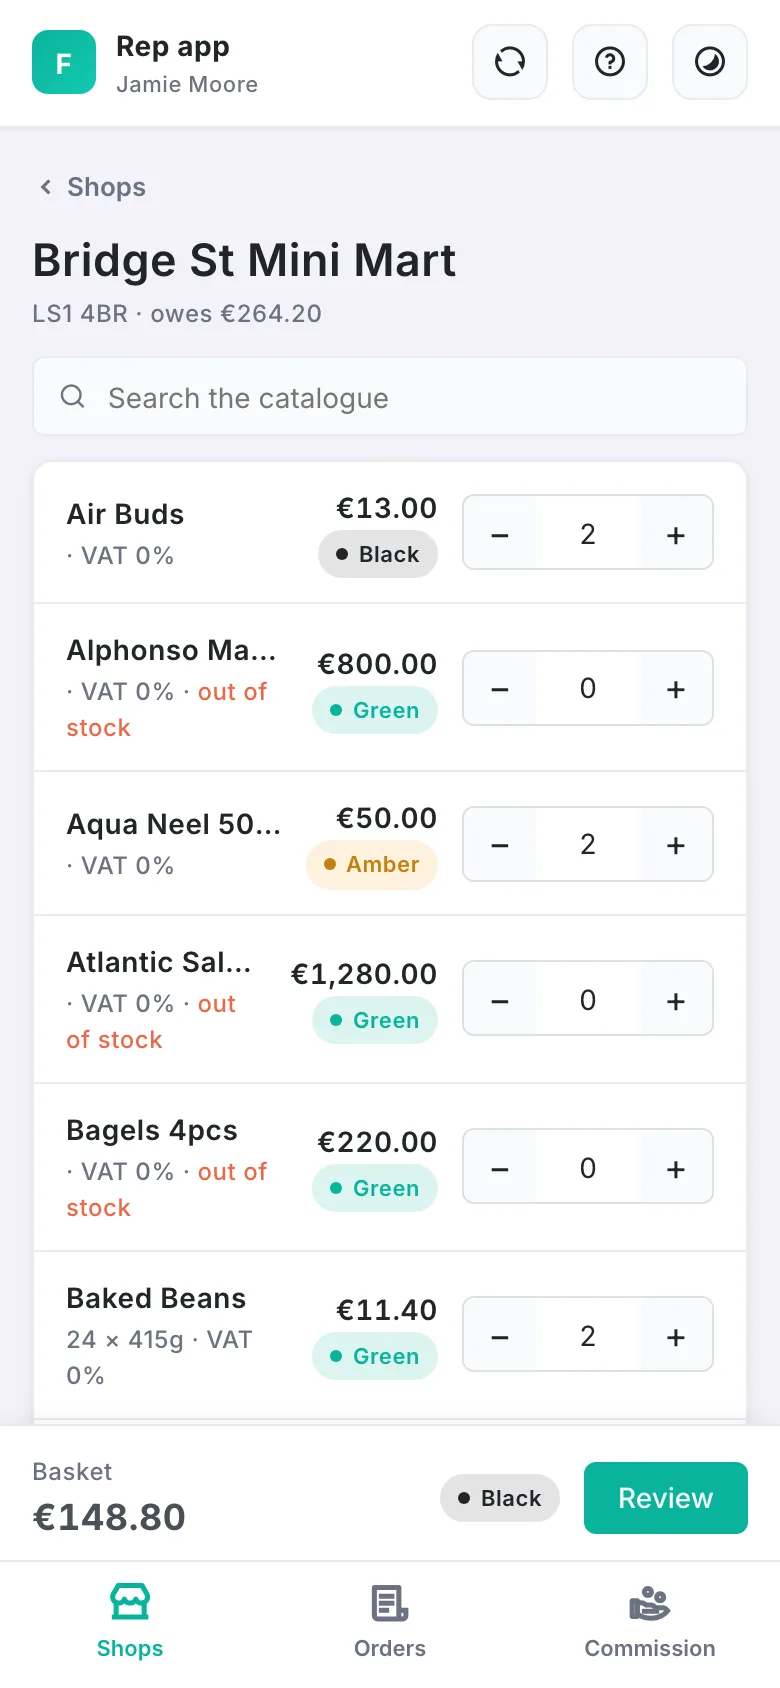
- Tap the shop. The catalogue shows this shop's prices, promotions and stock; the colour badge shows the margin.
- Tap + for each case (or type the number). The basket total and colour follow along at the bottom.
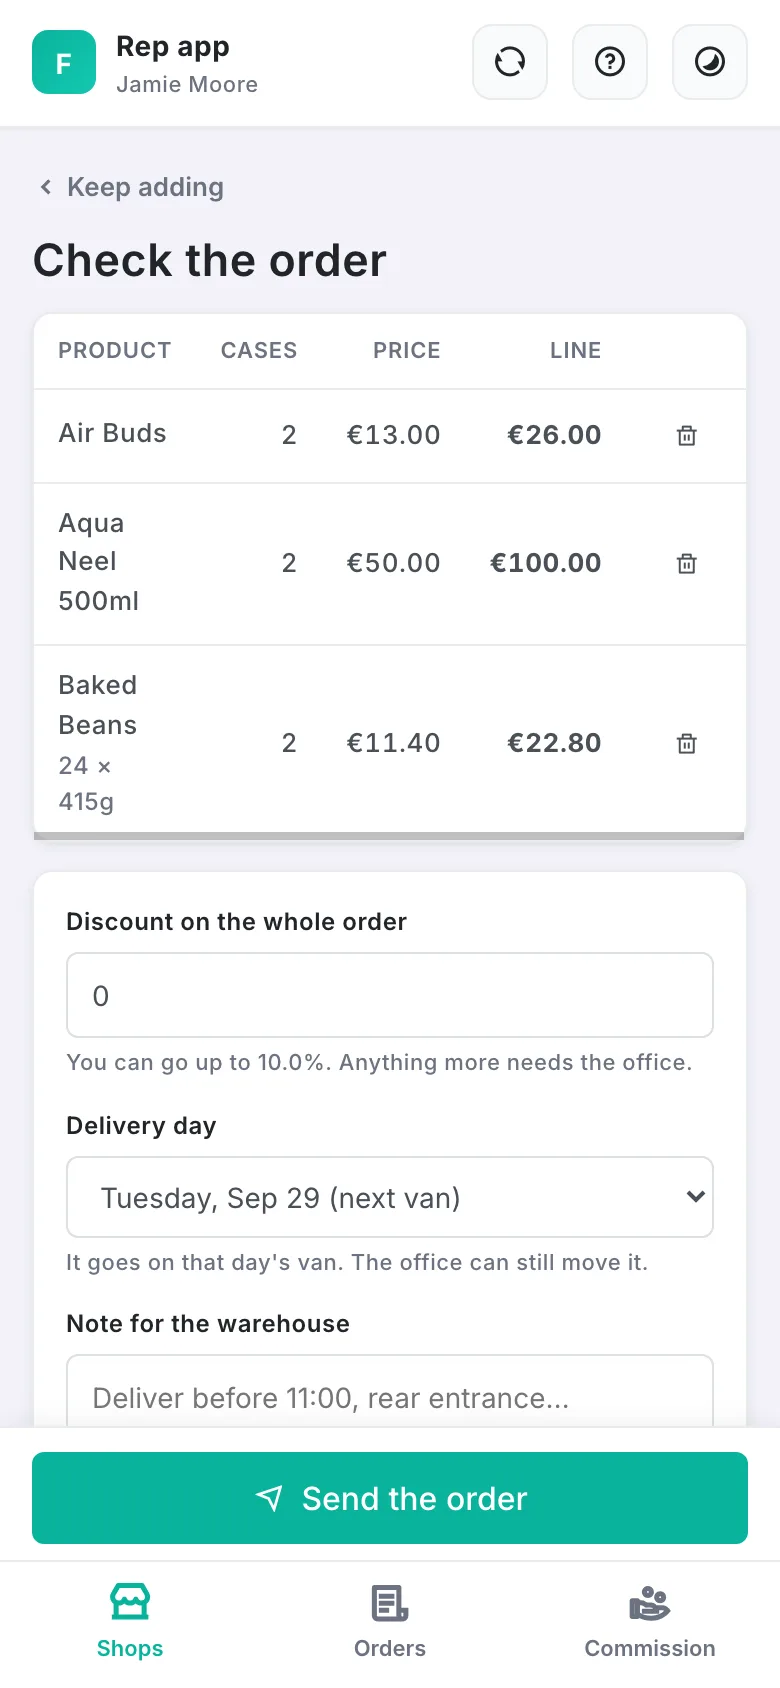
- Review: check the lines, add a discount (up to your limit), pick the delivery day (tomorrow onwards, no Sundays) and a note for the driver.
- Send the order.
Check your orders and ask for a change
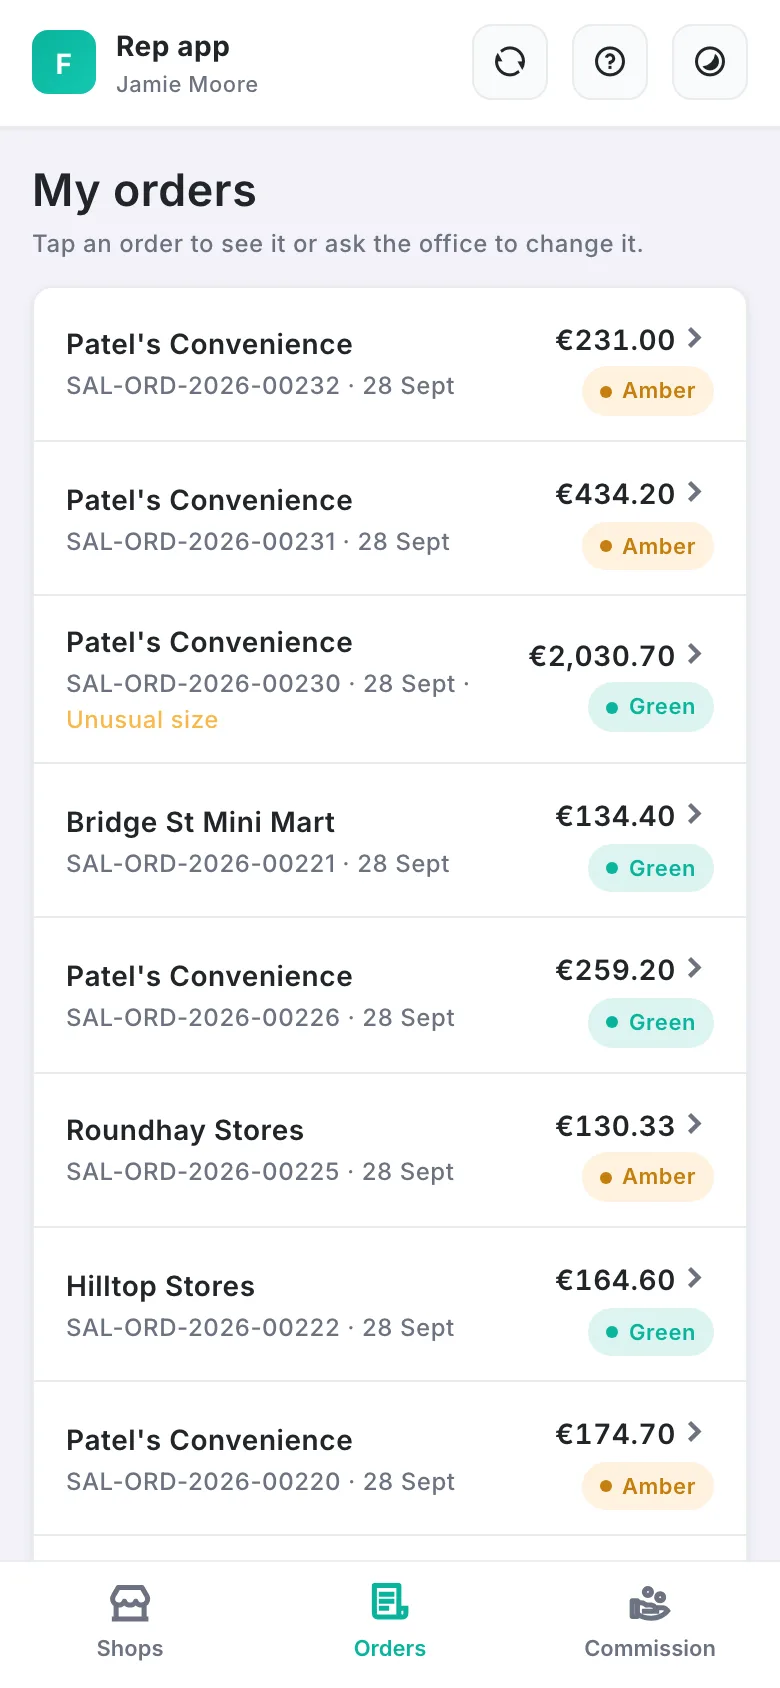
- Orders lists your recent orders and where they are.
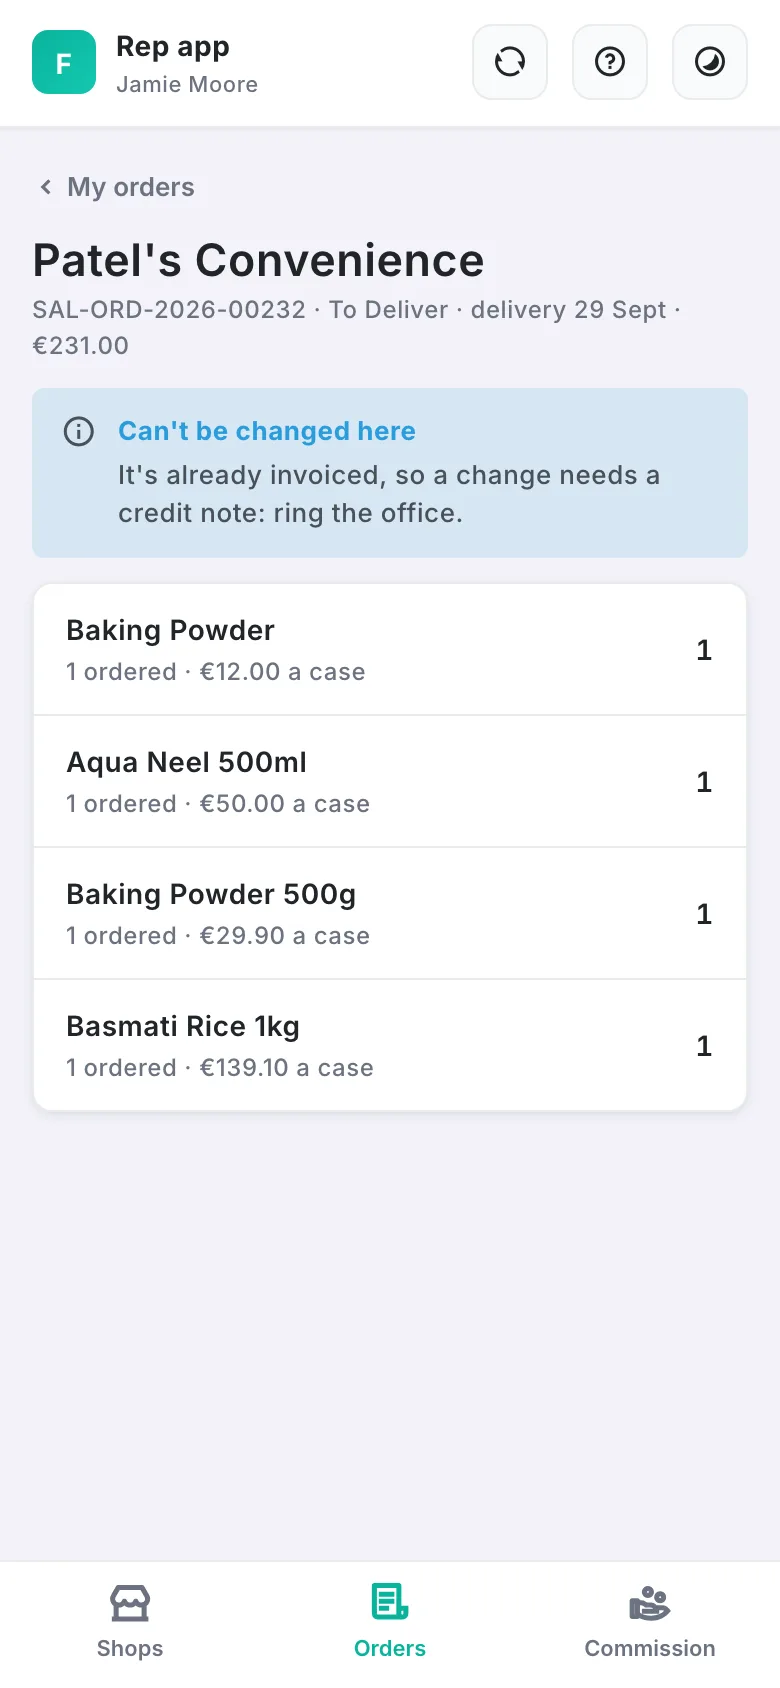
- Tap one to see its lines. While it's not yet delivered or invoiced, change the quantities, give a reason and tap Ask the office for this change.
- The office approves it in Approvals › Changes. Until then the order says a change is waiting.
Sign up a new shop, see your commission
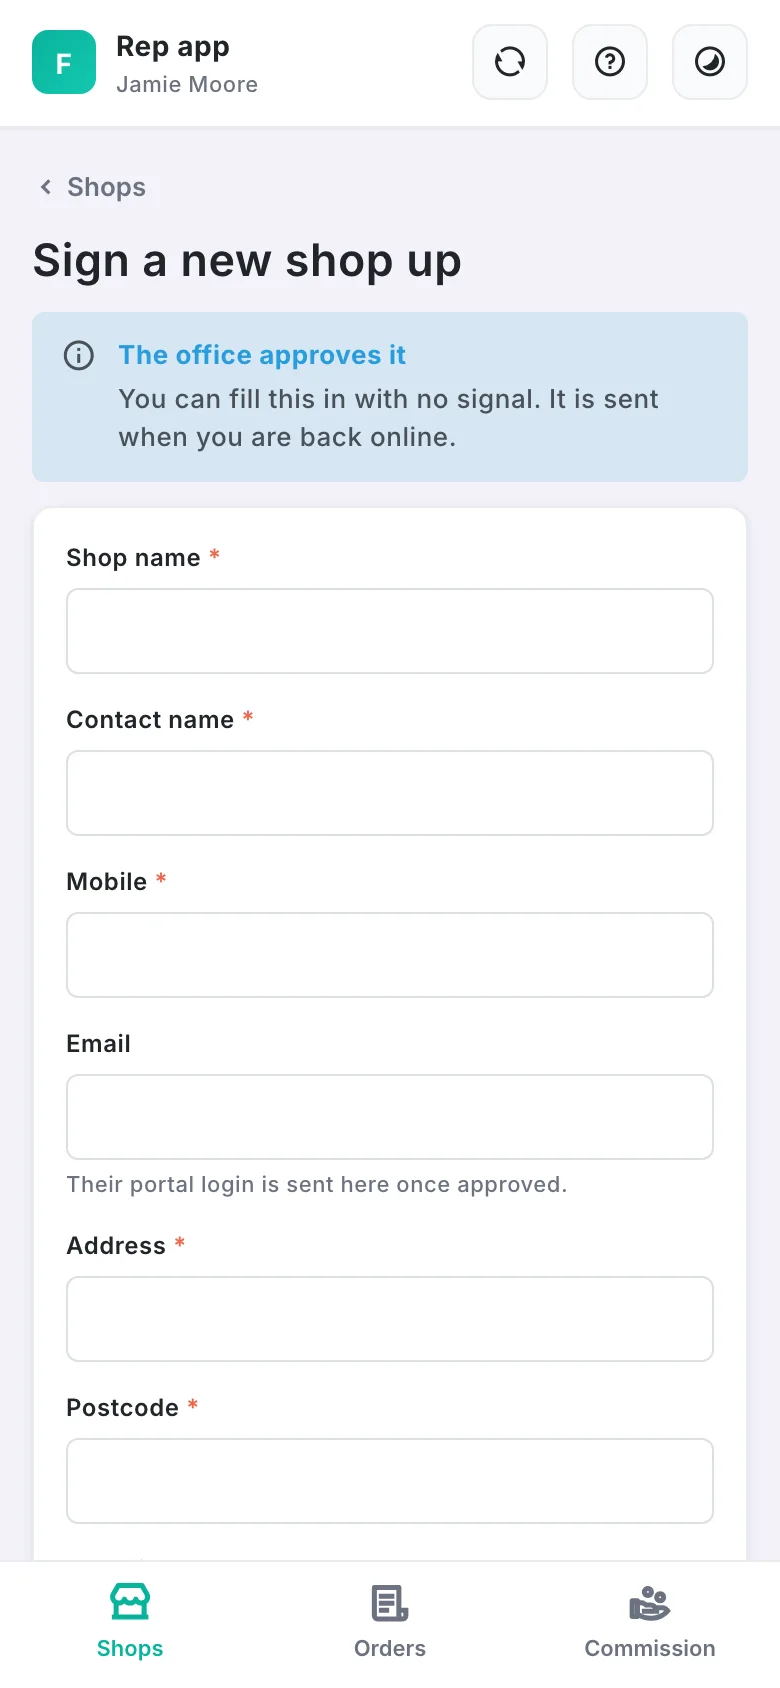
- On Shops, Sign a new shop up: name, contact, mobile, email, address, postcode. It goes to the office in Approvals › New shops.
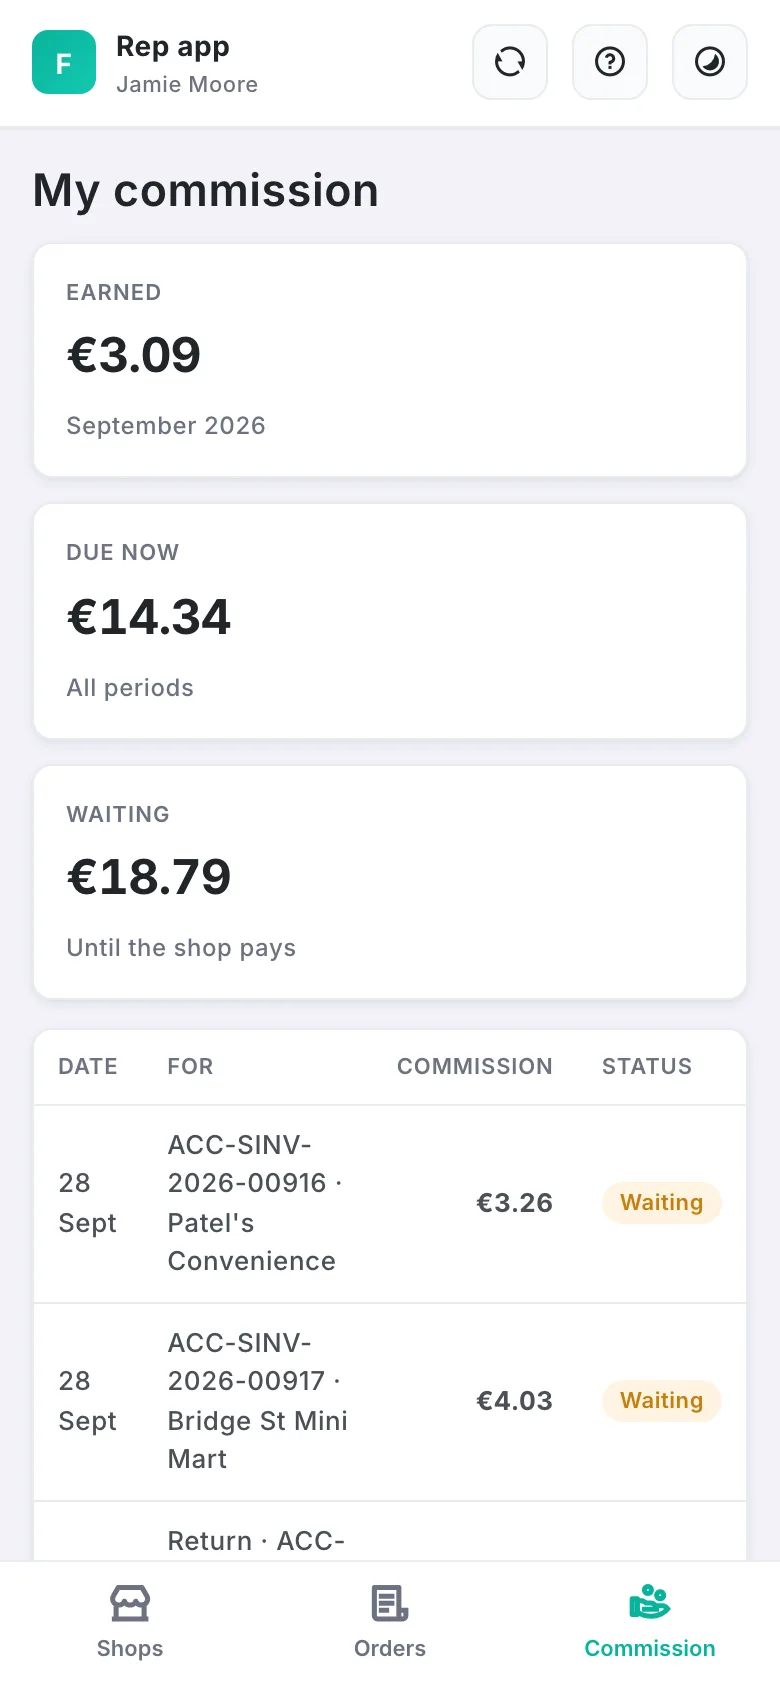
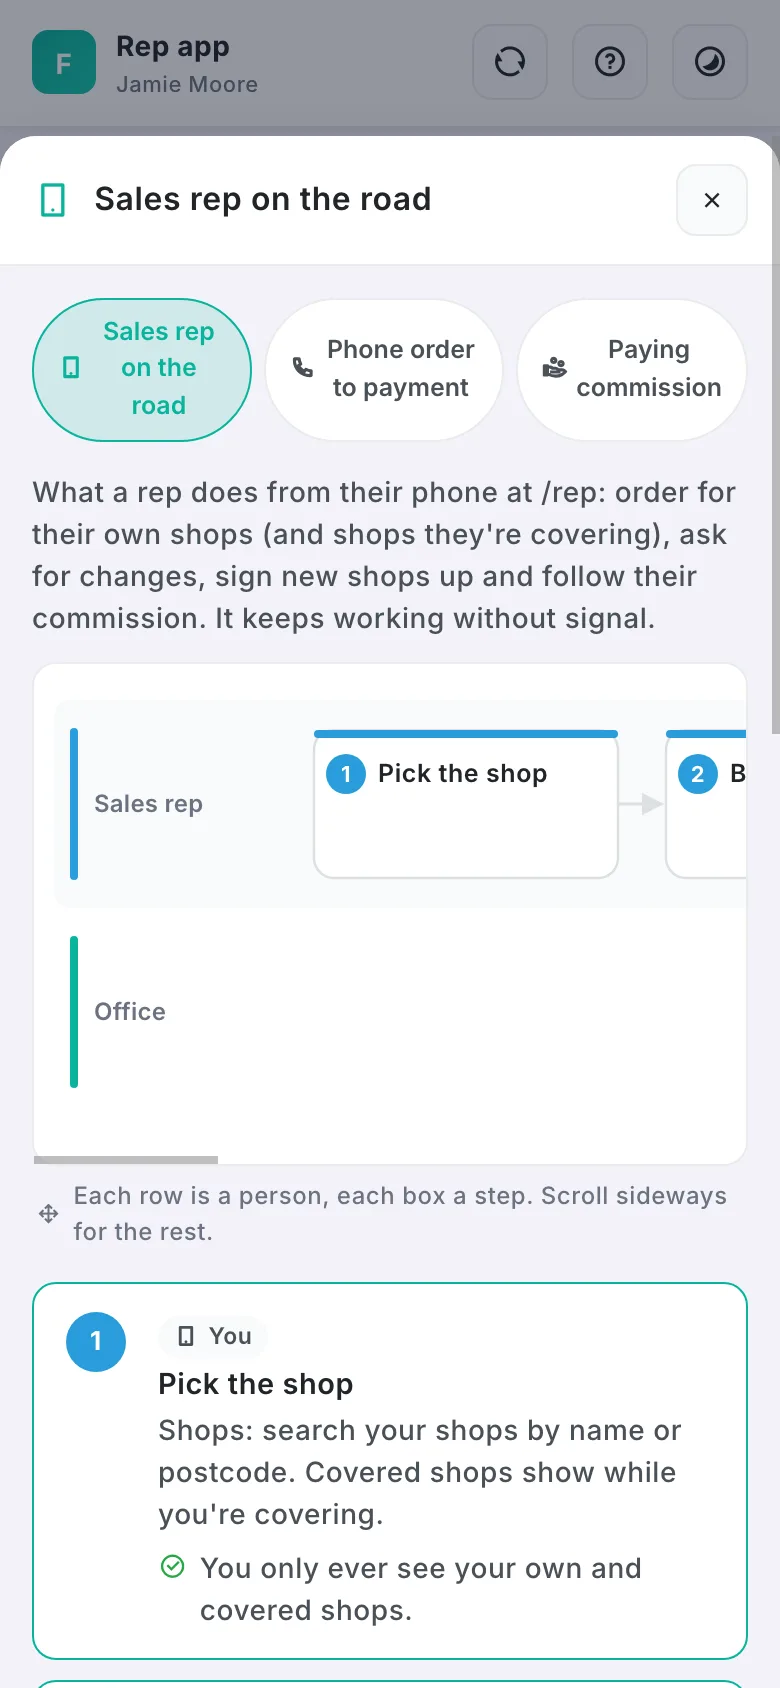
- Commission: what you've earned this period, what's due and paid, and your target.
- The ? at the top shows the rep's step-by-step guide as a diagram; the circle arrows send anything waiting and refresh.
Driver
The driver's whole day, on their phone. They only ever see their own van. No signal? Everything is saved and sent in order later.
Van check
- Open the app: it shows today's van. (No run yet? It says "No run for you today" with Check again: the office may not have published yet.)
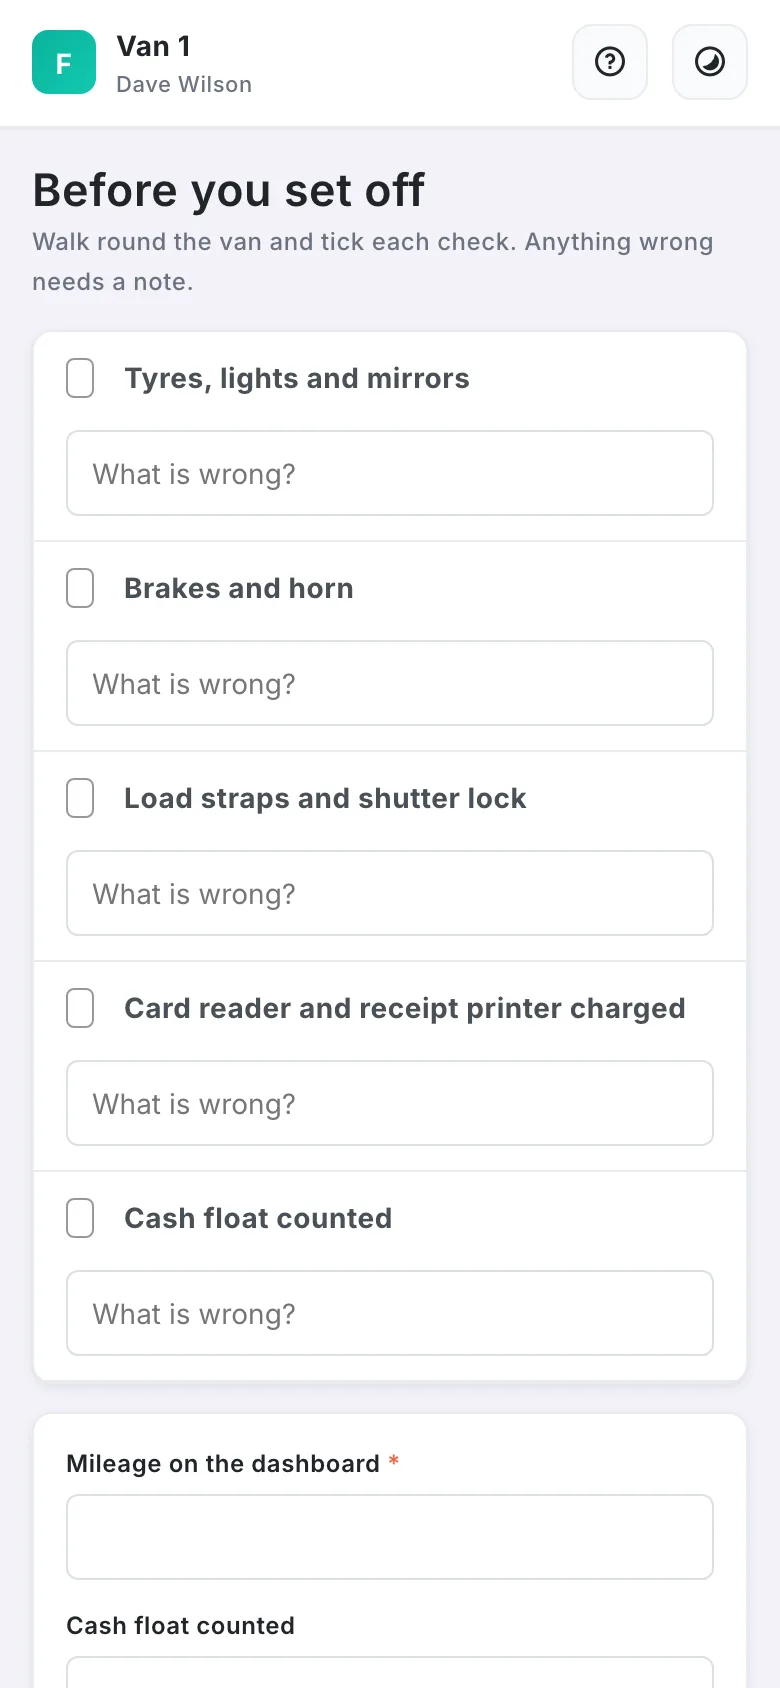
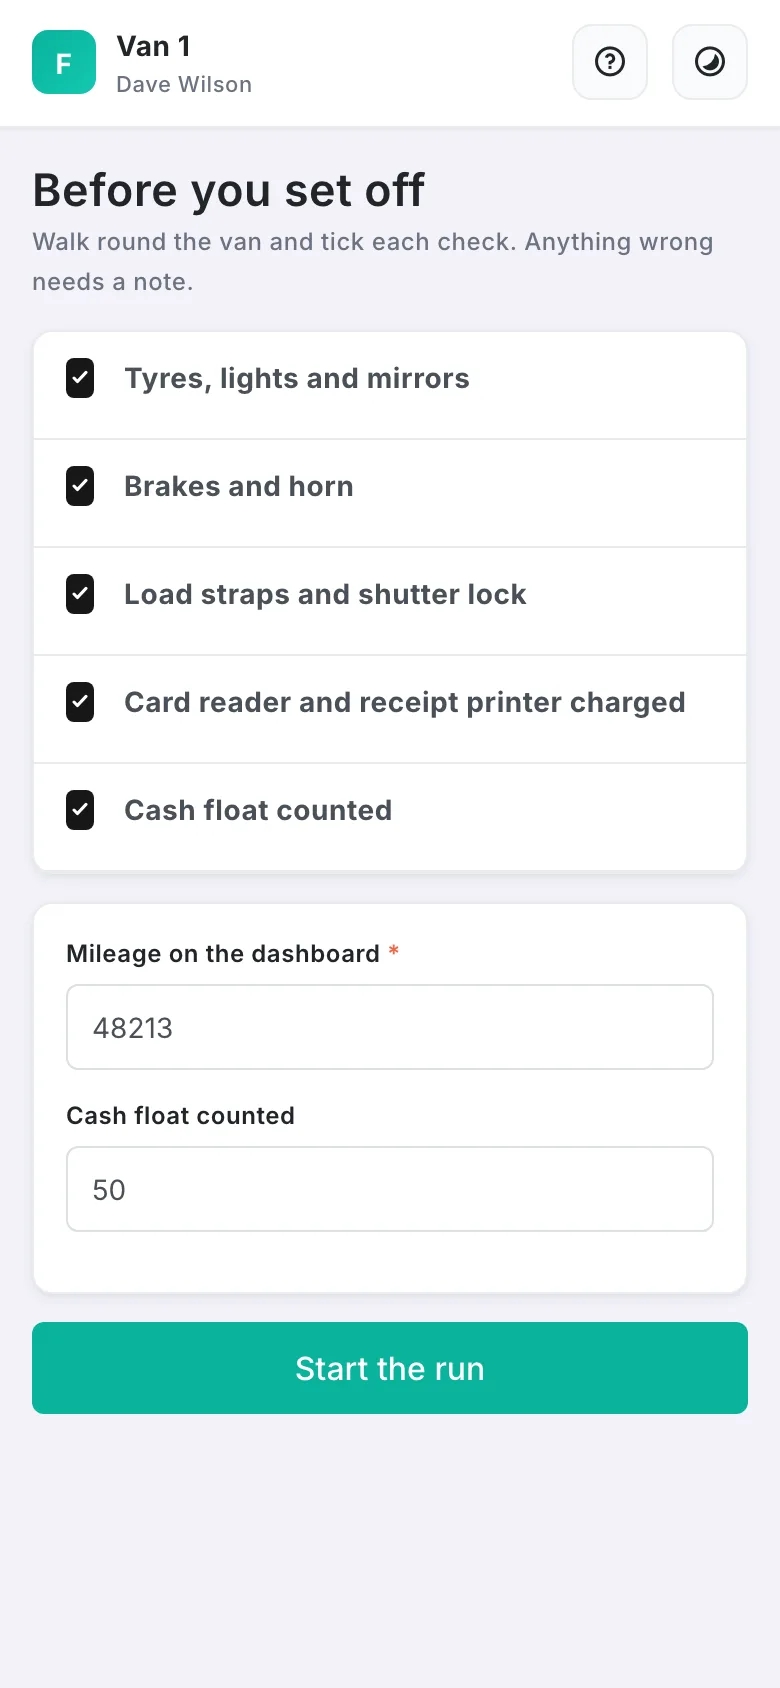
- Tick each check (tyres, lights, straps…) and note any fault.
- Type the mileage on the dashboard and the cash float you're taking.
- Start the run: the loading list opens.
Load the van
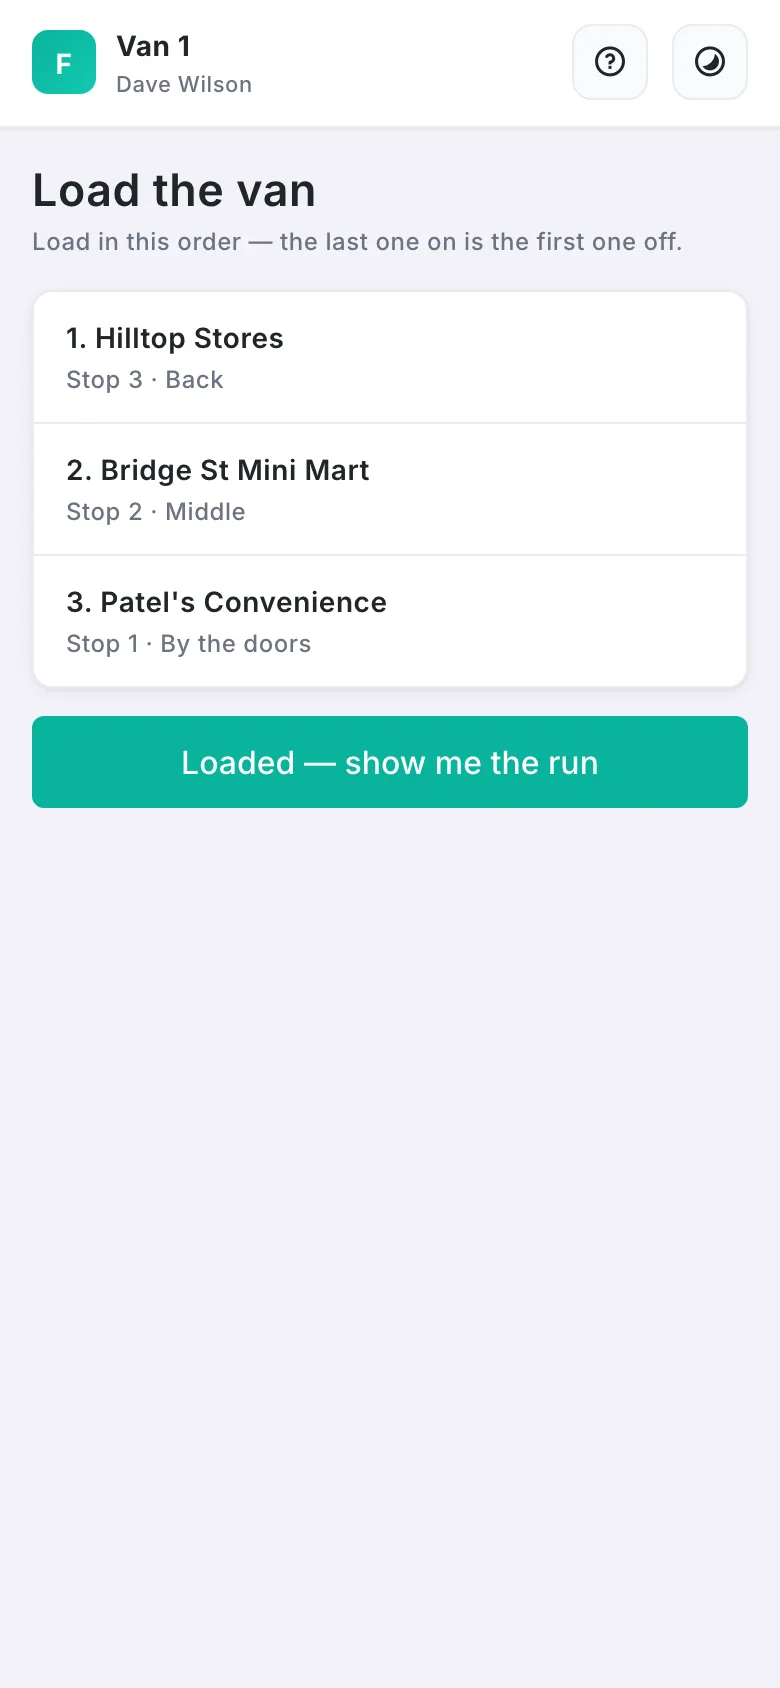
- The list is in loading order: the last stop first.
- Tap each order as it goes on the van (or scan it). The count goes up.
- When everything is on, Loaded — show me the run.
Deliver each stop and take payment
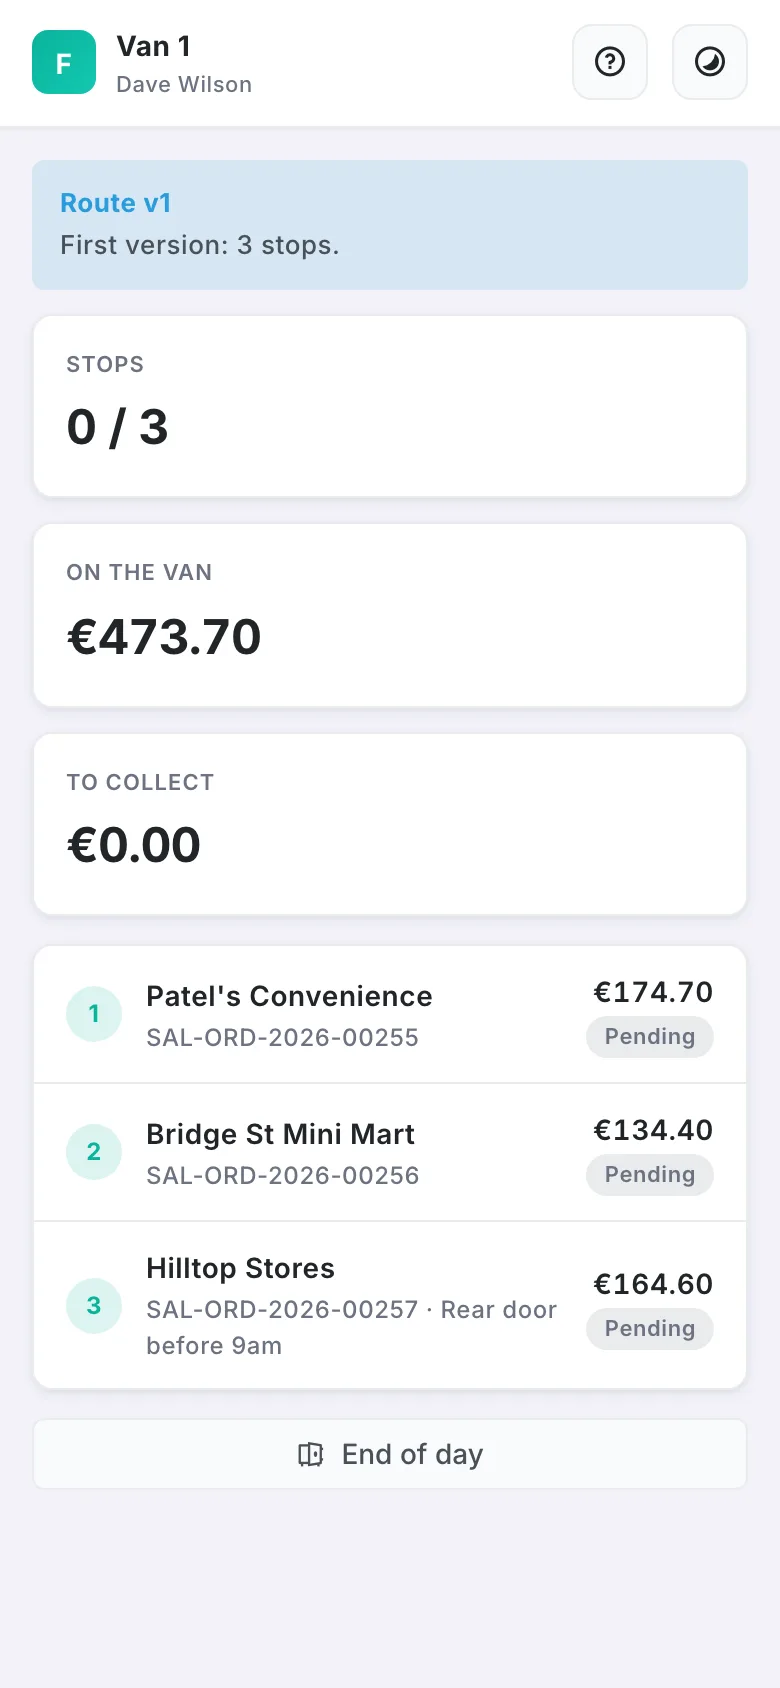
- The run list shows the stops in order with what to collect. If the office changes the order, a banner at the top says which version you have and what changed.
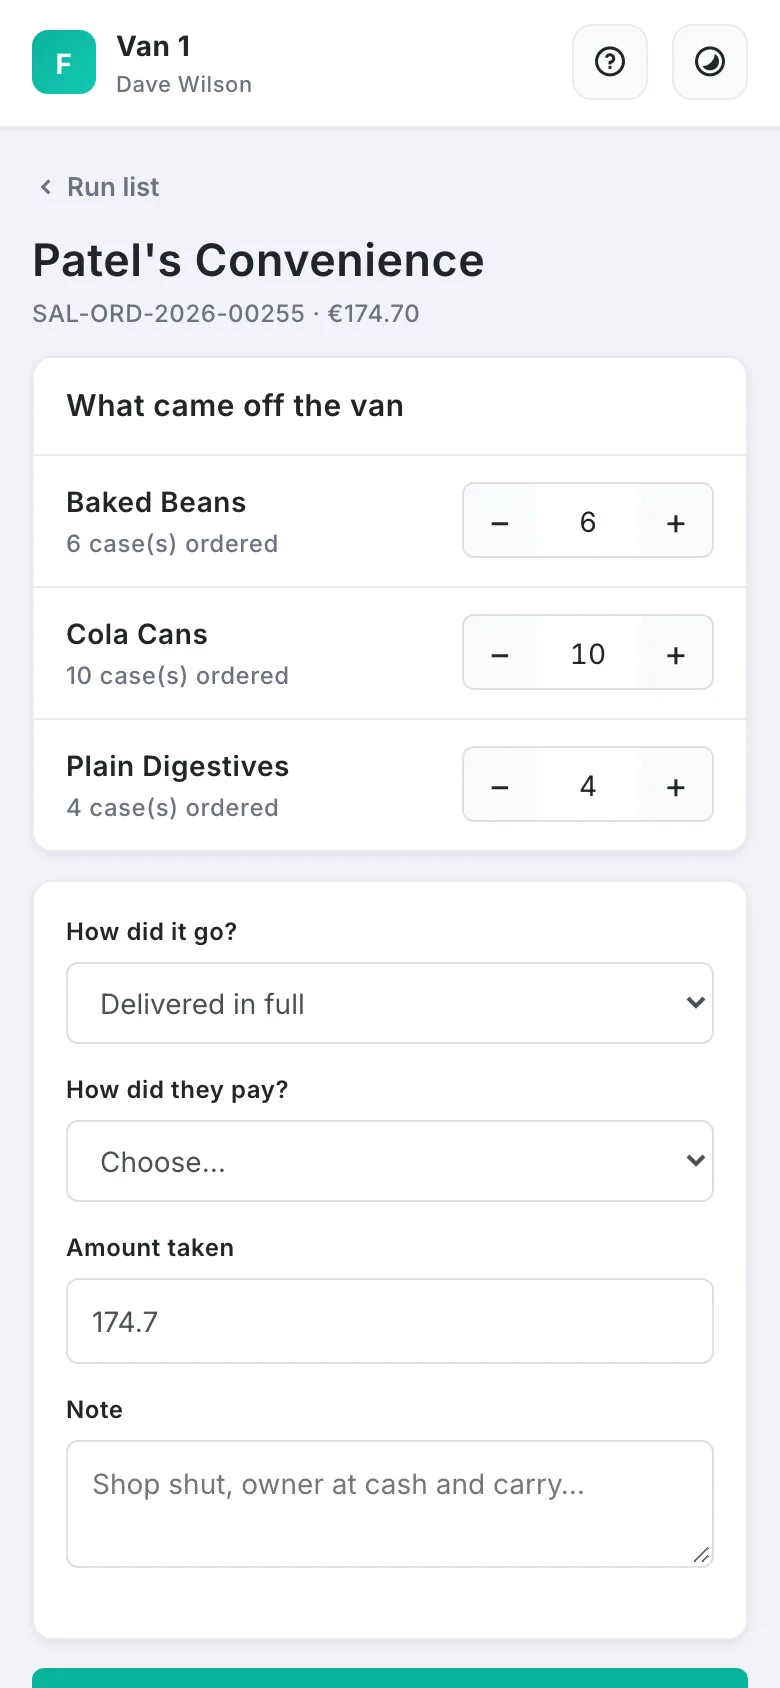
- At the shop, tap the stop. What came off the van: leave the numbers if everything was delivered, or lower a line that was short and say why (damaged, refused, missing).
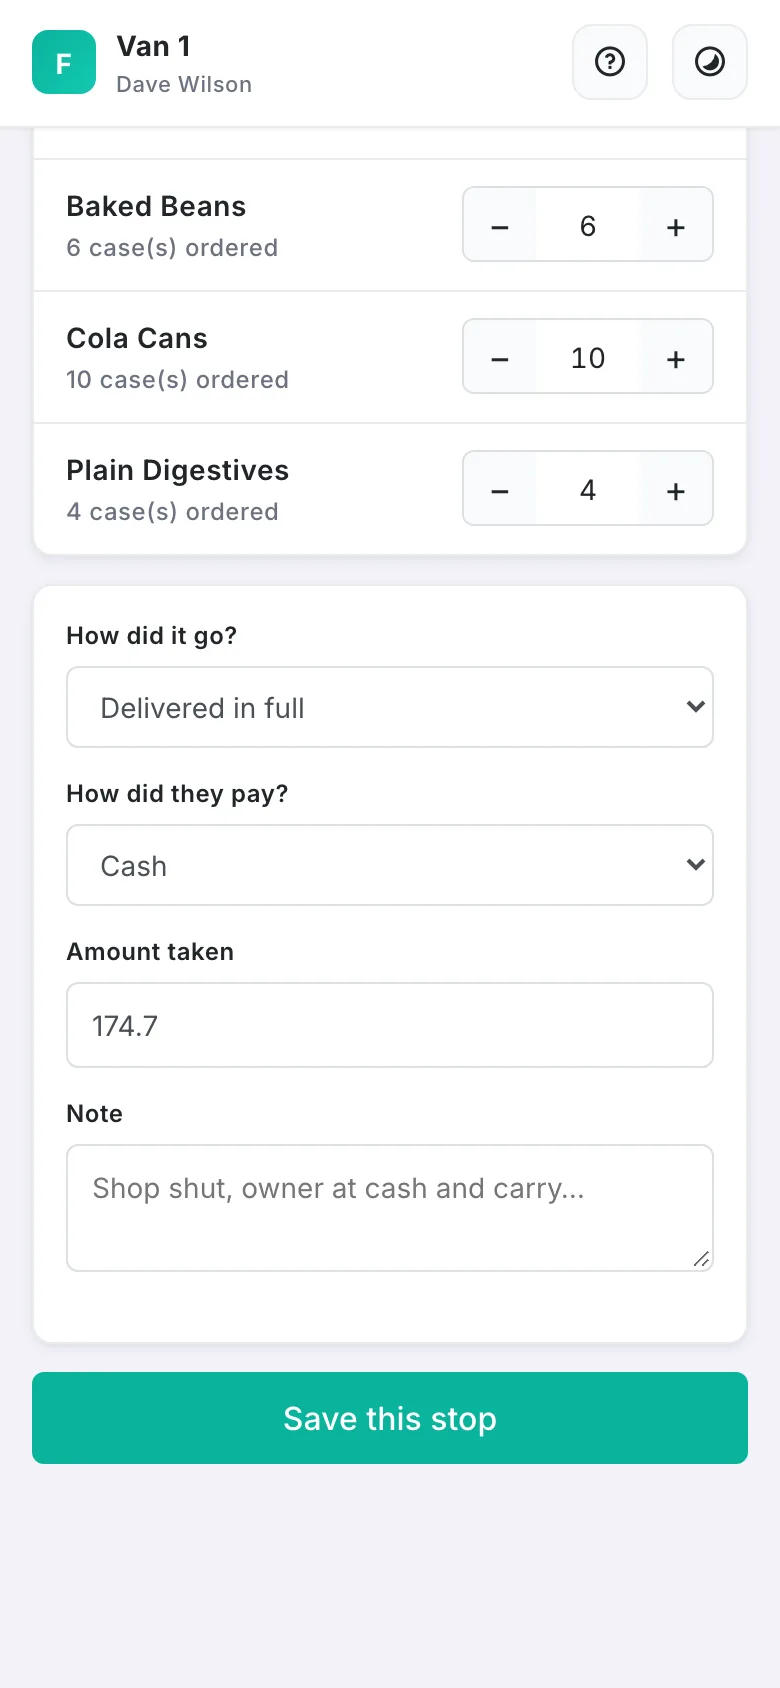
- How did it go? Delivered in full, part delivered or not delivered. How did they pay? Cash, card, part cash or on account, and the amount taken.
- Save this stop. A receipt is shown to hand over or print.
End of day
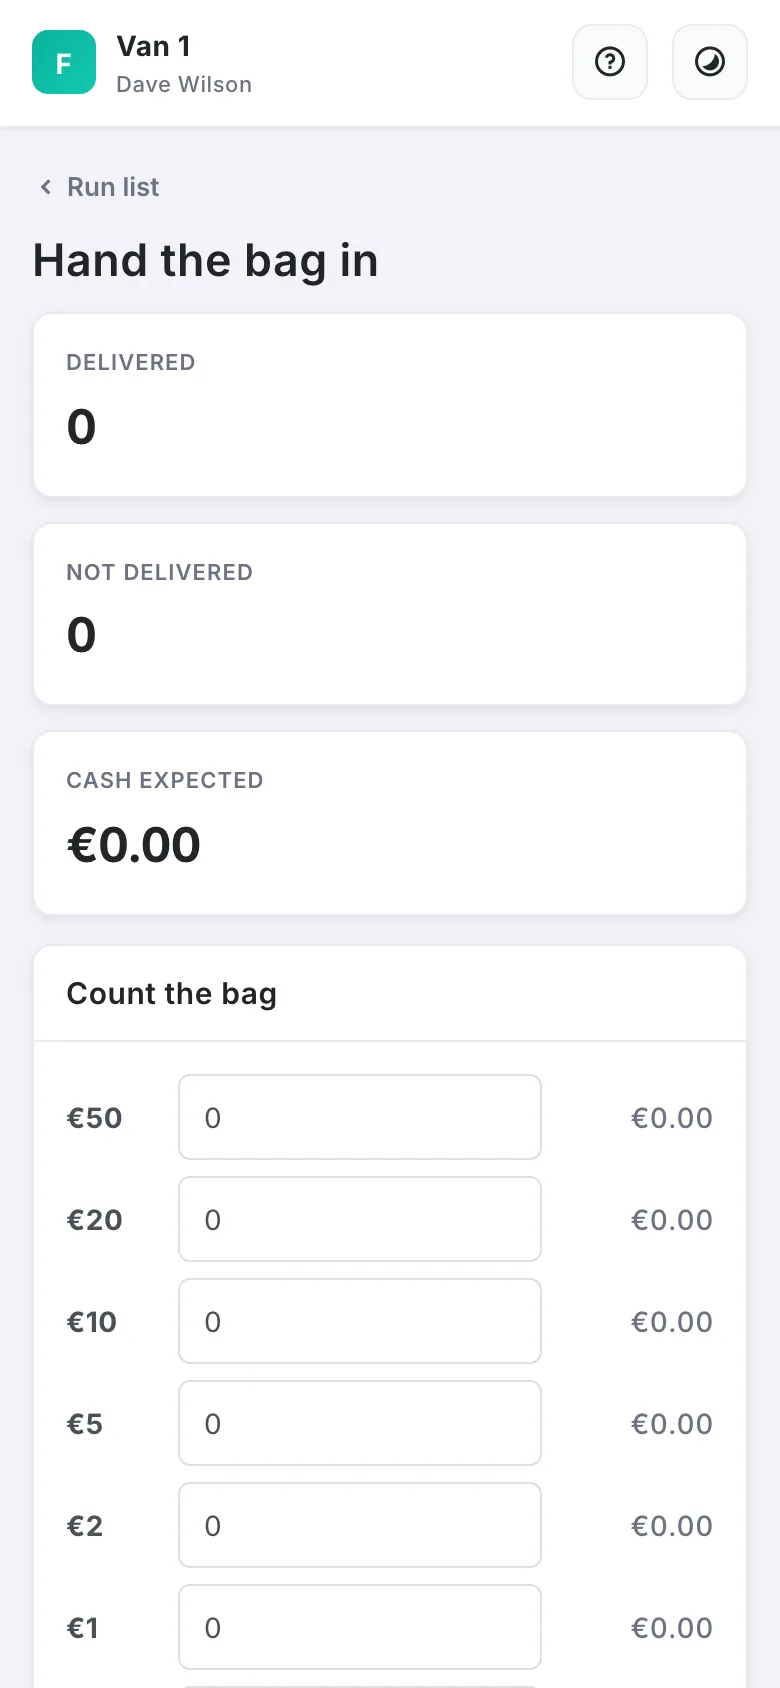
- End of day shows what was delivered and the cash you should have.
- Count the cash bag note by note and coin by coin, type the mileage.
- If it's more than a little out, write why. Close the run.
Cashier & supervisor (the counter till)
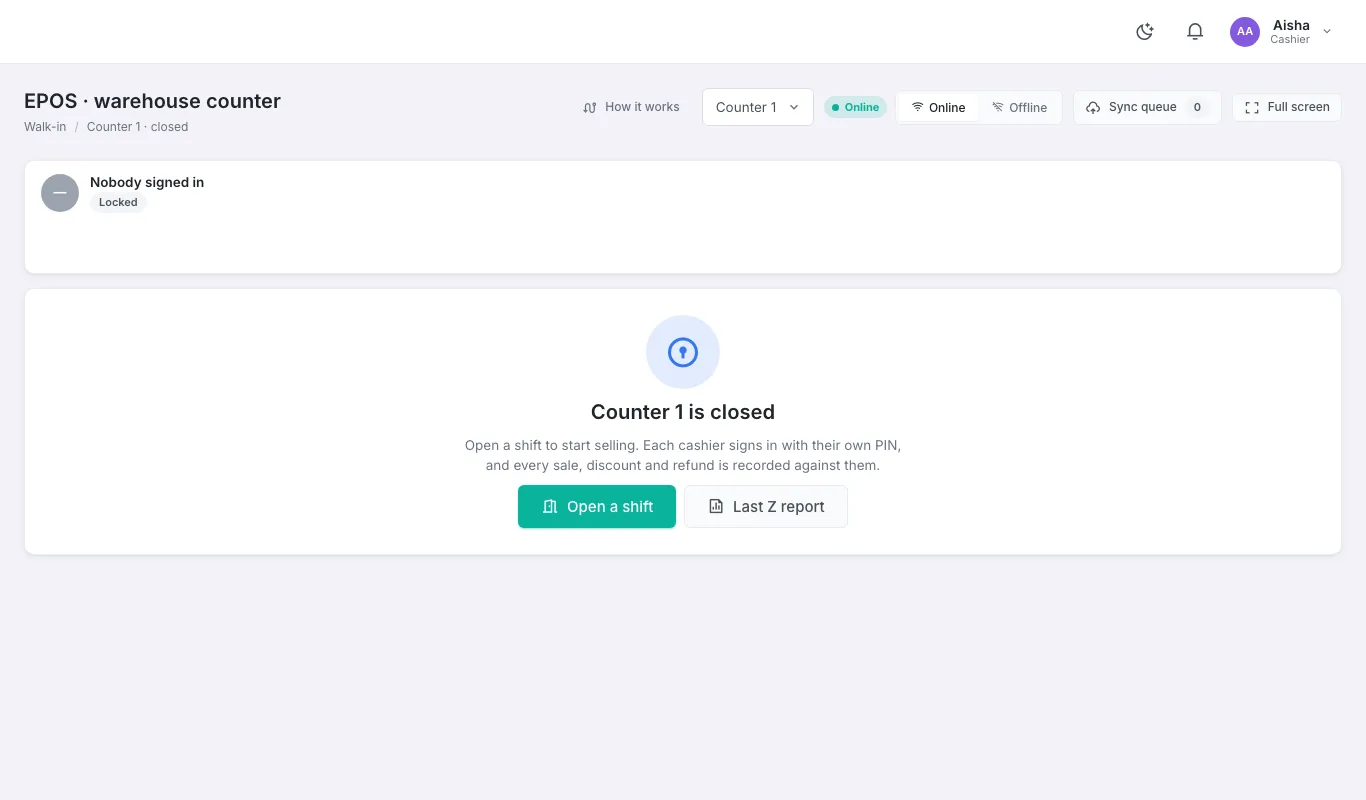
Selling over the counter at the warehouse. The till runs full screen on the counter PC; a cashier signs in with their PIN and can't open anything else.
Open the shift
- The till shows it's closed. Tap Open a shift.
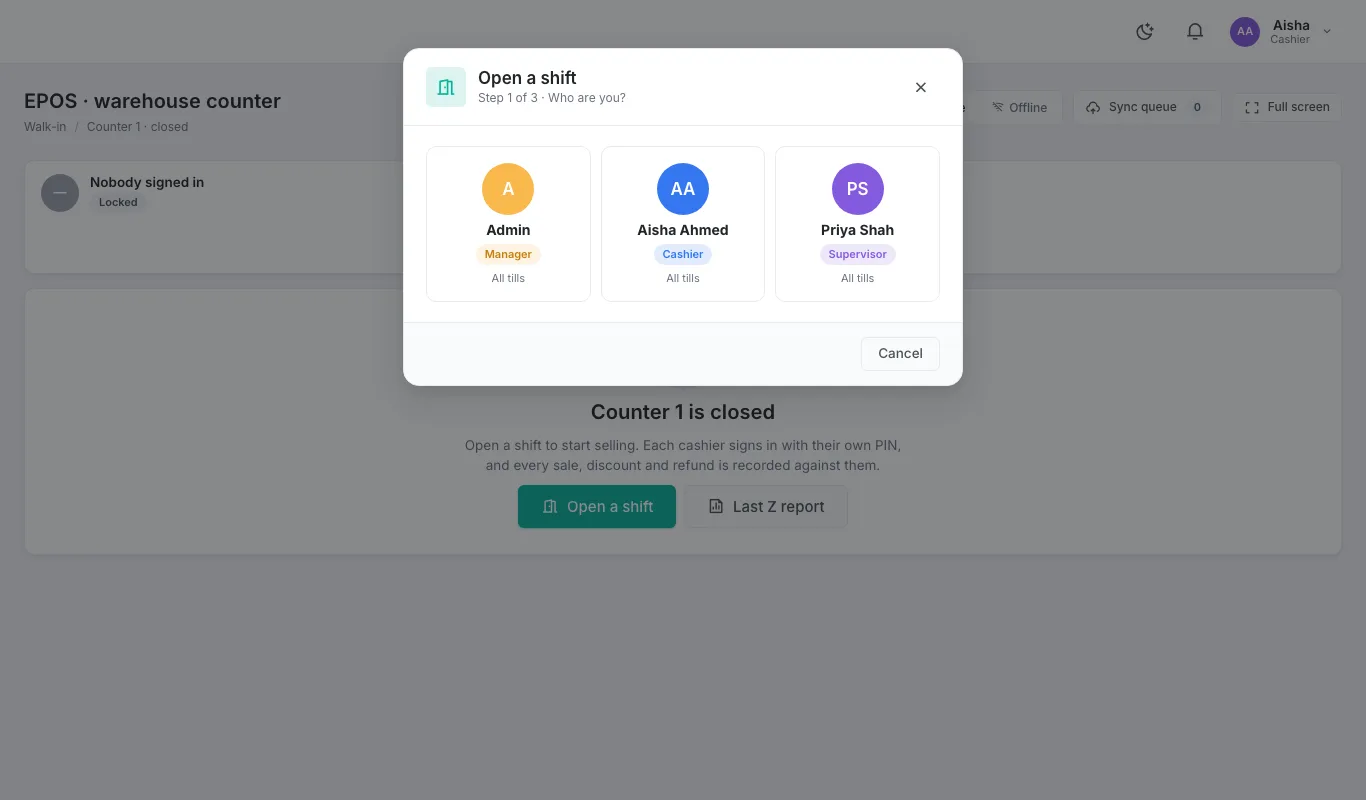
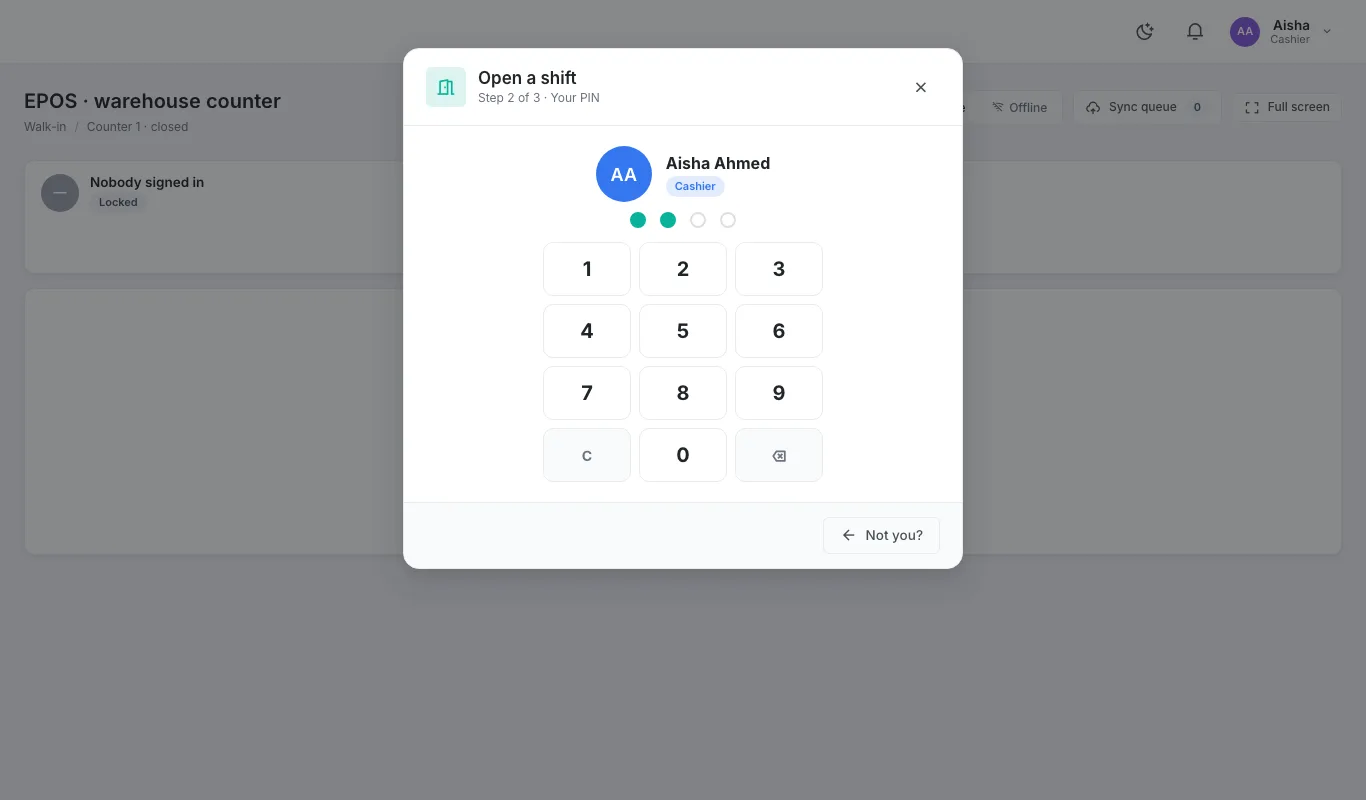
- Tap your name, then type your 4-digit PIN. (First time? It asks you to choose your own PIN, twice. Five wrong PINs lock you out for five minutes.)
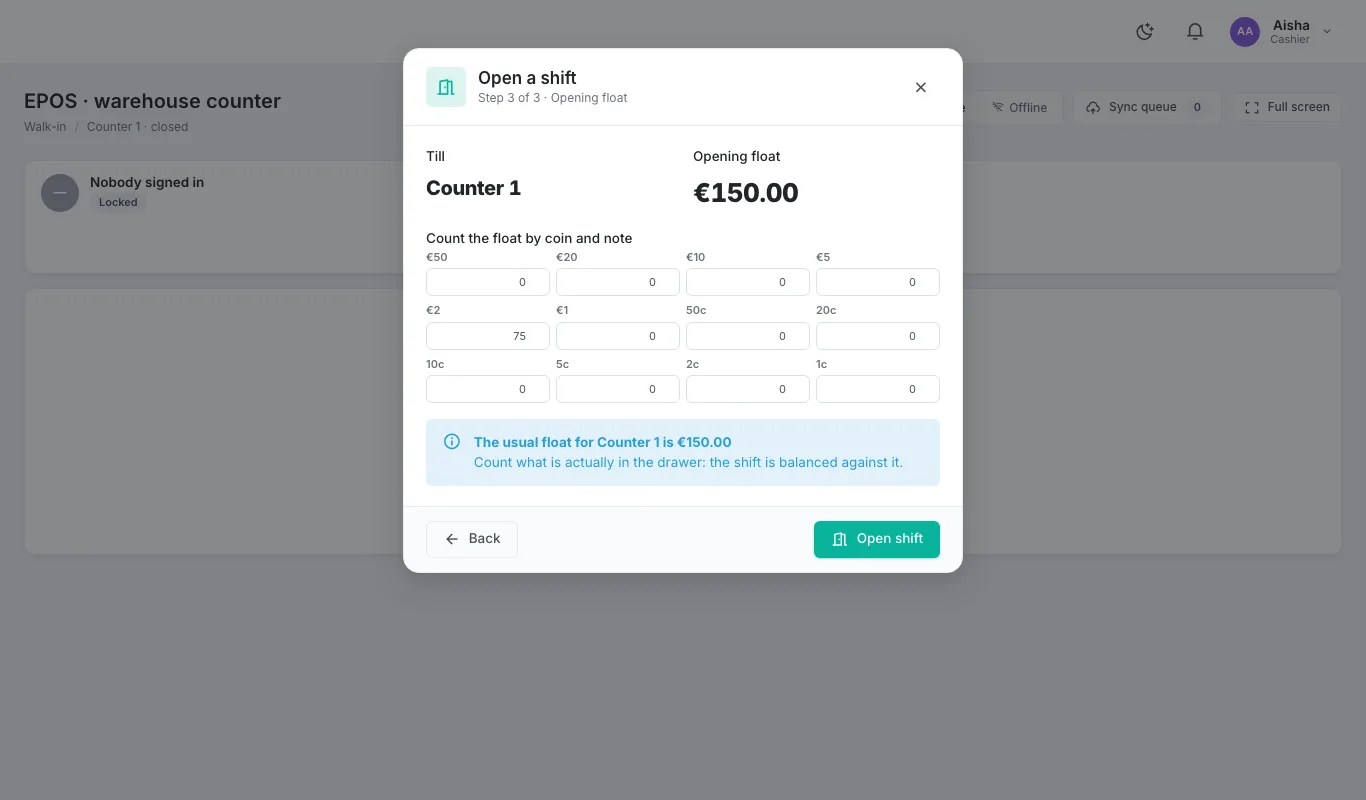
- Count the float in the drawer by note and coin, Open shift.
Sell: scan, tap, weigh
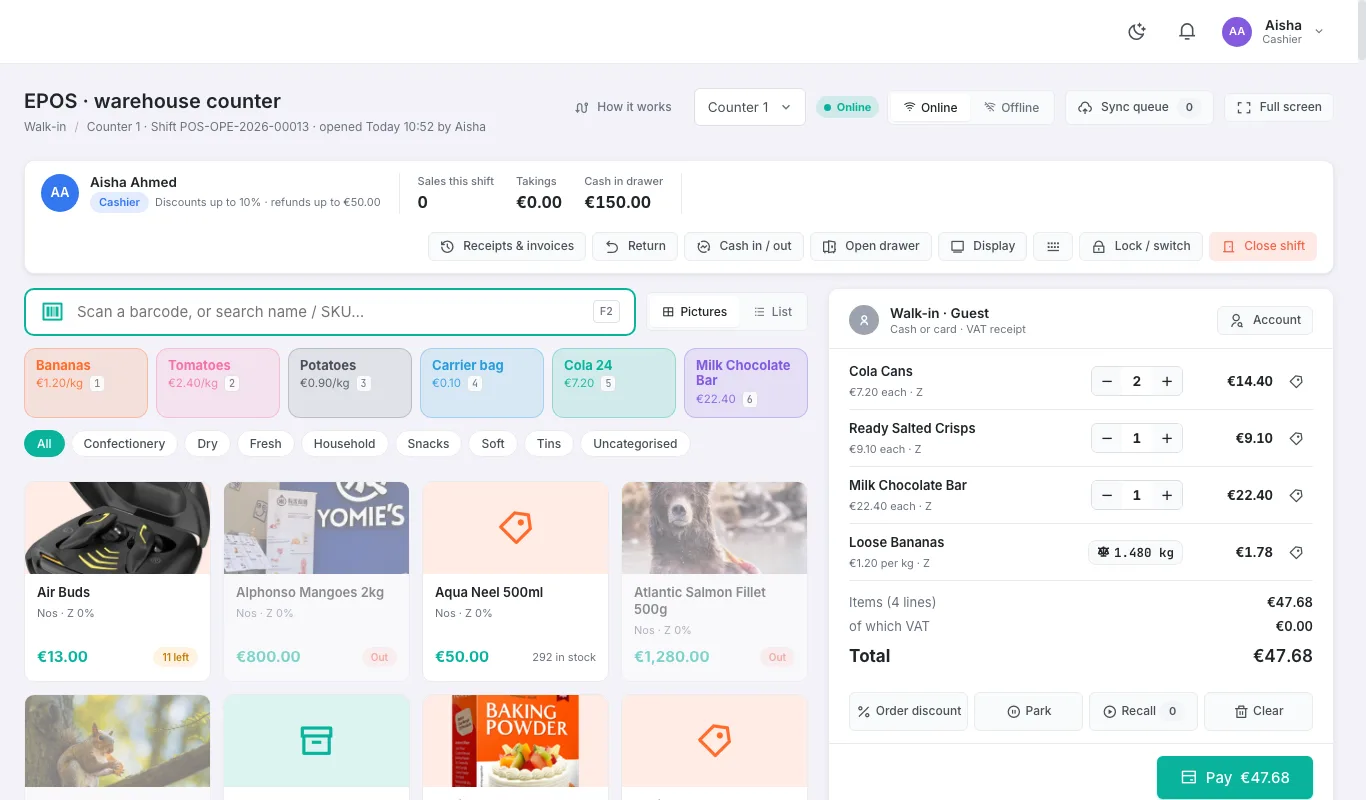
- Scan a barcode, or tap a product picture, or type part of the name. Quick keys across the top hold the busiest products (Alt 1–9).
- Type 6* then scan to add six at once. + / − change the last line; Delete removes it.
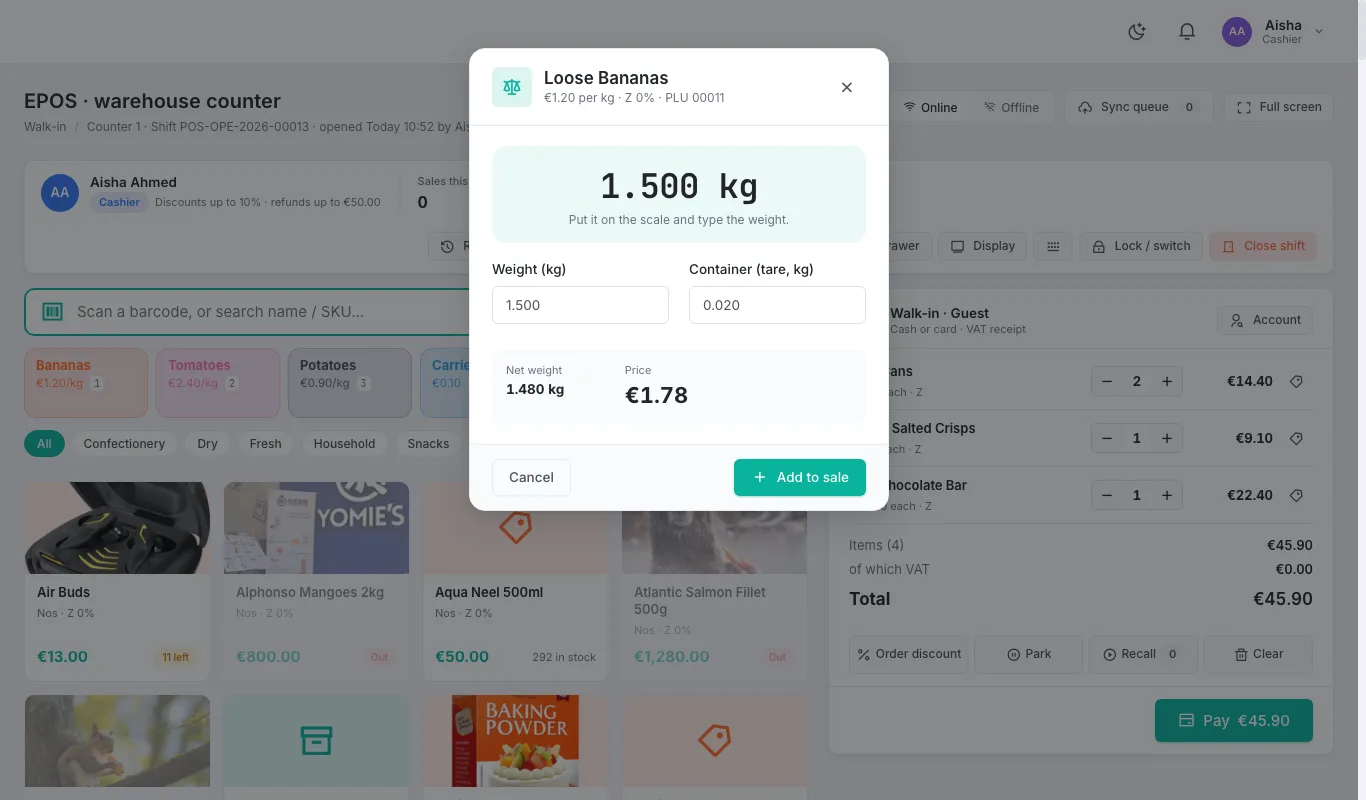
- Loose produce (bananas, tomatoes…): tap it and the weighing window opens. Put it on the scale (or type the weight) and any container weight; Add to sale. A scale label from the shop scale scans straight in.
- Selling to a trade customer? Account picks the shop: their own prices apply.
- A discount or refund over your limit asks for a supervisor's PIN; it's logged.
Take payment, cash in and out
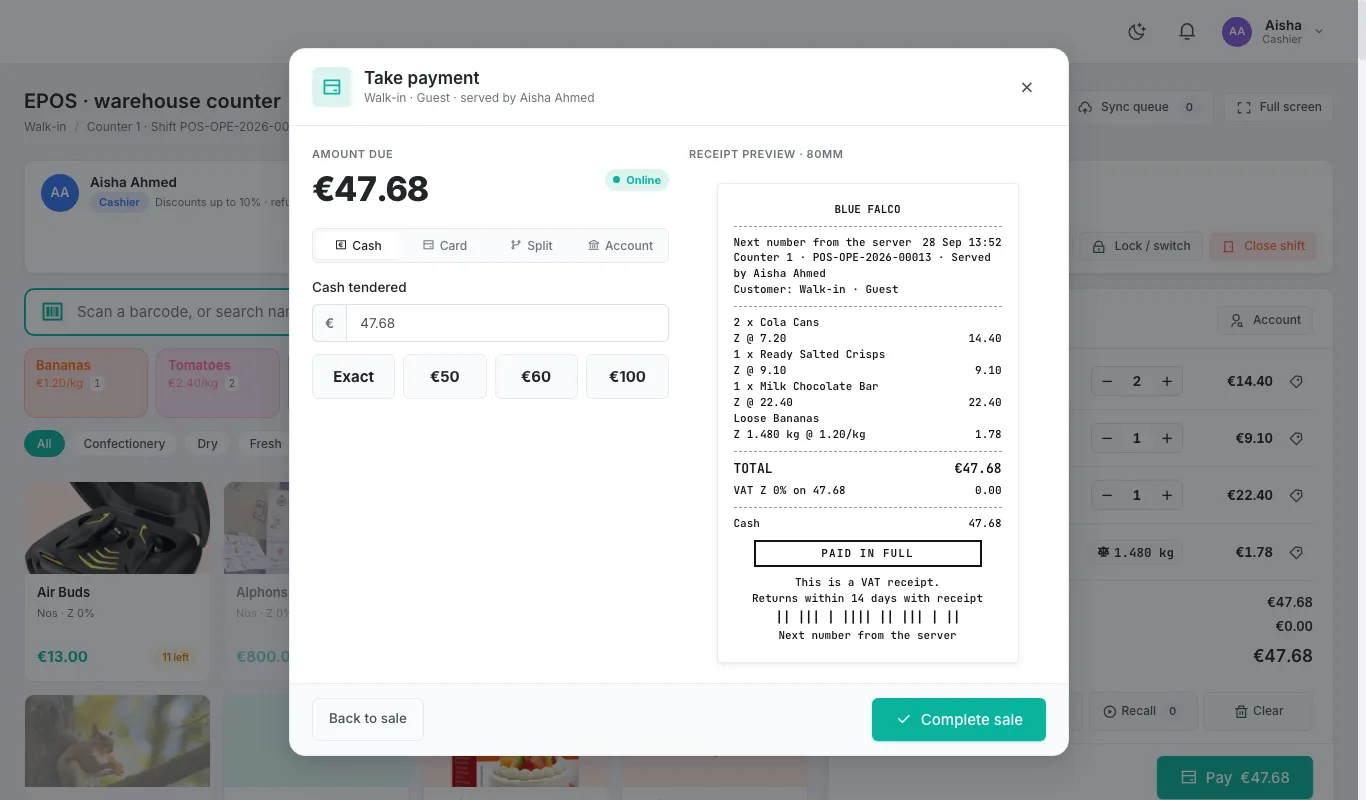
- Pay (F4): cash (type what they handed over, the change shows), card, split between several ways, or on account.
- The receipt prints and the customer display (second screen, Display) shows the total, savings and change.
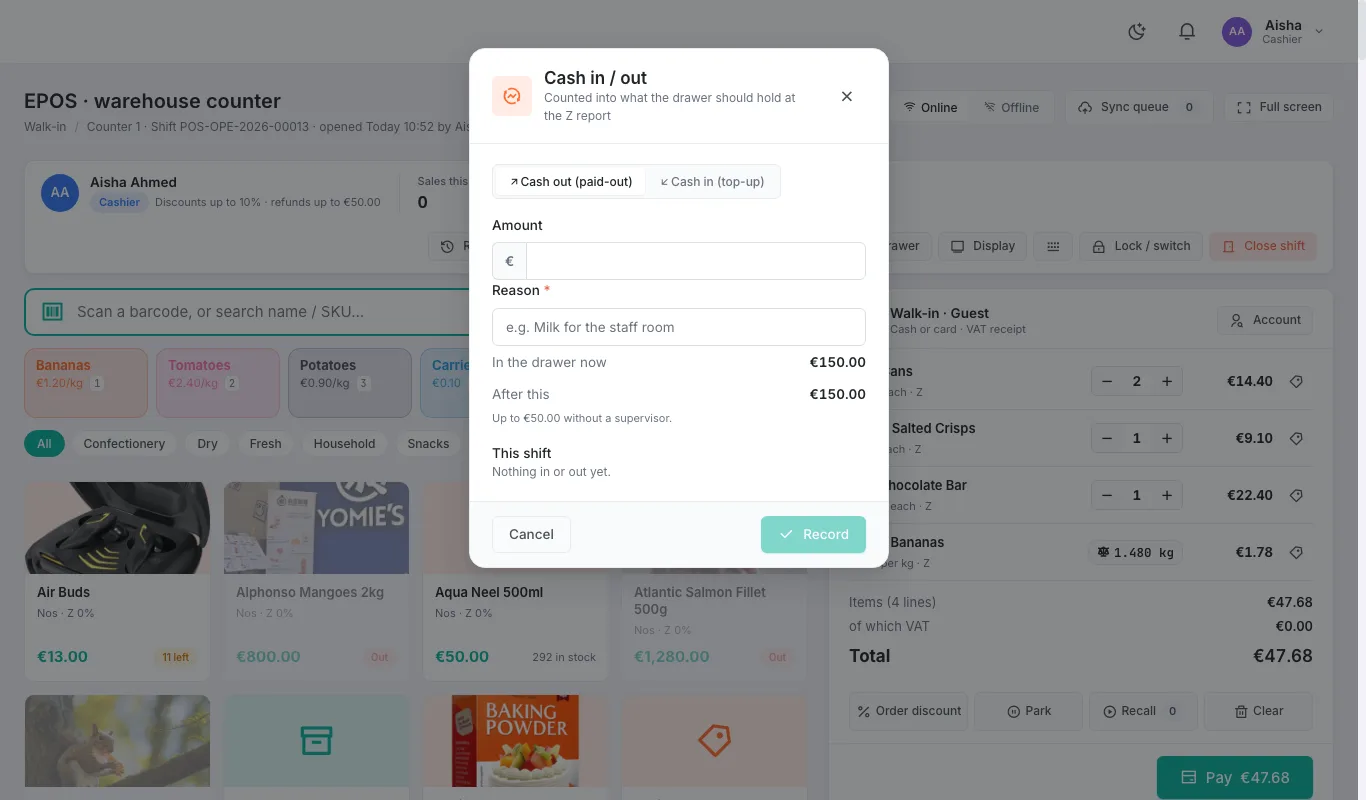
- Cash in / out (F6): money taken out for supplies or put in to top up the float, with a reason. Over the limit needs a supervisor.
- No connection? Switch Offline and keep selling: sales upload in order when it's back.
Close the shift (Z report)
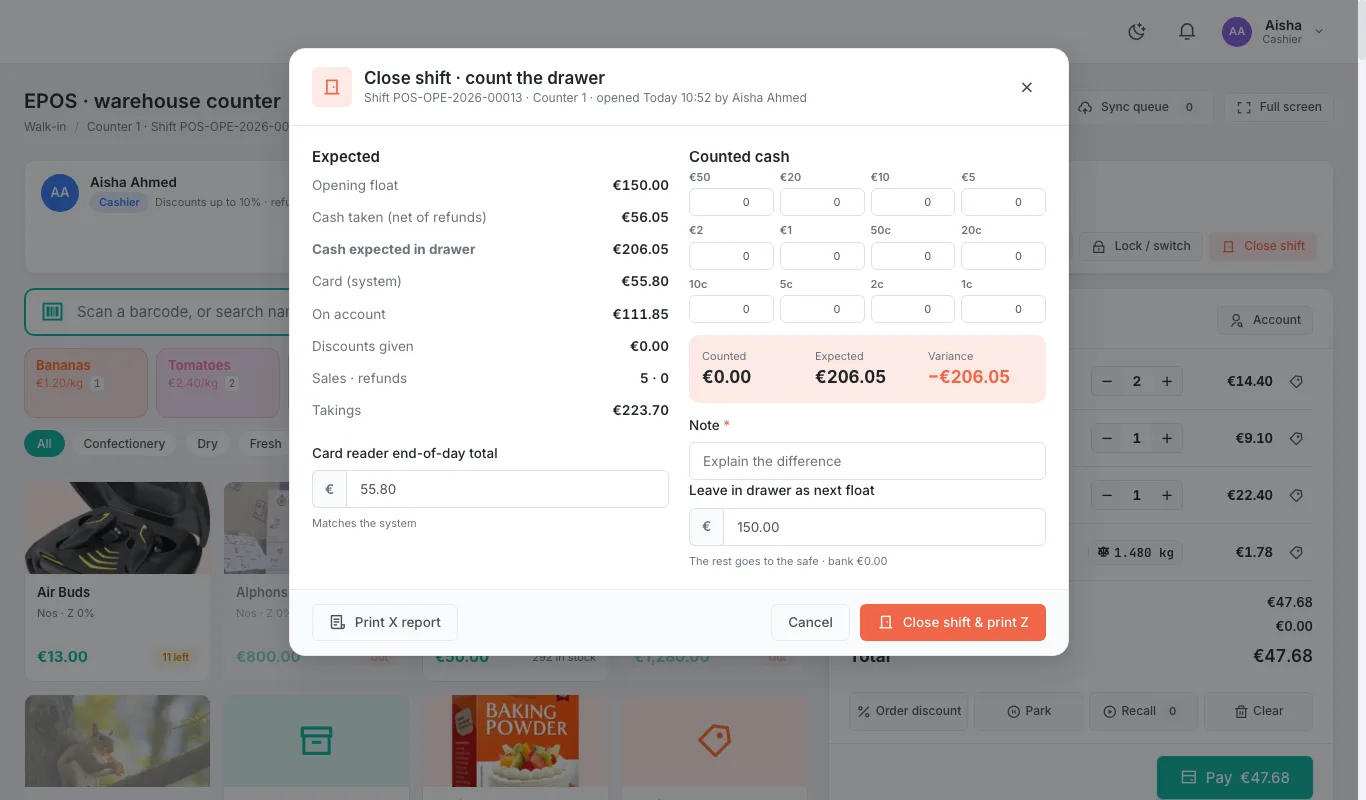
- Close shift: the till shows what should be in the drawer (float + cash taken + cash in − cash out).
- Count the drawer. A difference needs a note.
- Confirm: the Z report prints, and every sale of the shift is posted to the accounts and stock.
Shop owner (trade customer)
The shop's own app: order at its own prices whenever it likes, see when the van is coming, and keep on top of invoices. It works on a phone and on a computer.
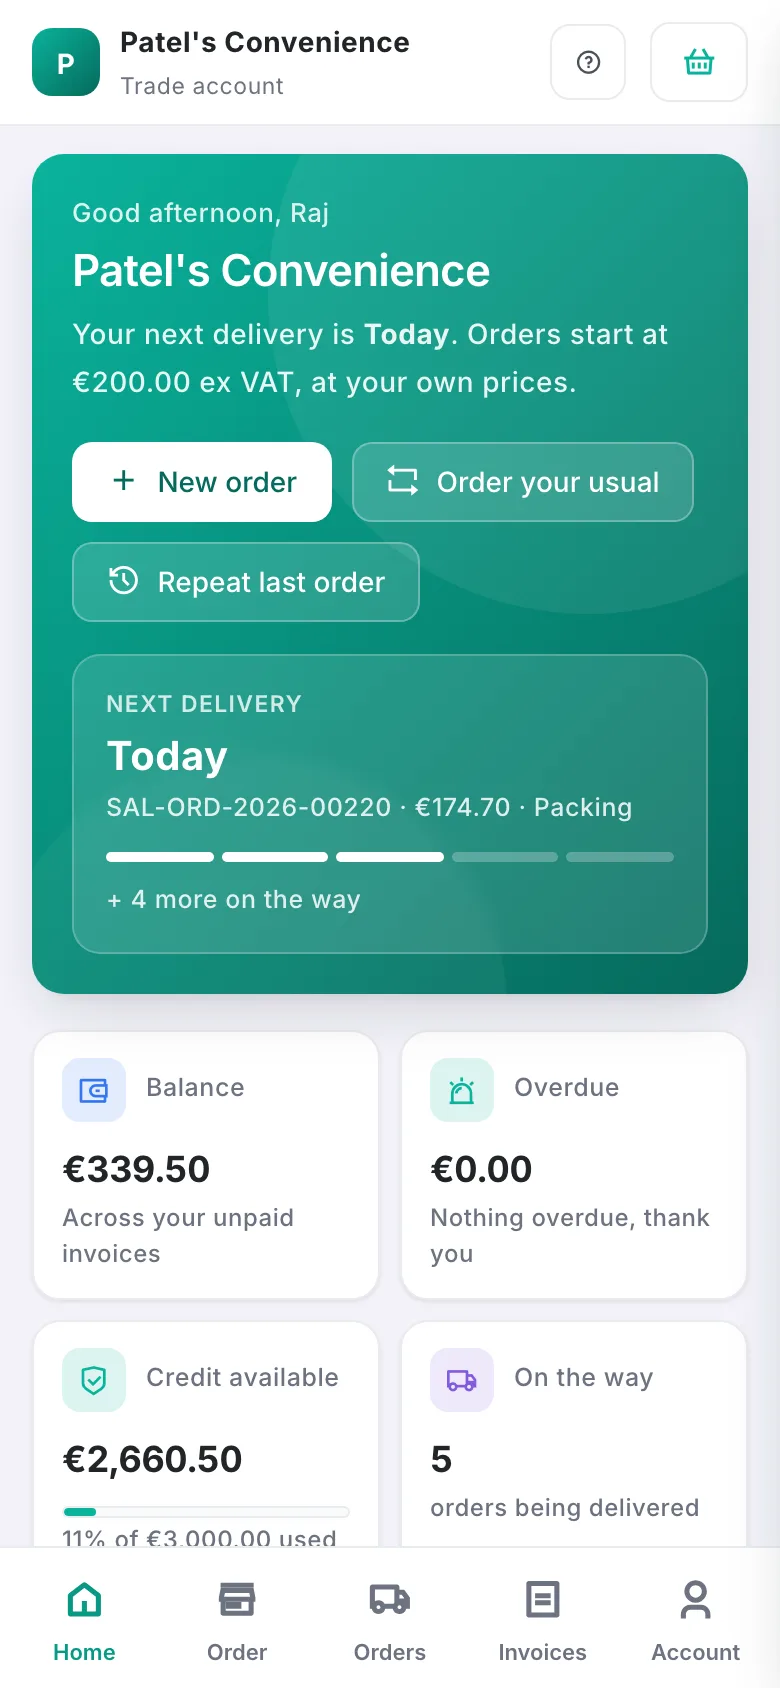
Home: your account at a glance
- Sign in with the login the office gave you.
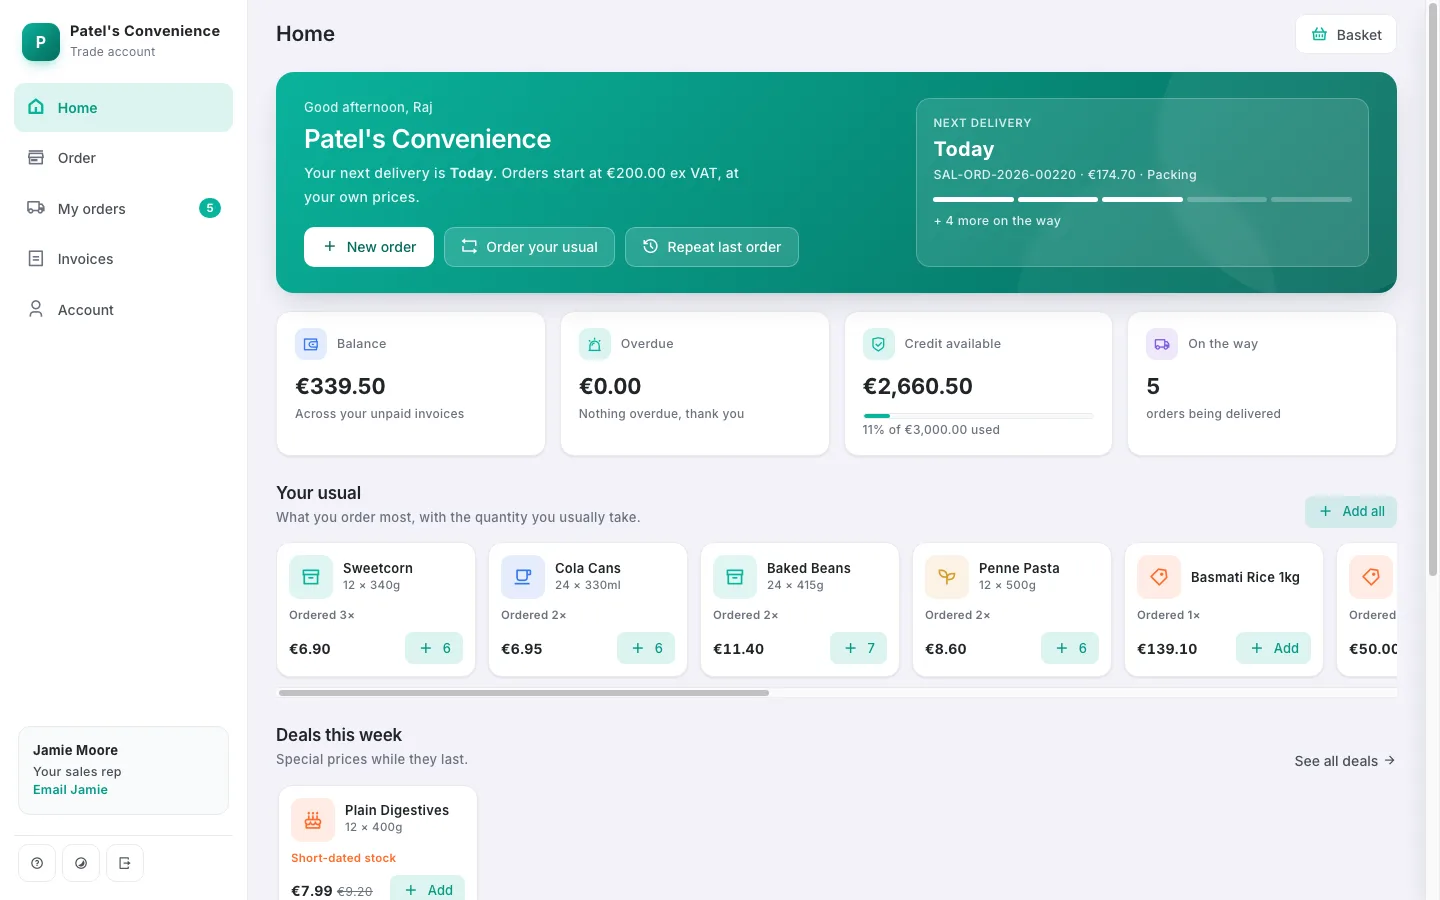
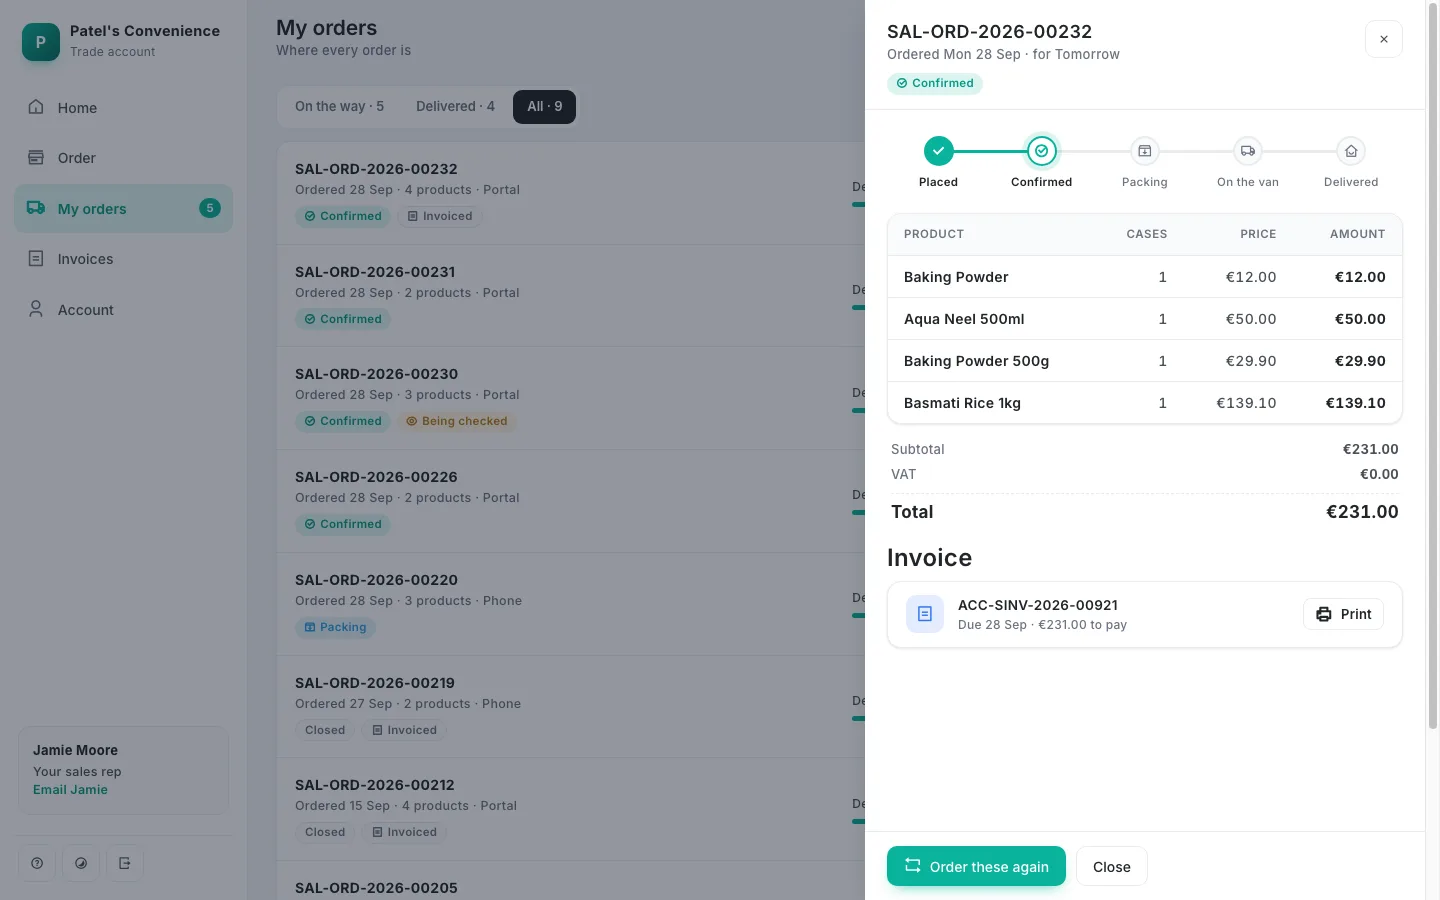
- The green banner shows the next delivery with a tracker (Placed → Confirmed → Packing → On the van → Delivered).
- The tiles show your balance, anything overdue, credit left and orders on the way.
- Your usual lists what you order most with the usual quantity: Order your usual fills the basket in one tap. Deals this week shows special prices.
- Your rep and the office are one tap away (Call / Email), with how to pay.
Order
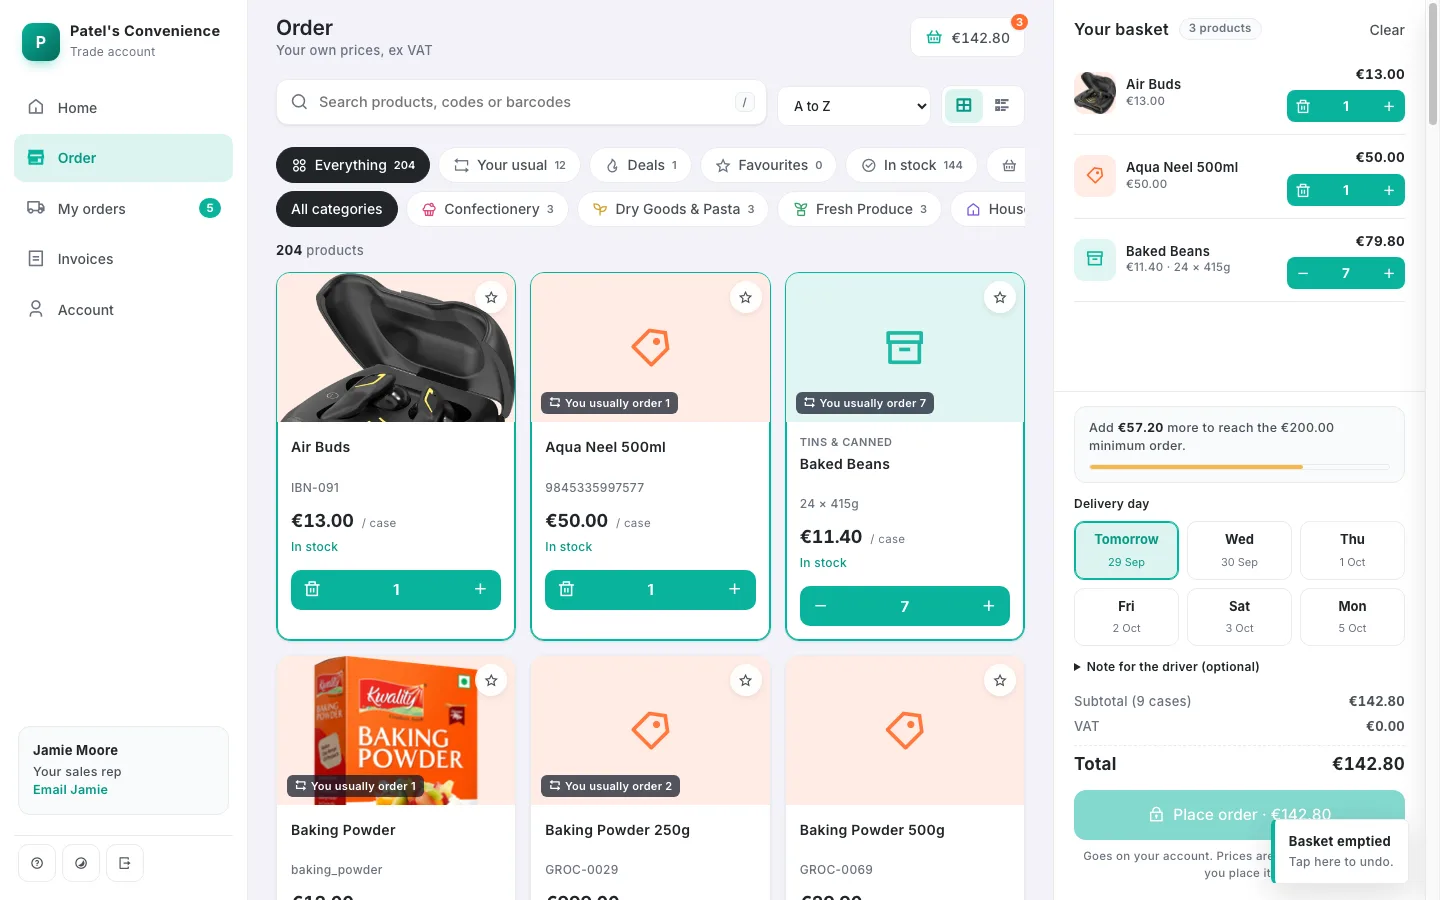
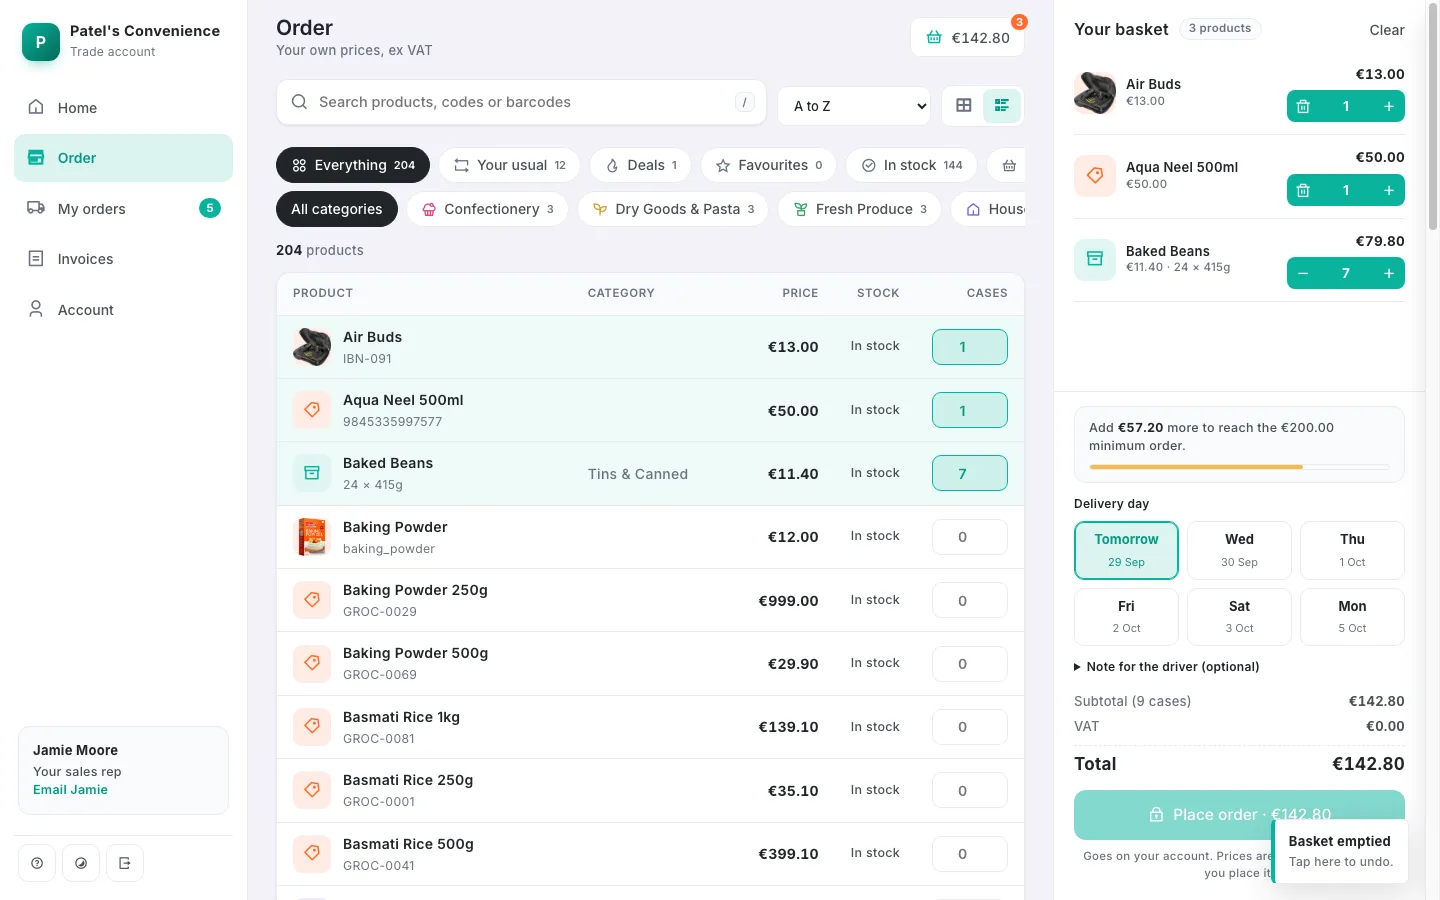
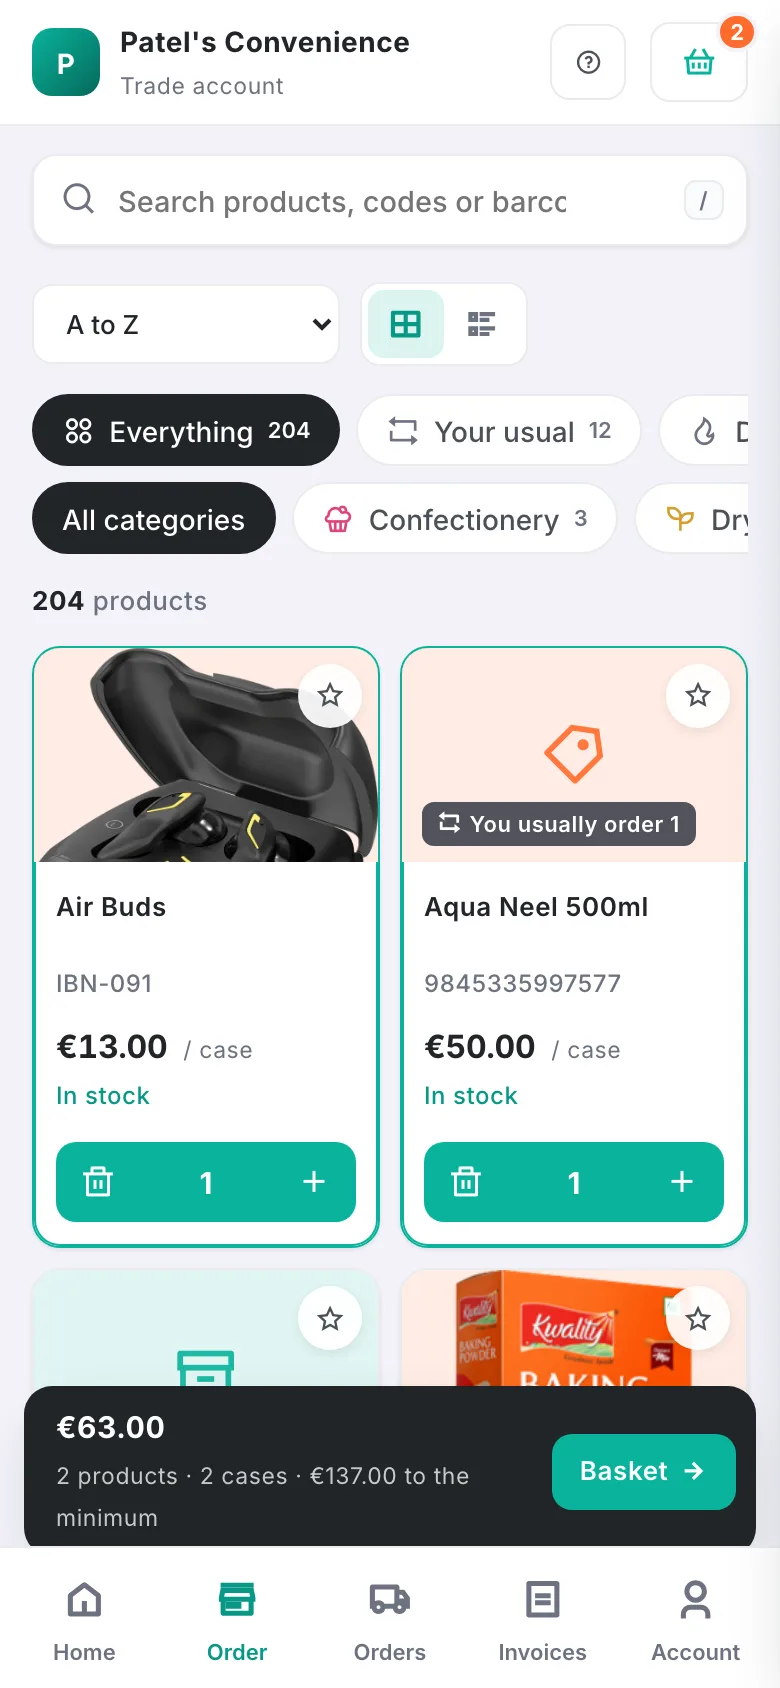
- Order shows the catalogue at your prices. Search (press / on a computer), pick a category, or filter: Your usual, Deals, Favourites (★), In stock, In basket.
- Tap Add, then + / −. Products running low say "Only 5 left"; you can't order more than is there.
- Ordering lots? The quick list (list icon) lets you type the cases for each product and press Enter to move down.
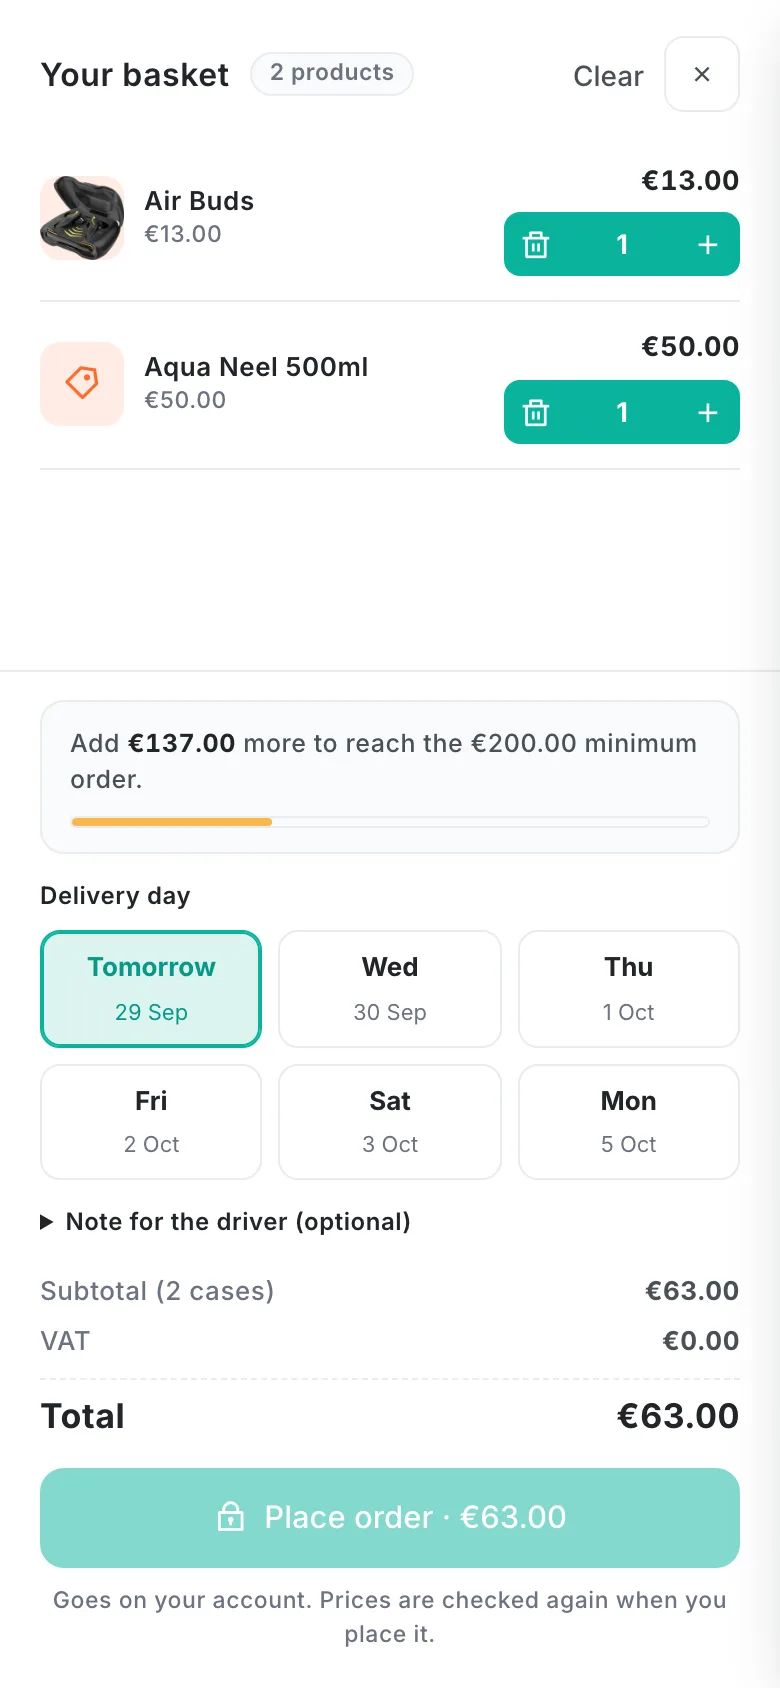
- The basket (on the right on a computer, the dark bar at the bottom on a phone) shows how much more you need for the minimum order, the delivery day (tomorrow onwards, no Sundays), a note for the driver, and the total with VAT.
- Place order.
Track orders, invoices and your account
- My orders: On the way / Delivered / All. Tap an order for its timeline, lines (with anything short), total, invoice, and Order these again.
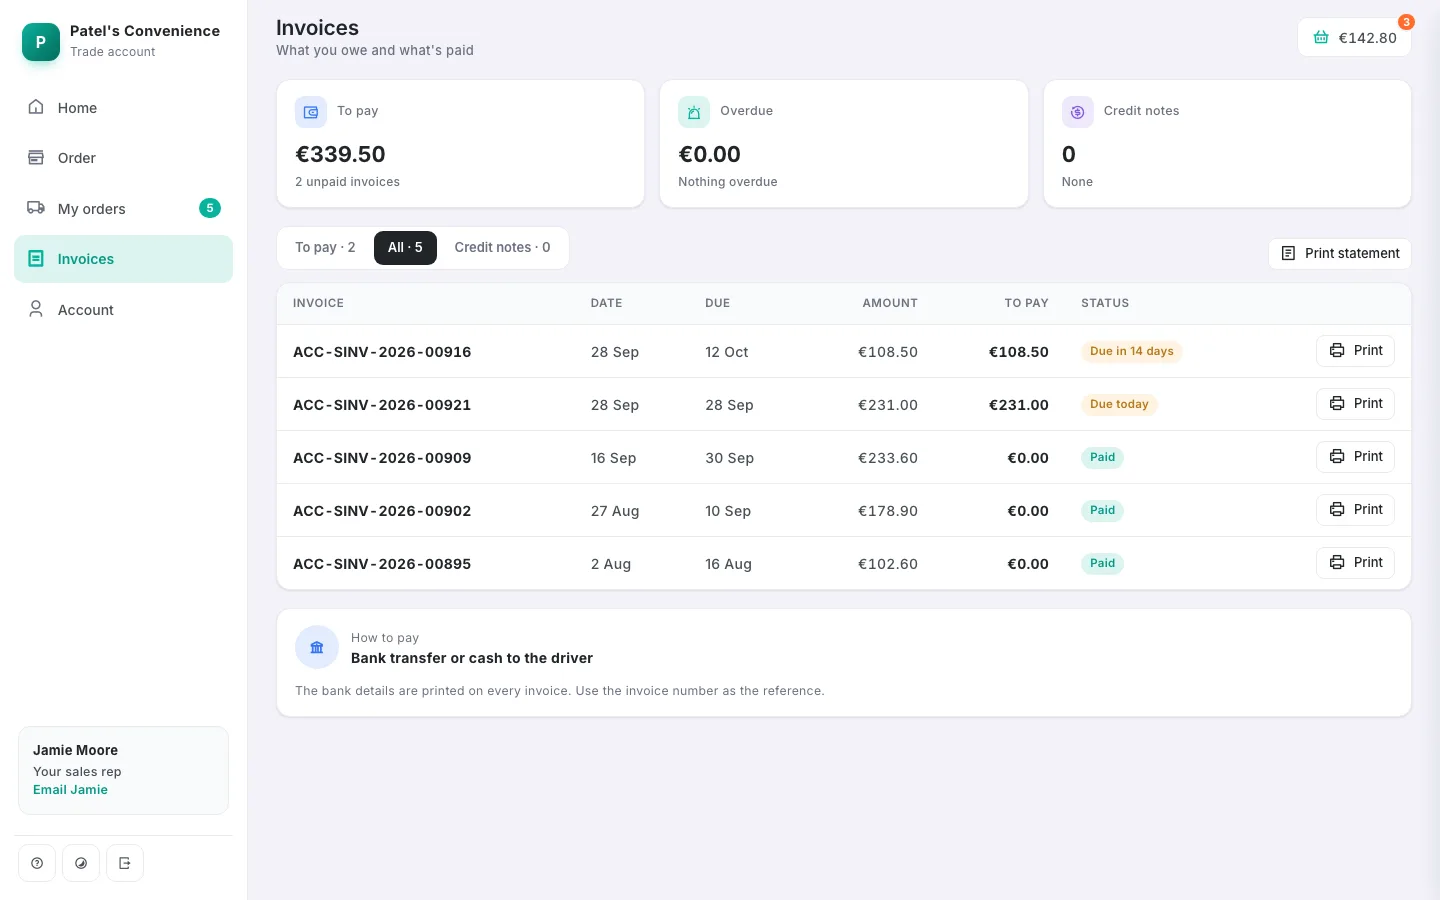
- Invoices: what's to pay, what's overdue ("Overdue 18 days") and credit notes. Print any invoice or save it as PDF; Print statement lists everything unpaid with the bank details.
- Account: your details, credit and terms, your rep and the office, dark mode, help and sign out.
Staff opening /shop
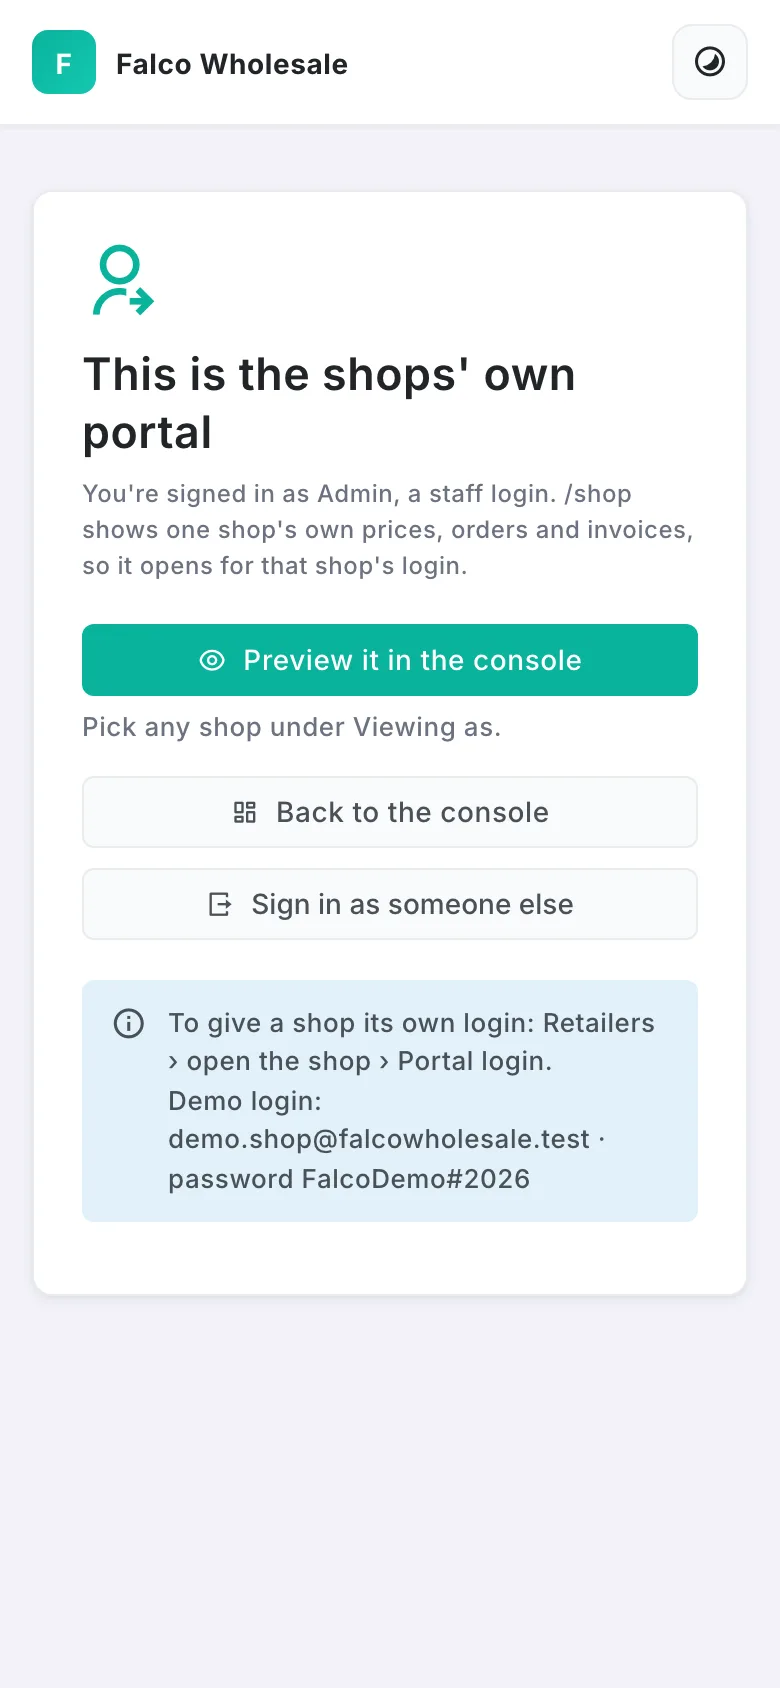
- /shop always shows one shop's own account, so a staff login gets a page saying so instead.
- Preview it in the console opens Retailer portal · ordering, where you pick any shop under Viewing as and see exactly what they see.
- Sign in as someone else signs you out and opens the sign-in page, which returns to /shop.
Online shop customers
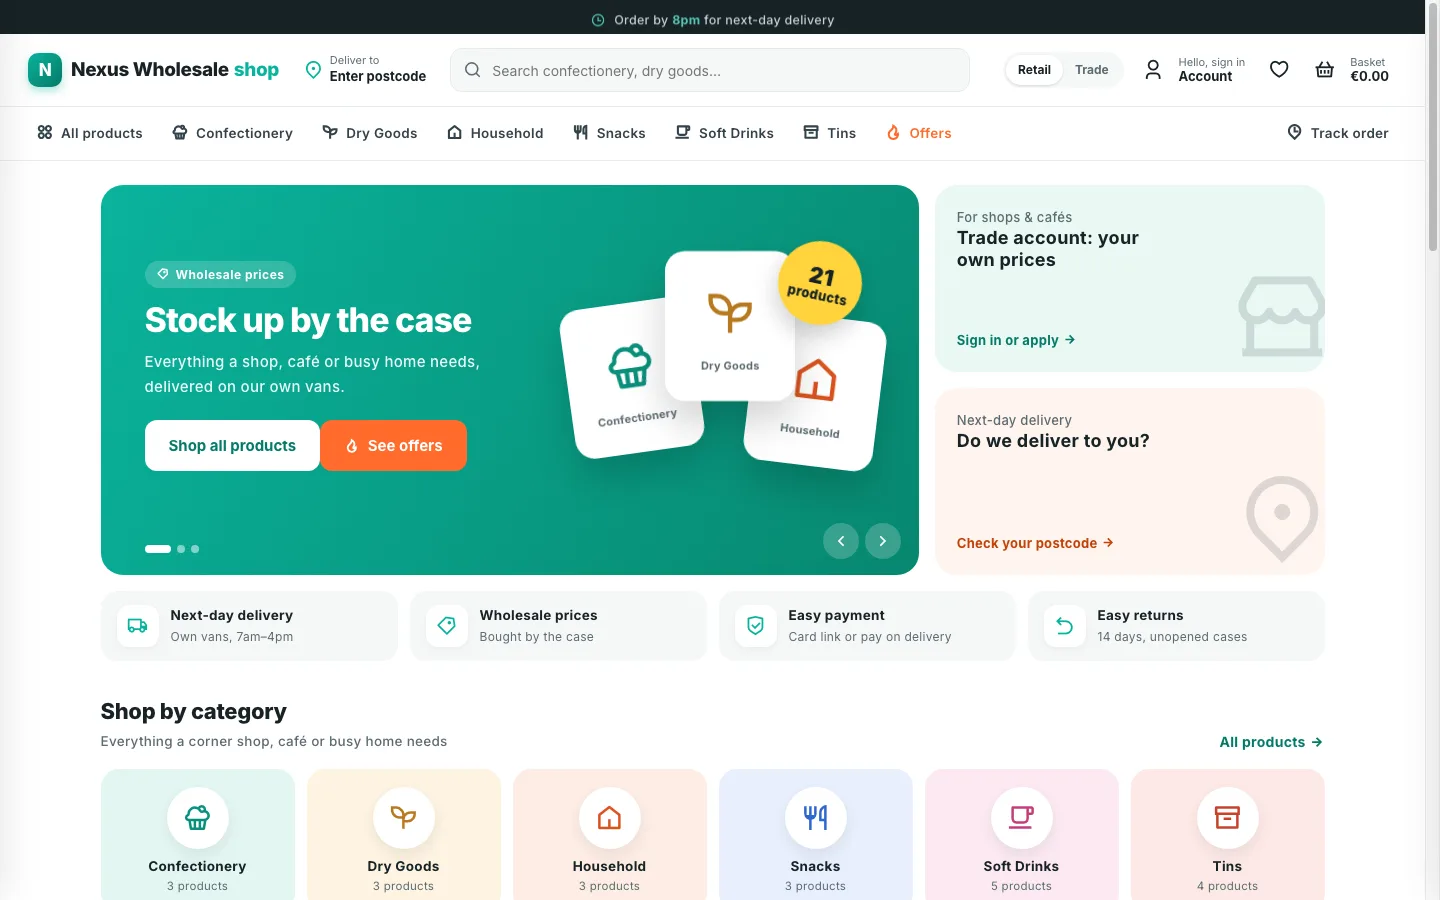
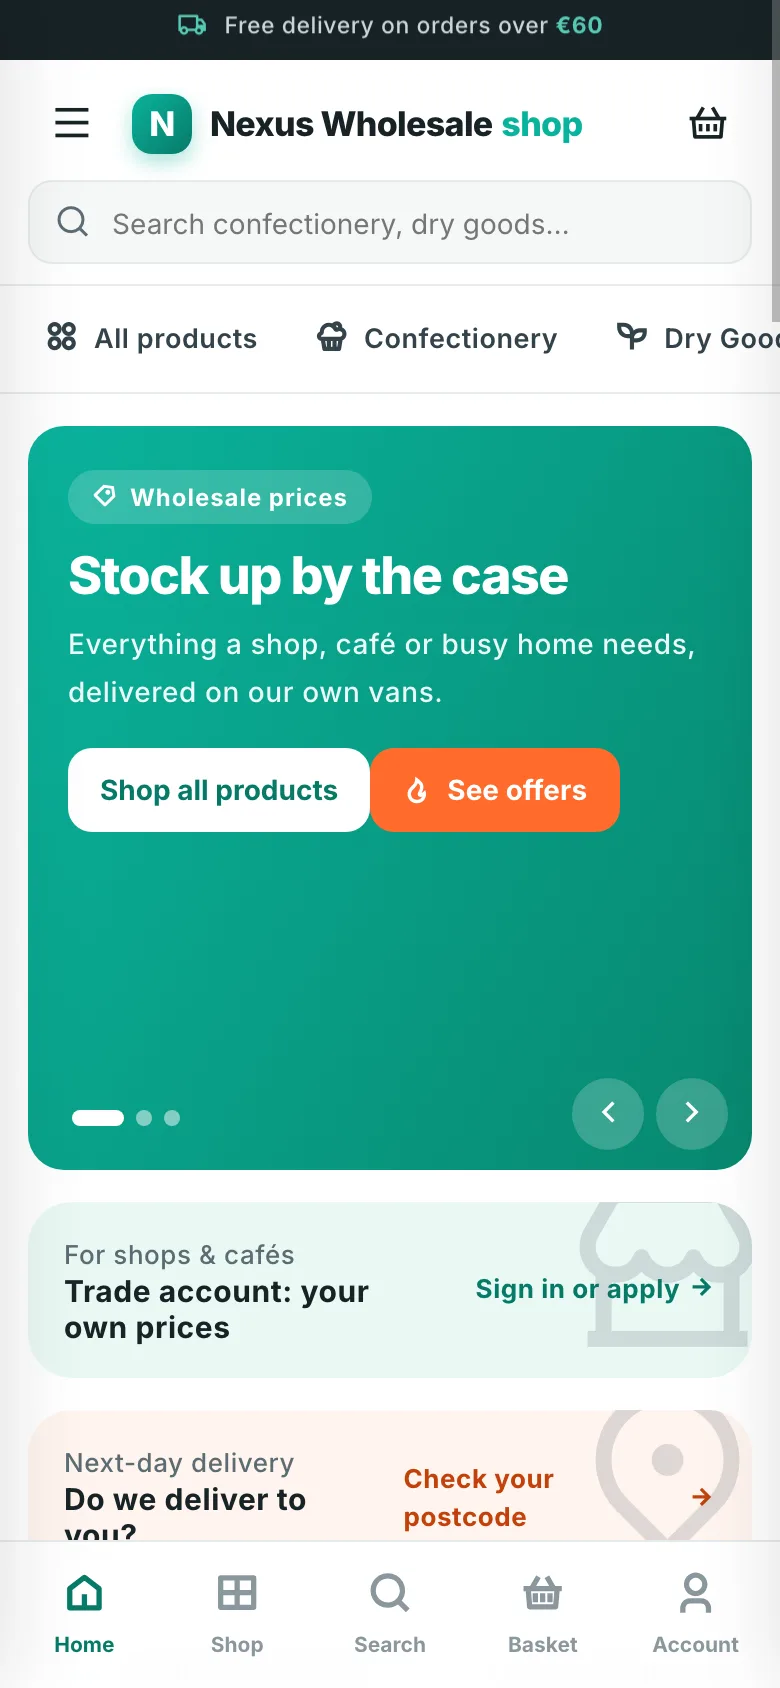
The public shop, open to anyone with no login: homes, cafés, anyone in your delivery areas. Trade customers can sign in here too and get their own prices.
Browse and fill the basket
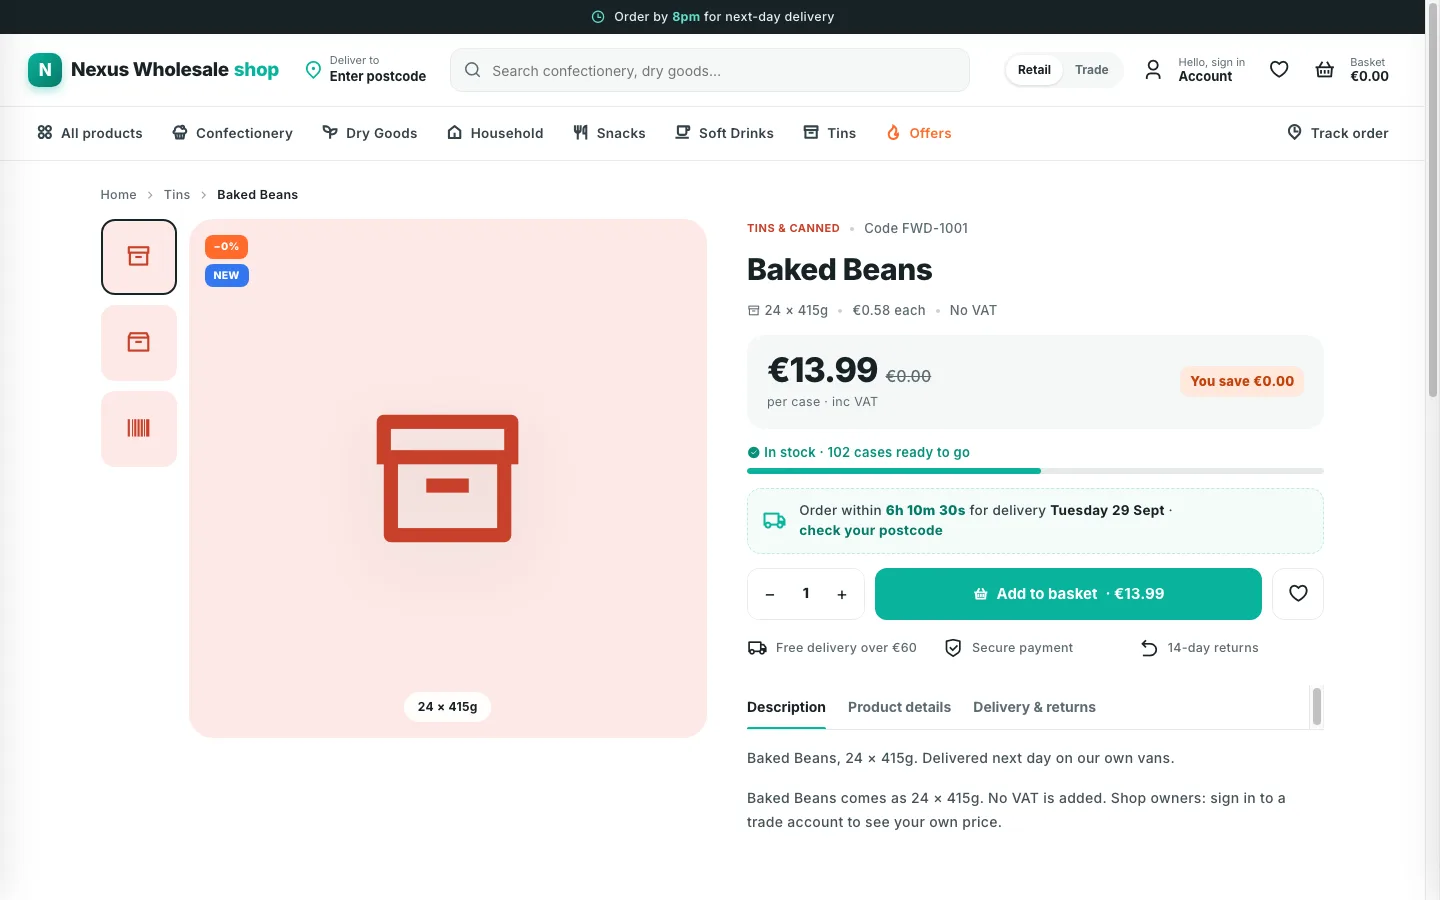
- Browse by category, search, or look at offers. Prices include VAT.
- Deliver to: type your postcode to check you're in a delivery area.
- Open a product for its details, then Add to basket. The basket shows the minimum order and when delivery becomes free.
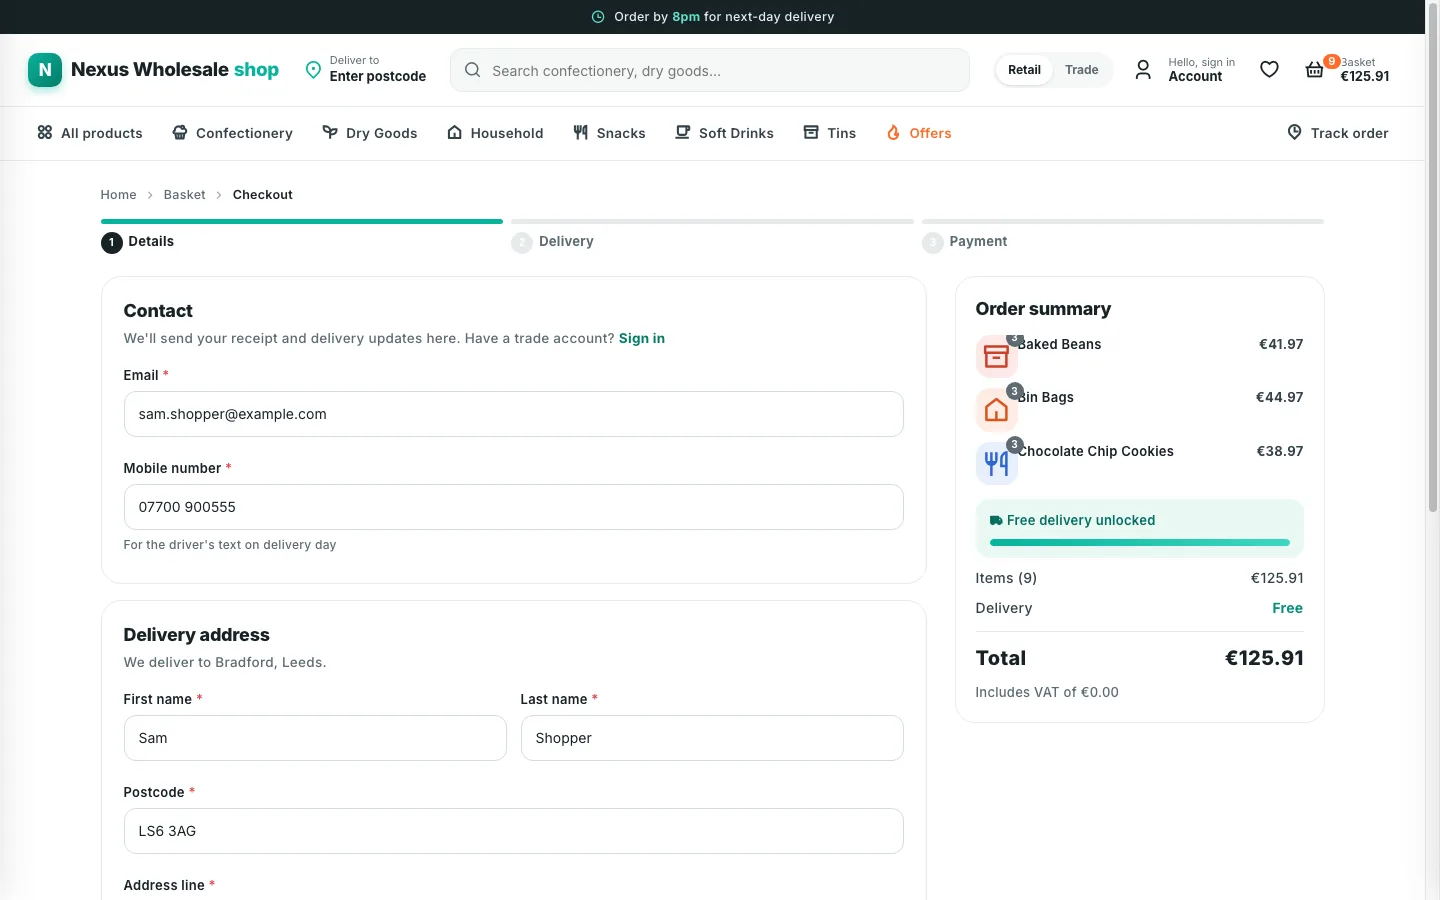
Check out
- Details: email, mobile (for the driver's text), name and delivery address.
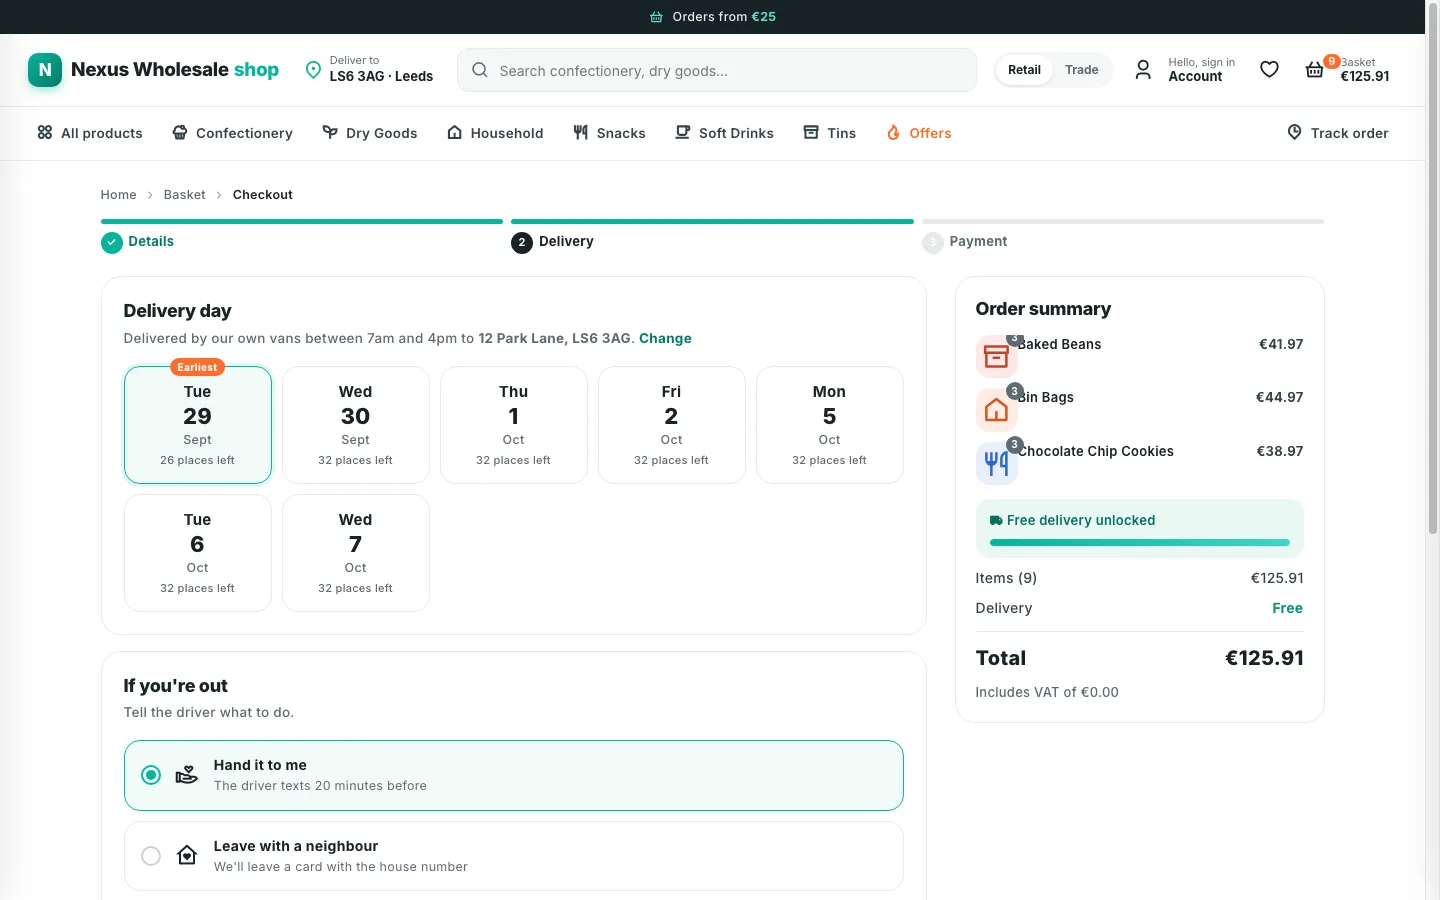
- Delivery: pick the day and what the driver should do if you're out.
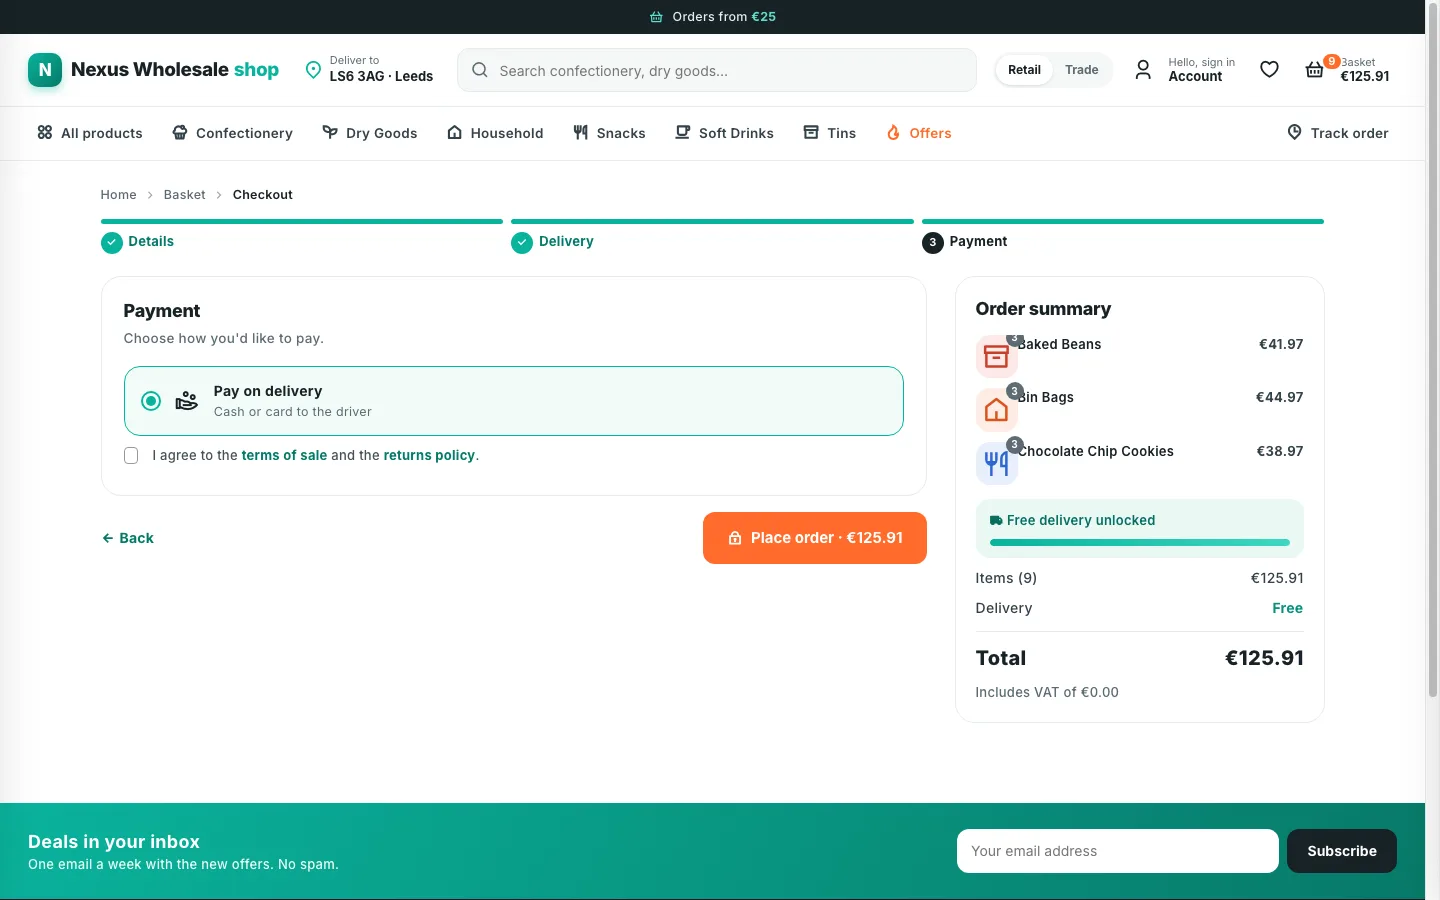
- Payment: pay on delivery (or by card when card payments are switched on: a secure payment link is emailed; card numbers are never typed here). Accept the terms, Place order.
Track an order, ask for a trade account
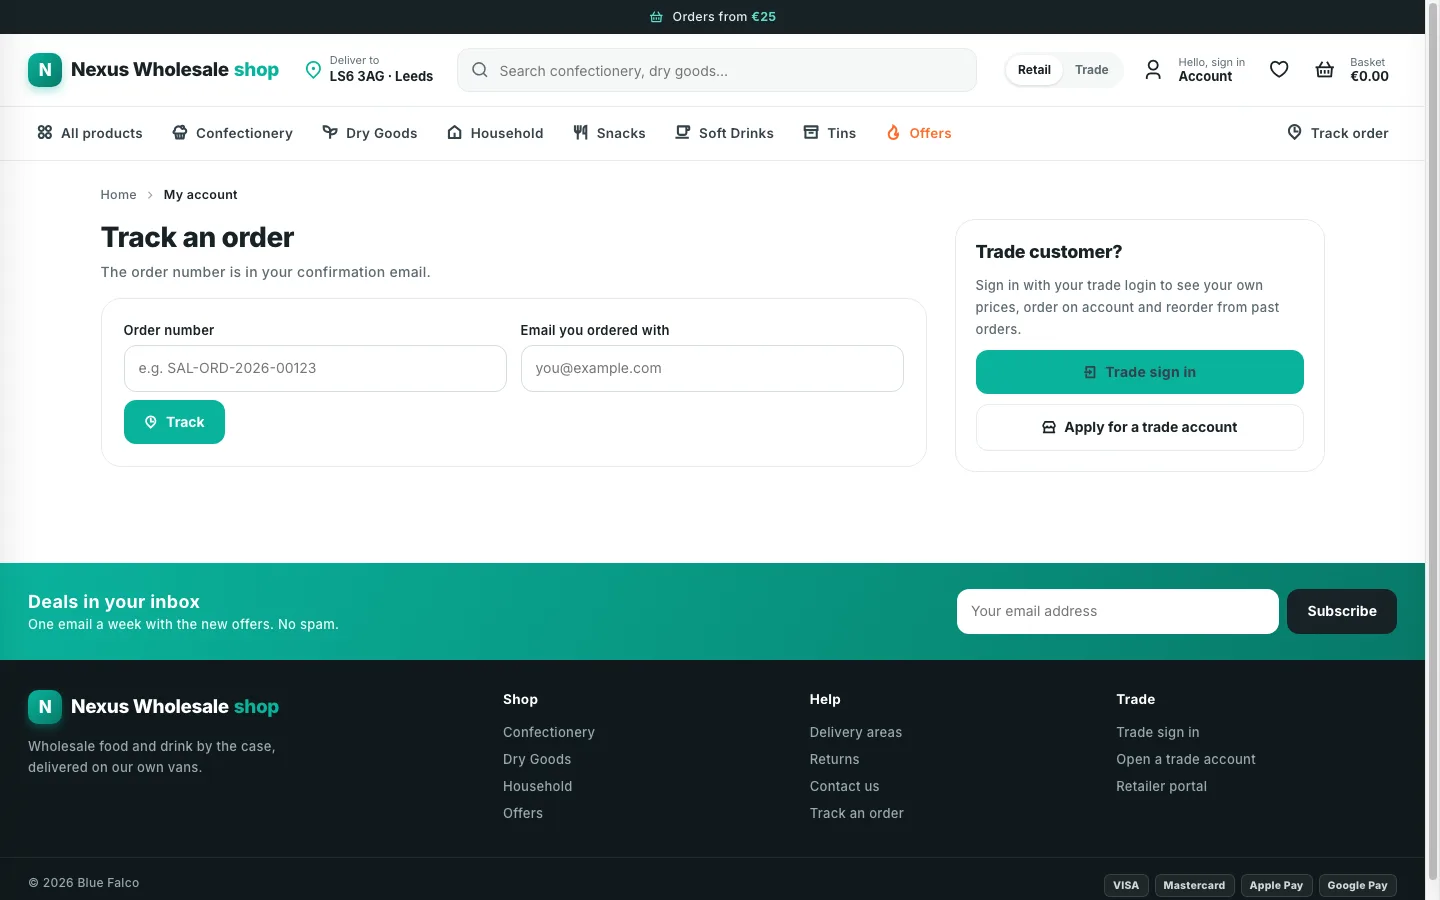
- Track order: type the order number and the email you ordered with. It shows whether it's confirmed, on its way or delivered.
- A business? Apply for a trade account: the office approves it and sends a login for /shop.
- Trade customers can also sign in here to buy at their own prices, on account.
Help inside the app
You don't need this guide open to find your way: every app has its own help.
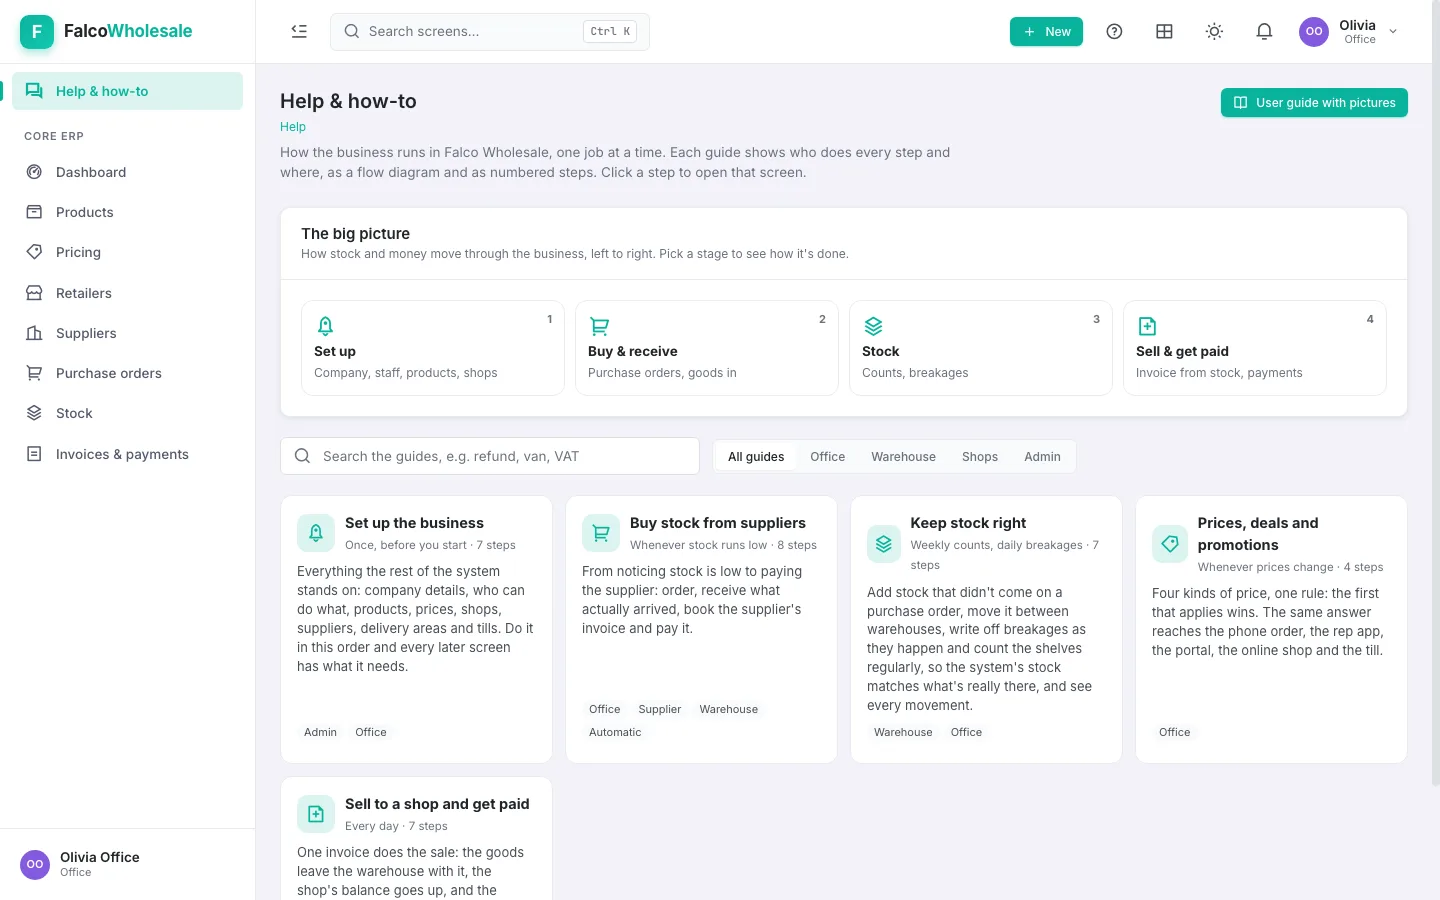
- In the console, Help & how-to has a guide for each job, each as a flow diagram showing who does which step, plus numbered steps. Click a step to open its screen.
- Screens that are part of a job have a How it works button at the top: it opens the guide at that step.
- On the phone apps and the shop portal, the ? at the top shows that person's guides, with their own steps marked "You".
Problems & answers
A screen, app or guide in this guide isn't in my menu
Your installation may not include that part (Phase 2 adds reps, the shop portal and the online shop; Phase 3 adds vans, the warehouse, the till and commission). Your system provider sets this. It's also possible your role doesn't show it: an admin can check in Roles & permissions.
I forgot my password
On the sign-in page, Forgot password? and type your email. The link arrives by email; check spam. Admins can also send one from Users.
A shop says "Your login isn't linked to a shop yet"
The login exists but isn't connected to their shop. In the console, open the shop in Retailers and give it its portal login with that email.
I'm signed in as staff and /shop says "This is the shops' own portal"
That's expected: /shop shows one shop's own account. Use Preview it in the console, or sign in with the shop's login. See Staff opening /shop.
The driver sees "No run for you today"
The office hasn't published the runs yet, or the van isn't assigned to that driver. Publish on the Dispatch board, then the driver taps Check again.
A cashier is locked out after wrong PINs
After five wrong PINs they wait five minutes, or a manager sets a new PIN in Tills & cashiers (they'll choose their own on the next sign-in).
An order can't be placed: "Not enough stock"
Someone bought the last cases meanwhile. The message names the product and how many are left: lower the quantity or call the office.
An order says "Delivered, but not taken out of stock yet"
The driver recorded the delivery but it couldn't be booked (often the books show no stock). Receive the missing stock, then press Book delivery on the order.
The online shop doesn't offer card payment
Card needs a payment gateway connected. Until then shoppers pay on delivery, and trade customers can order on account.
New invoice says "Not enough stock"
The warehouse you picked holds less than you're selling (the message names the product and how many are there). Receive the supplier's delivery or Add stock first, or pick the warehouse that has it. Nothing was saved.
New invoice says "Over the credit limit"
What the shop owes plus this invoice is more than its limit. Take a payment first (Record payment), make the invoice smaller, or raise the limit on the shop (Retailers › the shop › Edit). A payment ticked as Paid now is booked after the invoice, so it doesn't count towards the limit.
No VAT on invoices
A VAT code only charges VAT when it has an account to post to: set it in Settings & VAT › VAT codes.
No signal on the phone
The rep and driver apps keep working: what you do is saved on the phone ("Saved on this phone") and sent in order when the signal returns. The shop portal and online shop need a connection to place orders.
The pictures in this guide come from the demo business and are refreshed with tests/guide/capture_screens.py whenever the screens change.